The Merge user interface shares many common features with the Compare user interface, but also includes extra functionalities to manage the merge process.
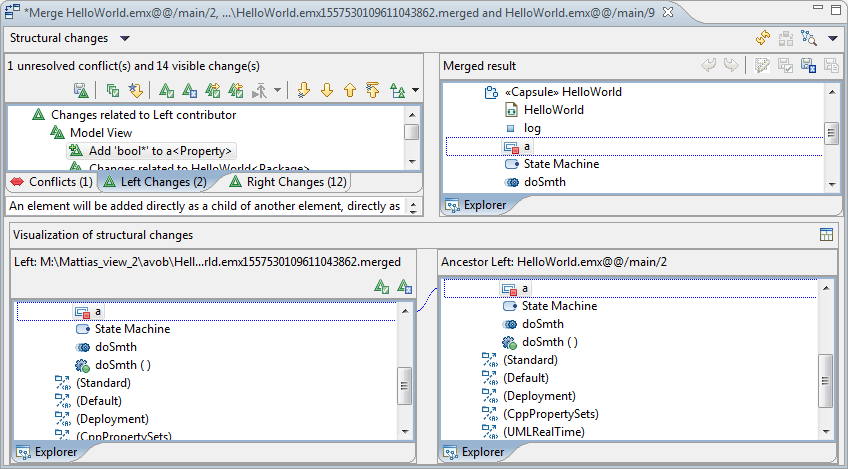
The Merge user interface consists of four compartments:
The top left compartment shows the list of changes. They are organized into three tabs:
Left Changes
These are the changes between the left contributor and the common ancestor model.
Right Changes
These are the changes between the right contributor and the common ancestor model.
Conflicts
These are the changes that are in conflict and that need to be resolved during the merge session.
The bottom two compartments show one of the contributor models and the ancestor model. If you select a change from the Left Changes tab, the left contributor model and the ancestor model will be shown. And if you select a change from the Right Changes tab, the right contributor and the ancestor model will be shown. This is how you can understand what has happened to each contributor model since the common ancestor version.
If you press the button Show All Contributor Panes you will see both the left and the right contributor panes at the same time as the common ancestor model. This may be useful when you have selected a conflict, to better understand how the changes from the left and right contributors are in conflict with each other.
The top right compartment shows the merge result model. This is the model that you edit during the merge session. It is edited by accepting or rejecting changes from the left and right contributor models. When the merge session is completed, and you press the Commit Merge Session button, the merge result model will be saved. It is usually recommended to have the merge result model loaded in your workspace, because then you can continue to edit it directly after completing the merge session. Sometimes it is necessary to edit the merge result model manually after a merge session has been completed because some of the merge conflicts could not be properly resolved by the Merge tool. For example, you may want to resolve a merge conflict by accepting both the left and the right contributor change, and then make some small modification to the resulting model. The Merge tool won't let you do this, and such more advanced ways of resolving conflicts have to be done as a post-merge edit operation. You may use Compare/Merge Tasks to help remember changes that are required after completing the merge session.
Before we go into the details of the Merge user interface, here is a brief summary of the basic steps taken when merging two models:
When the merge session starts, and the Merge user interface appears, all non-conflicting changes have by default been accepted, hence are present in the merge result model from start.
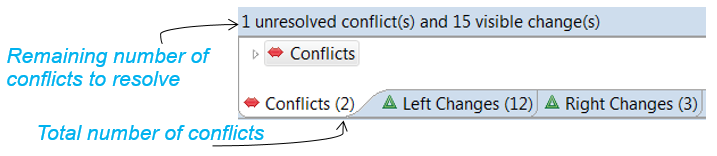
Click on the Conflicts tab in the change list compartment and check if there are any conflicting changes that need to be resolved. The number within parenthesis tells you how many conflicts there are, and the text above the change list tells how many of these conflicts remain to be resolved. For example:
If there are unresolved conflicts, select the first one from the list. Look at the visualization of the changes in the left and right contributor models using the bottom compartments. When you understand how the changes conflict with each other, decide if the conflict should be resolved by accepting the left change, the right change or none of the changes. See Resolving Conflicts for more information.
If you don't understand the conflict, or suspect that it may be a consequence of another conflict, skip the conflict and proceed to the next one. Work your way through all conflicts in the order in which they appear in the Conflicts tab.
When the change list shows that there are 0 unresolved conflicts, then you are done, and can finish the merge session. This is done by pressing the "Commit Merge Session" button.
Note that most parts of the merge user interface is same as the comparing models (see Compare User Interface).
In This Topic:
This button is the same as in the Compare user interface, except that during a merge session it creates a different kind of Compare/Merge task based on a selected conflict which has been resolved, or based on an element that is selected in the merge result model. The created task can help you remember how a particular conflict was resolved, or that a certain element in the merge result model needs to be manually edited after completing the merge. See Compare/Merge Tasks for more information.
Pressing the Accept All Non-Conflicting Changes button will accept all changes from the left and right contributor models that are not conflicting with each other. The changes will be applied to the merge result model. When you start a merge session, all the non-conflicting changes are by default automatically accepted, so you only need to use this button if you later have rejected some changes, and now want to accept them all again.
If you don't want the Merge tool to automatically accept non-conflicting changes when the merge session is started, you can turn off the preference General - Compare/Patch - Modeling Compare/Merge - Automatically accept resolvable differences for repository merge session.
If this toggle button is pressed, the Merge user interface enters a mode where it automatically selects the next conflict as soon as you have resolved the previous one in the list.

Pressing this button will accept the change that is selected in the change list. If the selected change is conflicting with another change, then accepting the change will automatically reject the conflicting change. When a change has been accepted the merge result model is modified so that it contains the change. Also, to show that the change has been accepted, a small "accepted" decorator will be shown on the change. For example, the accepted change shown below means that the merge result model has been modified to now contain the added attribute "attribute1":


Pressing the Reject button will reject the change that is selected in the change list. Note that if the selected change is conflicting with another change, then rejecting the change will not automatically accept the conflicting change. You have to specifically accept that conflicting change if you want to have it in the merge result model. When a change has been rejected, and the change previously existed in the merge result model, then the merge result model is modified so that it no longer contains the change. Also, to show that the change has been rejected a small "rejected" decorator will be shown on the change. For example, the rejected change shown below means that the merge result model has been modified to now not contain the added attribute "attribute1":

Press the Accept All Changes from Left button, which will accept all changes from the left contributor model. This command is equivalent to selecting the changes in the “Left Changes” tab one by one, and do Accept on each of these changes. This means that all conflicts will be resolved afterwards.

Pressing the Accept All Changes from Right button, which will accept all changes from the right contributor model. This command is equivalent to selecting the changes in the “Right Changes” tab one by one, and do Accept on each of these changes. This means that all conflicts will be resolved afterwards.
The Next/First Unresolved buttons can be used to quickly go through the list of merge conflicts that remain to be resolved. When you select the first conflict in the Conflicts tab, the Next Unresolved button becomes enabled and you can press it to go to the next unresolved conflict. And if you press the First Unresolved button, the first of the conflicts that is still unresolved will be highlighted. Hence, these buttons make it convenient to find unresolved conflicts, especially for the situation when you choose not to resolve the conflicts in the same order that they appear in the “Conflicts” tab.

The Undo/Redo buttons operate on the merge result model. You edit the merge result model by accepting or rejecting changes from the contributor models. Also, in the case of a textual sub merge, by directly editing the merge result model. You can use the Undo and Redo buttons to undo such edit operations.
The Commit Merge button becomes enabled as soon as you have resolved all the merge conflicts. Pressing the button will complete the merge session, by committing the changes that have been made to the merge result model.
For Git users, the term “commit merge session” may be slightly confusing, since this has nothing to do with Git commits. Committing a merge session saves all results in the merge result model. The changes will not be committed to Git.
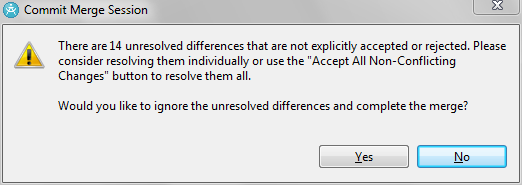
Before the merge session is committed you will be prompted for confirmation:
Press Cancel to return to the merge session and Commit Result to finish the merge session and save the merge result model to disk. After the merge session has been committed you can continue to edit the merge result model just like any other model that you have in your workspace. For example, you may need to do post-merge editing to fix issues caused by conflicts that could not be properly resolved using the Merge user interface.
Another way to commit the merge result and finish the merge session is to simply close the Merge editor window, and then answer Yes to the question about saving the merge result model. However, this approach is not recommended because if you missed to resolve any of the conflicts, the saving of the merge result model will be aborted, and in this case you will loose all the changes you have done during the merge session.
If you press the Cancel Merge Session button, the merge session will be cancelled. All changes you have made to the merge result model by accepting and rejecting changes, and by editing in textual sub merge sessions, will be lost. Before the merge session is cancelled you will be prompted for confirmation:
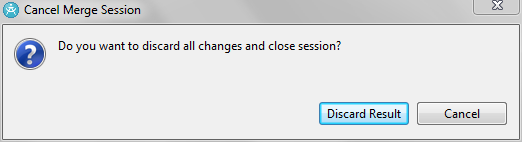
Press Cancel to return to the merge session and Discard Result to stop the merge session and discard the merge result model.
While using ClearCase, note that the files that were automatically checked out when the merge session was started will still be checked out after the merge session has been cancelled, and you may want to do Undo Checkout on these files.
You can also cancel the merge session by simply closing the Merge editor window, and answer No to the question about saving the merge result model.

Pressing the Save a Copy button will save a copy of the merge result model. You can only do this when all the merge conflicts have been resolved. The main reason for saving a copy of the merge result model is to remember what the model looked like immediately after the merge session was completed, before starting to do any post-merge editing. If you want to save the merge result before the merge session is completed, you first have to ignore all remaining unresolved conflicts. This may be useful if the merge is complex, and you want to save the merge result model at a particular point in time before certain complex conflicts have been resolved.
It can also be useful to have a copy of the merge result model if you later find that the merge session introduced errors in the model, for example because conflicts were resolved in an inappropriate way. You may then want to redo the complete merge session, and resolve the conflicts in a different way. A copy of the previous merge result model can then be useful to avoid making the same mistake again. Also, you can of course compare saved merge result models using the Compare tool to study the effect of resolving conflicts in a different way.
If you perform the Save or Save All command when the Merge editor is open, the merge result model will be saved to a temporary location. However, saving is only possible if there are no unresolved merge conflicts.