The compare user interface is a visual tool that helps to display the differences between two versions of a file or codebase. It's often used in version control systems like Git to understand the changes and modifications made between commits, as well as to review code changes before merging them.
The Compare user interface consists of three compartments:
The top compartment lists the changes made between two versions of a model. The bottom two compartments display these versions side-by-side. Selecting a change in the list will highlight the specific modifications in both the original as well as modified models.
The two key features of the compare user interface are as follows:
Hint: You can double-click the header of a compartment to maximize that compartment and hide all the others. Double-click the header again to make all compartments visible.
As you can see there are several buttons and menus available in the Compare user interface. Many of these apply only for merge sessions, and are therefore disabled for a compare session.
In This Topic:
The Compare tool supports comparing many kinds of files, not just UML model files created in Model RealTime. For each kind of supported file one or many content types may apply. Each content type corresponds to a particular compare viewer which controls the overall appearance of the Compare user interface.
The Compare tool uses the file extension of the compared files to find a default content type to use for the compare session. For example, for model files (.emx, .efx etc.) the default content type is called "Model RealTime Model Content Type". When this content type is used, the Compare user interface will consist of the three compartments that were mentioned previously.
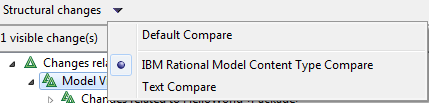
You can use the menu that appears immediately to the right of the text "Structural changes" to switch to using a different content type and compare viewer. As you can see in the picture above, the content type "Text" is also available for model files. If you choose this content type the Compare tool will treat the compared files as plain text files and the Compare user interface will change to just show two compartments, where the models are shown as text files:
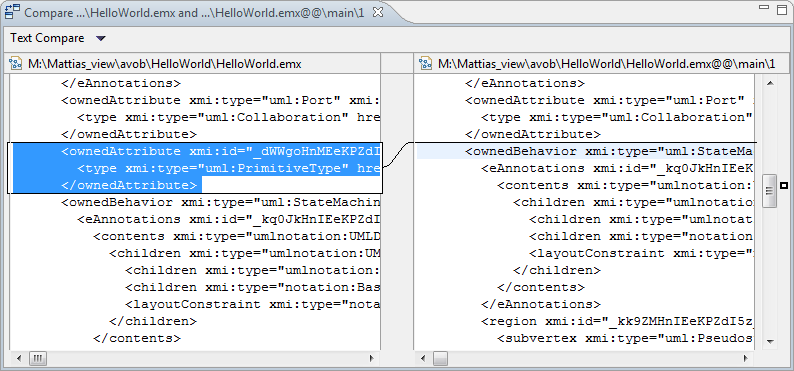
Switching to a non-default content type, such as Text, can sometimes help you better understand what a particular change relates to. However, in most cases the default content type will be the most appropriate to use.
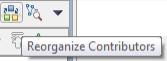
Before starting to look at any of the changes in the change list, it's a good idea to first check so that the correct model versions were chosen as the left and right contributor. As said previously Compare/Merge reports changes as "what happened to the left contributor compared to the right contributor" or, put differently, "what changes are required to be made in the right contributor to make it equal with the left contributor". If you by mistake choose the contributors in the wrong order when doing a compare, you will see Add changes when Delete changes were expected, and vice versa. If this happens you can easily swap the order of the contributor models by using the Reorganize Contributors button. When pressing the button a dialog appears that lets you swap the order of the contributor models:
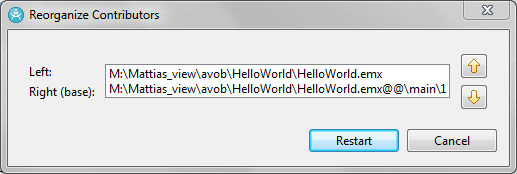
If the compare is three-way an ancestor contributor will also be shown here.
Close the dialog by pressing the Restart button to relaunch the compare session with reordered contributors.
The Browse button is a toggle button which, if pressed, switches the Compare user interface to a so called browse mode. In this mode only two compartments (three in case of three-way compare) are visible, one for each contributor model.

In the browse mode you can explore the contributor models in more detail than what is otherwise possible. Each compartment will show three tabs that let you explore the model in different ways:
Explorer
Explore the model using a tree viewer similar to the Project Explorer.
Properties Explore all details of one particular element in the model using a property page similar to the Advanced tab in the Properties view. To use the Properties tab first select an element in the Explorer tab, then right-click and choose the Show in Properties command.
Diagram Explore a diagram of the model. To use the Diagram tab first select a diagram in the Explorer tab, then right-click and choose the Show in Diagram command.
Note that you can also explore the contributor models using the regular Properties view and Code view. See Exploring the Contributor Models to learn more about this.
The Preferences menu is located in the top-right corner of the Compare user interface. It contains a Preferences command that opens the preference page for Compare/Merge. The menu also repeats some of the commands from the toolbar.

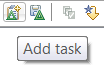
The Add Task button creates a Compare/Merge task for the change that is selected in the change list. You can for example use this as a means of reviewing changes in a model. See Compare/Merge Tasks for more information.
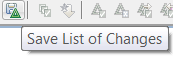
This button allows you to save the list of changes to a textual log file. You will be asked if you want to save only the changes that are currently visible (i.e. not the ones that are hidden because you have applied a filter), or if you want to save all the changes.
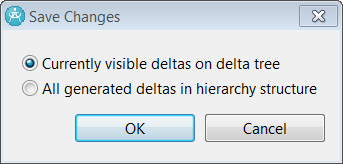
The dialog uses the term delta, which is just a fancy name for a change. See Delta Tree Configuration for more information about how the change list can be filtered.
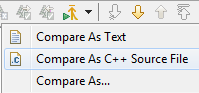
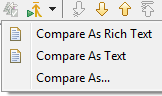
This button becomes enabled when you select a change in the change list that relates to a changed code snippet or documentation comment. Such changes are best explored using a textual sub compare session. See Sub Compare for more information about what this is.
For a code snippet that contains C++ code the default sub merge command is Compare As C++ Source File which means that the compare tool provided by CDT will be used for comparing the code snippets. However, you can also do the sub compare by choosing Compare As Text in the button menu. In this case the base text compare tool provided by Eclipse will be used.
If you choose Compare As… in the Sub Compare button menu a dialog appears that lets you choose both which tool to use for the sub compare, and also in which order the contributors should be set for the sub compare session:
Usually there is no reason to swap the contributors with this dialog since the default order is the same as is used for the corresponding left and right contributor models in the enclosing model compare session.

You can use these buttons to go through the changes in the change list, as an alternative to clicking on the changes one by one.
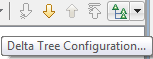
Sometimes the number of changes in the change list can be so large that it becomes impractical to show them all at the same time. In this case you can use the Delta Tree Configuration button to apply a filter so that some of the changes become hidden. If you press the button the following dialog appears:
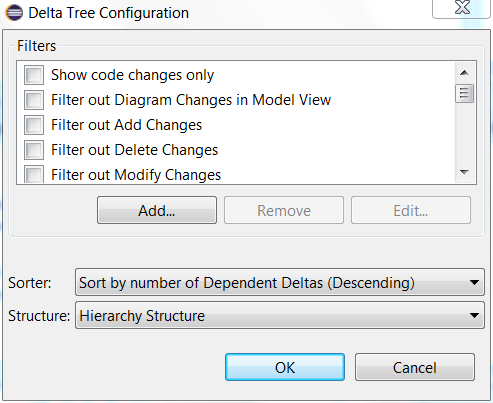
The bottom drop down menus allow you to configure how to sort and structure the changes that are shown in the change list. The default sorting is to sort according to the number of dependent changes, so that changes that have many dependent changes appear before changes that have few dependent changes. See Dependent Changes for more information about what a dependent change is. You can also choose to sort by model element name, by the change description ("Delta Label") or not to sort at all. The default structuring of changes is "Hierarchy Structure" which means that changes are grouped into a hierarchy corresponding to the hierarchy of the changed model elements. There are several other alternatives for how to structure the change list, including "Flat Structure" which means that changes are not grouped at all but appear in a single flat list.
The Filters list shows all the different kinds of changes that may appear in the change list. See Types of Changes for more information about what the different kinds of changes mean. Note also that some filters simply work by filtering out all changes that are related to a certain kind of element, regardless of the type of changes:
The "Diagram Changes" filter means that all changes that are related to diagrams will be filtered out (everywhere, or only under the “Model View” node)
The "Documentation Changes" filter means that all changes that are related to documentation comments will be filtered out.
The "Stereotype Application Changes" filter means that all changes that are related to applied stereotypes will be filtered out.
It can also be useful to filter out all changes that are not related to code changes, by choosing “Show code changes only”.
You can create your own custom filter by pressing the Add button:
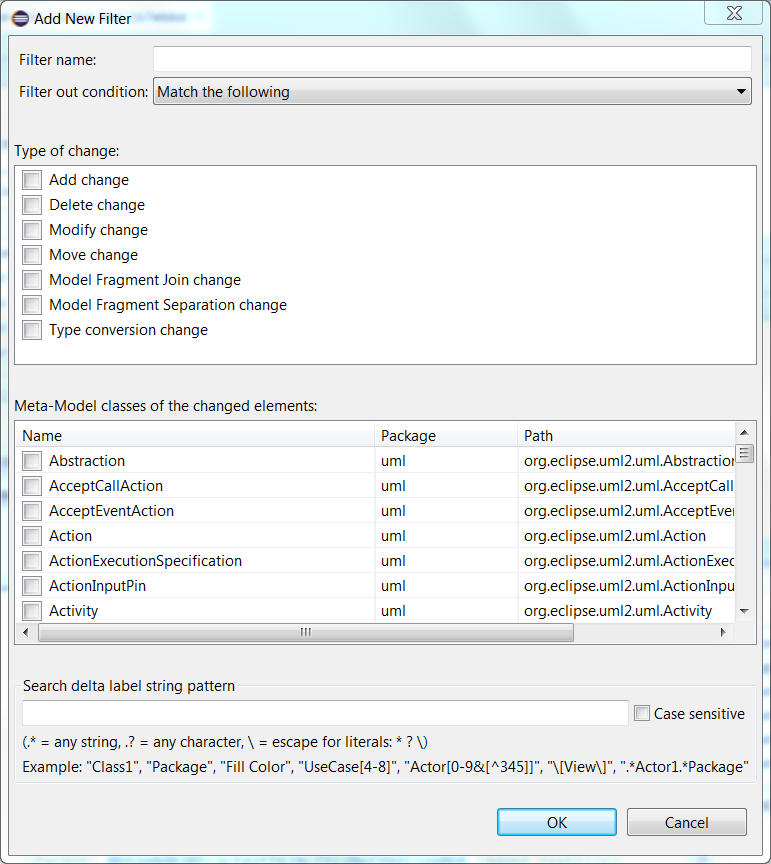
This dialog lets you create a filter that
filters out changes of one or many types (mark the checkboxes in the upper list for which types of changes to filter out)
filters out changes that relate to model elements of certain kinds (mark the checkboxes in the lower list for which kinds of model elements to filter out)
filters out changes that have a certain kind of description (enter a regular expression in the bottom text box which will be matched against the description of changes, and hide those changes that match)
For example, if you want to filter out all changes that relate to attributes that start with the prefix "He" you may create a filter with the meta-class "Property" selected in the lower list and with the following description pattern: He*
The Delta Tree Configuration button also has a button menu that lets you turn on or off filters quickly:

The commands in this button menu let you do the same kind of filtering, sorting and structuring of the change list as the Delta Tree Configuration dialog described above. In addition it contains a few other commands that affect what is shown in the change list:
Add to Exclusion Set
This command can be used to add a selected change to a predefined filter called "Exclusion Set (N)" where N is the number of changes that have been added to this filter. This is hence a way to filter out individual changes from the change list.
Show description section
This command toggles visibility of a text box at the bottom of the change list which contains a more detailed description of the selected change. Here is an example:

The detailed description text can be quite technical, and by default this text box is not shown to save user interface space.
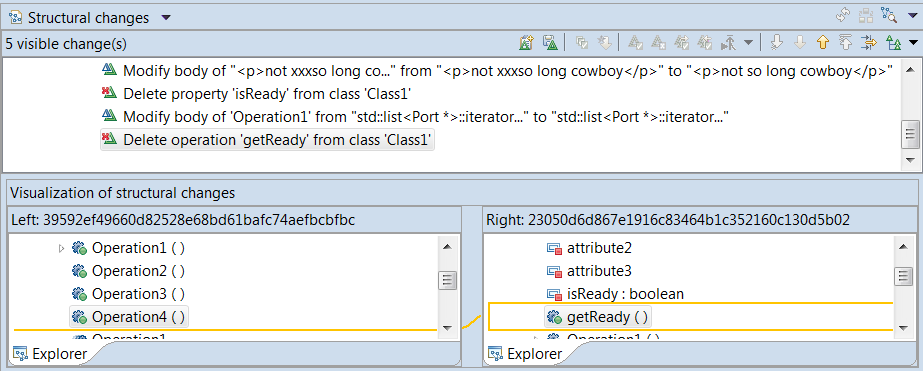
The change list shows all (or a subset of, if a delta tree filter has been applied) the changes between the left and right contributor models. The changes are always presented as related to the left contributor model. For example, if the left contributor contains an attribute that the right contributor does not contain, the change list will contain an Add change for that attribute:
You can right-click on a change in the change list and perform the Navigate – Show in Project Explorer command in order to try to locate the changed model element in the model that is loaded in the Model RealTime workspace. Doing so can help you better understand the context of a particular change, but the navigation will of course only work if the changed element exists in the workspace model. Depending on the kind of changed element there may also be other useful navigation commands in the Navigate context menu. For example, if the changed element is shown on a diagram you can navigate to that diagram.
The description text for a change in the change list can sometimes be quite long. If the text is too long to fit in the change list compartment, you can look in the Model RealTime status bar which also shows the description of the selected change.
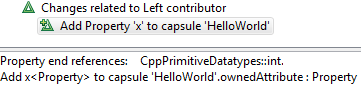
Another approach Model RealTime uses to avoid very long descriptions of changes is to put some of the information about the selected change in a separate text area. This text area is located just below the change list. For example, for the attribute shown in the picture above the text area will contain text that tells you what type the added attribute has:

Here we can see that the type of the added attribute is the primitive C++ type 'int'. There may also be a more detailed technical description of the change. For example, above we can see that the attribute "x" was added as one of the owned attributes of the capsule "HelloWorld". Note that this text area is by default hidden (to save user interface space). You can make it visible by means of the command Show description section in the Delta Tree Configuration button menu.
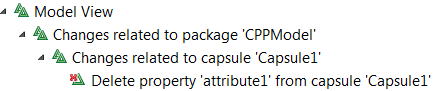
The changes shown in the change list compartment are by default grouped into a hierarchy. You may encounter the following groups of changes:
Model View
Groups all changes to the model that do not fit under any of the other groups. These changes affect the meaning of the model.
Diagram View
Groups changes related to diagrams. These changes do not affect the meaning of the model, but only how the model is presented in diagrams.
Stereotype Application View
Groups changes related to applied stereotypes. Usually changes in applied stereotypes do not change the core meaning of the model, but rather affect the additional information which the applied stereotypes constitute. Such information may for example be used by domain-specific tools that operate on the model.
Fragment View
Groups changes related to model fragment files. These changes do not affect the meaning of the model, but only how the model is stored in files.
Note that grouping is also used within the top-level groups mentioned above. The purpose of such sub-groups is
to give context to a change. For example, the location of a change in the model is shown by grouping the change under nodes that tell in which class/capsule and package the changed element is located.
to group multiple related changes. For example, a simple editing operation such as resizing a symbol on a diagram typically causes two changes (one for the change in width, and another for the change in height), and by grouping them under a single parent “Change Size” change it becomes easier to quickly understand how the model has changed.
If you prefer to not group changes into a hierarchy you can select "Flat Structure" in the Delta Tree Configuration button menu. In this menu you also have choices for sorting the list of changes.
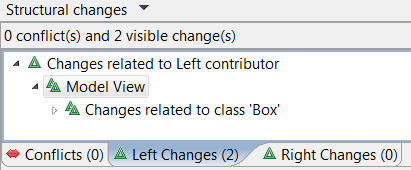
In case of a three-way Compare session the change list compartment will have tabs that show three lists of changes:
Left Changes
The changes between the left contributor and the common ancestor.
Right Changes
The changes between the right contributor and the common ancestor.
Conflicts
The list of those changes in the Left Changes and Right Changes tabs which are conflicting.
These two compartments show the left and right contributor models. When you select a change in the change list the changed element is highlighted in both the left and right contributor model in order to visualize the impact of the selected change. If the changed element does not exist in one of the contributors, the nearest container element is highlighted instead. Also, a line is drawn between the contributor models to indicate how they are related by the selected change. For example, if a change describes that an operation "doSmth" was added in the capsule "MyTopCapsule" in the left contributor model, the contributor model compartments may look like this:
The contributor model compartments provide different tabs in order to present the change in different ways. Depending on the type of change that is selected in the change list, different tabs will be available. Sometimes you may have to switch to a different tab to fully understand exactly what has changed. The following tabs are used:
Explorer  Shows the change in a tree viewer similar to the Project Explorer. This tab is useful for seeing where in the model the change belongs. This is the default tab for most kinds of changes.
Text  Shows the change in a text viewer. This tab is useful for changes in textual properties such as code snippets or documentation comments. However, a sub compare of a textual property may be even more useful. You can launch a sub compare from the Text tab by right-clicking in the text viewer and selecting the command Show Text Sub Merge Pane. See Sub Compare for more information.
Properties  Shows the change in a property page that is similar to the Advanced tab of the Properties view. This tab is useful for changes in properties that are not textual, or that contain rather short texts (such as the name of an element). For changes in textual properties that contain longer texts the Text tab is more appropriate.
Diagram  Shows the change in a diagram. This tab is useful for changes related to diagrams, such as when a symbol has been repositioned or a line has been rerouted. The change is shown in the diagram using a colored ellipse. The colors that are used have the following meaning:
In case of a three-way compare the Diagram tab has a button _Show Ancestor Diagram_ () in the upper right corner which allows the diagrams from the ancestor and the contributor models to be overlaid graphically. This can sometimes help you understand what was changed in the diagram.
 This is an advanced tab that sometimes shows additional low-level information about a change. You usually do not need to use this tab, and it will only appear if the preference General - Compare/Patch - Modeling Compare/Merge - EMF Compare/Merge - Display EMF tabs in Compare/Merge Editor has been set.
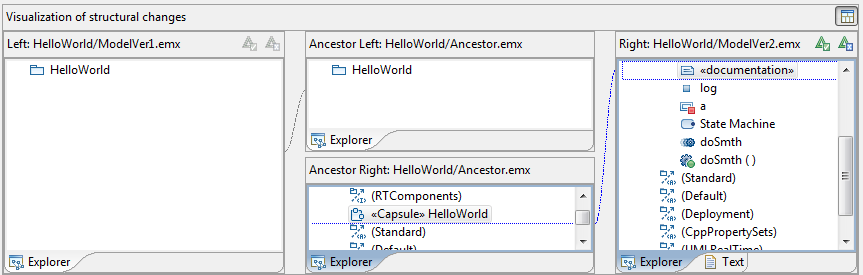
 In the case of a three-way compare (i.e., when a common ancestor model is available) there will be a button called "Show All Contributor Panes" in the upper right corner of the contributor model compartments. If you press this button you will see the common ancestor model in the middle between the contributor models. You will also see how each change in the contributor models relates to the common ancestor model by means of lines drawn between the compartments. It can for example look like this:
This extended view is possible to show only when doing a three-way compare, because then two sets of changes are computed by the Compare tool:
The changes between the left contributor and the common ancestor.
The changes between the right contributor and the common ancestor.
So if you are unsure whether you are actually doing a two-way or three-way compare, you can check if the "Show All Contributor Panes" button is visible or not. This information is also shown in the tooltip for the Compare editor:
