The time it takes to perform a merge session very much depends on the number of merge conflicts you have to resolve. If there are no, or few, conflicts the merge will usually be quick and easy, while if the number of conflicts is big, the merge will take a longer time to complete and may be more complex. Therefore, it is important to work in a way that reduces the number of conflicts you get when merging models.
The main advice for increasing the likelihood of getting simple merges is to merge frequently. If you are working on a feature stream, it is a good idea to compare your version of the model on this feature stream with the latest version on the main stream at regular intervals. If you detect changes you should consider rebasing, to merge these changes into your feature stream sooner rather than later. For the same reason it is important that you deliver your changes to the main stream incrementally, and avoid waiting a long time and then delivering a big amount of changes in one big delivery. Following this approach will help developers that work on other feature streams so that they don't get too many conflicts the next time they rebase their features streams.
Of course, the importance of following the above recommendations becomes bigger if many feature streams make changes to the same parts of the model. For features that are more isolated from the work of others, you don't have to rebase and deliver that frequently since you won't get many conflicts anyway.
If there are merge conflicts reported you have to resolve these before you can complete the merge session and commit the merge result. Use the Conflicts tab and the Next Unresolved button to go through the merge conflicts one by one. Model RealTime by default sorts the conflicts so that the ones that are best to resolve first appears at the top of the list. For example, conflicts related to model elements appear before conflicts related to diagrams, since resolving a conflict for a model element often automatically resolves a diagram related conflict too.
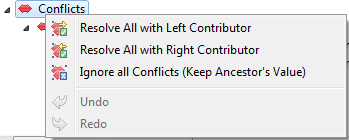
In some special cases you may want to resolve all conflicts by consistently choosing the change from either the left or right contributor. For example, if you only did very few changes on the feature stream, but still got lots of conflicts, it may be easier to resolve the conflicts by accepting all the changes from the main stream, and then redo your feature stream changes again after the merge has been completed. To resolve all conflicts right-click on the top-level Conflicts node in the Conflicts tab and choose either Resolve All with Left Contributor or Resolve All with Right Contributor. You can also choose to resolve the conflicts by ignoring them, that is to neither accept the left nor the right changes. In that case the affected model elements will look like in the common ancestor model once the merge is completed.
However, the most common scenario is to resolve conflicts individually, one by one. Each conflict is represented by a separate node in the Conflicts list, and below this node you can see the changes from the left and right contributor that is in conflict with each other. To resolve a conflict right-click on its node in the Conflicts tab:
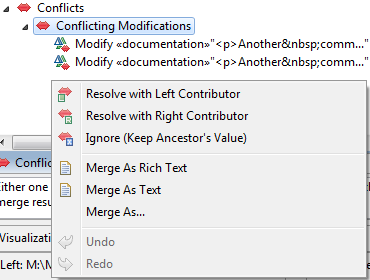
Choose Resolve with Left Contributor to accept the change from the left contributor and at the same time reject the change from the right contributor. Or choose Resolve with Right Contributor to do the opposite. You can also choose to resolve the conflict by ignoring it, that is to reject both the left and right change. This can be useful if the conflict needs to be resolved by somehow combining the left and right changes. The Merge tool won't let you do this, but you can resolve the conflict by ignoring it, and then later when the merge session is completed, return to the affected model element and edit it manually. It's a good idea to keep a separate list of elements that you need to get back to once the merge session is completed. The Compare/Merge Tasks view can help you with this.
As you can see in the above picture, conflicts related to textual modifications can also be resolved by invoking a sub merge session. See Text Merge for more information about this possibility.
Before you can decide how to best resolve a particular conflict you usually have to study the conflicting changes carefully. The name of the conflict describes the type of conflict and in which way the left and right changes are conflicting. Here are some examples of common kinds of conflicts you may encounter:
Conflicting Modifications
The same element property was modified in both contributors.
Conflicting Addition and Deletion
An element was added in one contributor, but one of its container elements was at the same time deleted in the other contributor.
Conflicting Modification and Deletion
An element was modified in one contributor, but at the same time deleted in the other contributor.
There are many more possible combinations in which two changes may conflict. See Types of Changes for a list of all the possible changes which may be part of a conflict.
When a conflict is selected the Merge user interface shows in the bottom compartments how the element has been modified in both the left and right contributor models compared to the common ancestor model. Let's look at an example:
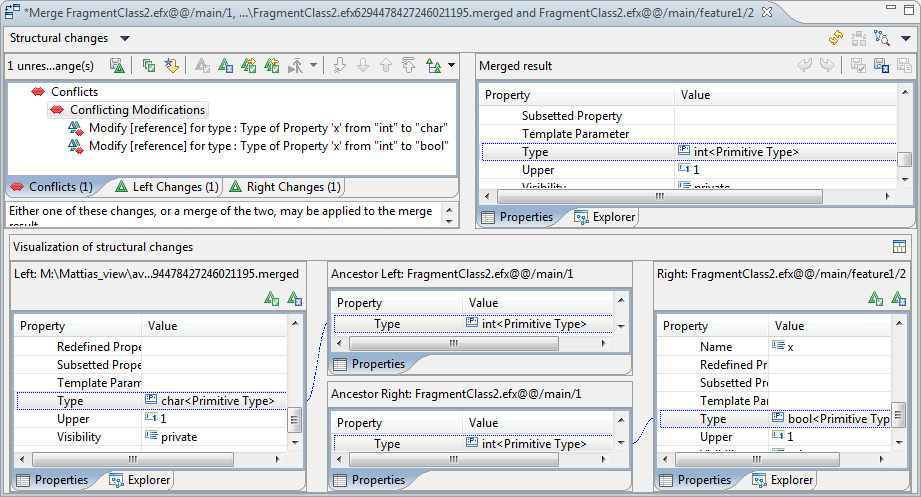
Here we have a conflict that is caused by the type of an attribute "x" being changed in both contributor models. In the bottom compartments we can see that in the left contributor the attribute's type was changed from "int" to "char", while in the right contributor it was changed from "int" to "bool". You can also select one of the changes shown below a conflict node to only look at the details of that particular change in one of the contributors. Then the four compartments shown in the picture above will be replaced by only two compartments; one for the contributor model and one for the common ancestor model. Thereby the compartments can take up more space, which in turn can make it easier for you to see exactly what has changed.
As you can see in the picture above there are Accept and Reject buttons also in the compartments that show a change in a contributor model. These buttons work in the following way:
If you press the Accept button the change from that contributor will be accepted. At the same time the conflicting change from the other contributor will be rejected.
If you press the Reject button the change from that contributor will be rejected. However, this does not mean that the conflicting change from the other contributor gets accepted automatically. Instead, the merge result becomes the same as the common ancestor model, and you have to explicitly press the Accept button for the other contributor if you want that change to be in the merge result model.
If you encounter a merge conflict that is hard to understand, a pragmatic approach is to simply skip it and proceed to the next conflict. Since resolving one conflict may automatically also resolve other conflicts there is a chance that the skipped conflict will disappear once you have resolved another conflict in the list.
Another guideline is to first resolve those conflicts that have a big impact on the merge result model, such as adding or deleting container elements in the model, before looking at conflicts for elements that are contained within these elements. When you resolve such "container element" conflicts it is likely that many other conflicts will be automatically resolved too.
Conflicts that have been resolved are marked with an icon to distinguish them from unresolved conflicts. For example:

Here, the first conflict has been resolved by accepting either the left or right change, the second conflict has been resolved by ignoring it (i.e. neither the left nor the right change was accepted), and the third conflict is still unresolved.
A model consists of elements that are highly interconnected. Therefore it is not uncommon that changes depend on each other. That is the reason why resolving one conflict may automatically resolve other conflicts at the same time. When you accept or reject changes the Merge tool will evaluate the effect those changes will have on the merge result model. The overall requirement is that the merge result model must never be inconsistent or corrupted by the merge. Dependent changes are those changes that the Merge tool has to automatically accept or reject depending on the choices you make during the merge session.
Sometimes you may encounter a situation where you have resolved all conflicts, but still there may be dependent changes from either the left or right contributor models that are neither accepted nor rejected. Because these are dependent changes the button Accept All Non-Conflicting Changes can not always be used to accept such changes. If you try to commit the merge result and finalize the merge session when you still have such dependent changes that are neither explicitly accepted nor rejected you will get a warning dialog:
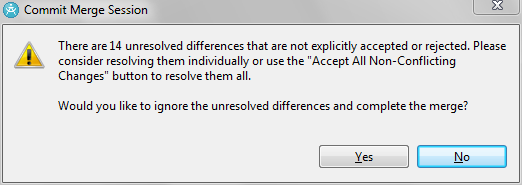
You may proceed and complete the merge, but then these changes will be ignored and will hence not be present in the merge result model after the merge. It is strongly recommended that you use the Left and Right tabs to look at these changes and make an explicit decision for each of them whether to accept or reject them. To know whether the unresolved changes come from the left or right contributor model you may click on the top-level nodes in the Left and Right tabs. This shows a message in the text area below that tells you how many changes there are in total for that particular contributor, and how many of these changes that are currently unresolved. For example, for the situation that caused the warning dialog shown above you may see the following message for one of the contributors:
There are 49 change(s) in the contributor. Among them, 14 change(s) still require resolution.
When you go through the contributor changes you should look for changes that are not marked as neither accepted nor rejected. For example, in the picture below the first change has neither been explicitly accepted nor rejected, while the second has been accepted and the third has been rejected.