If you get a merge conflict because both the left and right change involves a property that contains a piece of modified text, such as a code snippet, then you resolve the conflict by performing a textual merge of the modified texts.
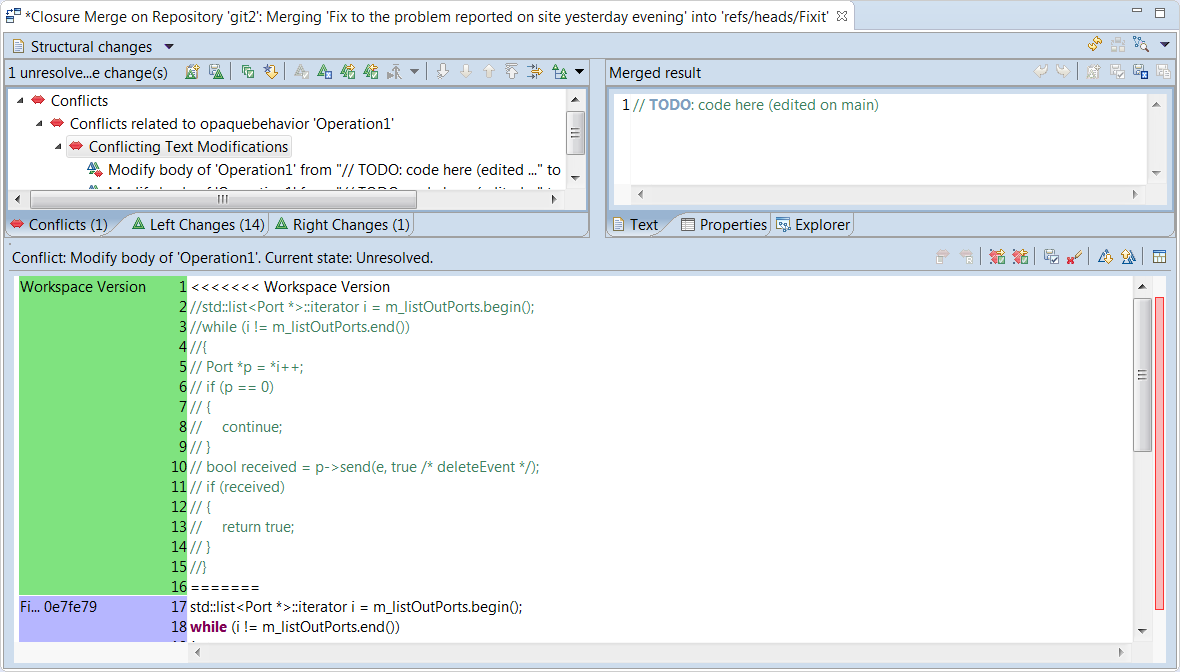
Here is an example of what the Merge editor could look like when you select a conflicting text modification:
In the text editor at the bottom you see the merged text. For conflicting parts the left and right versions are highlighted with colors (customizable in the preferences at General – Compare/Patch – Modeling Compare/Patch – UML Compare/Merge – Text annotation settings). There are also markers in the text showing which contributor a particular text fragment comes from. The names of the versions (Git commit messages in the above picture) are shown in the left column. If the version texts are too long to fit, hover the cursor over them to see the full texts in a tooltip.
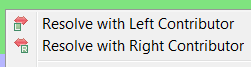
You can resolve each conflict by right-clicking in the text editor and perform one of the following commands:
If you want to resolve all conflicts in the text in the same way you can use the corresponding toolbar buttons:
![]()
Initially the “Merged result” compartment in the upper right corner shows the ancestor version of the text. But as soon as you save your changes in the text editor, it gets updated with the contents of the text editor. That is, what you see in the text editor is really the text that will be committed to the model (when you save).
Hint: Find/Replace can be used in both the text editor area and also in the “Merged result” compartment.
In addition to using the commands for resolving conflicts, you can also resolve them by simply editing the text directly. This can be very useful if the left and right versions somehow need to be combined, or if you want to resolve a conflict with a completely different piece of text. You can make edits anywhere in the text, not only in conflicting parts.
The information text above the text editor shows the current state of the text merge. Initially it says “Unresolved” (or “Auto resolved” in case there were no conflicts in the text), but as soon as you have saved, so that the Merged result is updated, it will say “Manually merged”. You can use the command Discard edit changes to revert your changes and get back to the “Unresolved” state.
Use the Next/Previous Difference buttons to walk through all conflicting parts in the text. You can also use the red markers in the right editor margin for quickly navigating to the conflicts. The tooltip of these markers show the line where the conflicting piece of text is located:

Press the Toggle Compare/Merge View button to hide the text editor and instead show a comparison between the ancestor version and the current merge result. This gives you an overview of all changes you have made in the text during the merge session, and it can therefore be useful in order to review the merge changes as a last step in resolving the conflict.
Merge of rich-text comments cannot be done in the same way as merging other pieces of text. This is because rich text comments may contain annotations (markup), such as font styling, images, tables etc. Allowing the merge result to be edited freely could in this case lead to corrupted rich text that would not render correctly. Therefore the user interface for rich text merging looks differently, and does not allow free editing of the merge result.
You have to resolve conflicts in rich text the usual way by accepting either the left or right version (or none). By pressing the button Show Text Sub Merge Pane you can invoke Sub Compare in order to get more information about the conflict. If you want more flexibility when resolving conflicts in rich text, it’s recommended to edit the model after the merge. See Compare/Merge Tasks for how to track needed post-merge changes during a merge session.