Merging models
Merging models involves combining two related models (left and right contributors) into a new model (merge result). These contributor models both originate from a common ancestor model.
The Merge tool starts by comparing the contributor models against the common ancestor model to get the list of changes for each contributor. Then it analyzes these changes to see if any of them are conflicting. A merge conflict consists of two changes, one from each contributor, that cannot both be applied to the merge result model at the same time. To complete the merge session you have to resolve all merge conflicts by deciding, for each one of them, whether the change from the left or the right contributor should apply. You can also resolve a conflict by deciding that neither of these changes should be included in the merge result model.
All non-conflicting changes are by default applied automatically by the Merge tool. That is, the Merge tool assumes that you want to have all changes from both the left and the right contributor models in your merge result model. Usually this is what you want but in some cases this is not appropriate, and you may want to skip some of the changes. For example, during the merge session you may realize that the authors of the left and right contributor models may have solved the same problem in two different ways. Their changes may not conflict on a structural level (i.e. they have not modified the same part of the model), but still it does not make sense to have both changes in the merged model. This is an example of a logical merge conflict. The Merge tool can only detect structural merge conflicts; it cannot help you to detect logical merge conflicts (except in some simple special cases, as mentioned in Structural Merging by Combining Models). There is no guarantee that just because no merge conflicts are reported, the merge result model will be logically correct. This is something only a human being can confirm, and it is therefore recommended that you review all changes that will be applied to create the merge result model, and also to review what the merge result model will look like after the merge.
A special case of a logical merge conflict is when the standard UML allows something which is not supported in the RT subset of UML. For example, in standard UML a composite state is allowed to have multiple regions, each of which can contain a sub statemachine for the state. However, in Model RealTime only one region with one sub statemachine is supported. If you merge two versions of a model where in both versions a non-composite state has been made composite by adding a sub statemachine for it, then the merge result model will contain both these sub statemachines. Such a model is valid according to UML rules, but invalid according to the more strict UML-RT rules. The reason for problems like this one is that the Model RealTime Merge tool is not aware of all RT specific constraints and hence misses certain logical conflicts. Therefore it is sometimes necessary to edit the merge result model after the merge to make it a correct UML-RT model. By carefully reviewing the merge result model prior to completing the merge session you avoid surprises and can detect places in the model where post-merge editing may be required. You may use Compare/Merge Tasks to help remember changes that are required after completing the merge session.
A merge session that does not contain any merge conflicts (i.e. a trivial merge), and where you are confident that there also will not be any logical merge conflicts, can be performed without using the Merge user interface. We call this an automatic merge since the Merge tool then can complete the merge session automatically without any user interaction. One example when it is safe to do an automatic merge is when delivering from a feature stream to the main stream, where you just previously have rebased so that all changes from the main stream already were merged into the feature stream.
In This Topic:
Merge from File System
There is no command in the Model RealTime user interface for merging model files in the file system, because usually you don't have different versions of the same model in a project. But you can merge files in the file system from the command-line using the Command Line Tool for Compare/Merge.
Merge from CM System
When using a CM system, such as ClearCase or Git, it is usually easiest to merge two versions of a model by triggering the merge from the version tree where you can see all available versions of the model.
ClearCase
With ClearCase you use the view called ClearCase Version Tree. Make sure that your ClearCase view selects the version of the model that you want to modify (i.e. the target version for the merge). Then select the version you want to merge from and perform the command Merge to View Selected Version in the context menu. For example, consider the version tree shown below:
To merge the changes from version 3 on the main branch with version 2 on the feature branch, you right-click on version 3 and perform Merge to View Selected Version. ClearCase will then checkout version 2 on the feature branch and start the merge session. When the merge session is completed, the merge result model is committed to the checked out file. You can then check in the resulting model as version 3 on the feature branch.
You can also trigger the merge from the command-line using tools such as "cleartool". For example, for ClearCase the equivalent of the above mentioned merge operation would be
cleartool findmerge HelloWorld.emx@@\main\feature1\2 -fta main_view -nc -merge -gmerge
Here we just specify the target version of the model, and then use the -fta argument to specify the source view that selects the latest version on the main branch. ClearCase will attempt to do an automatic merge, but if this fails because there are merge conflicts that need to be resolved, the merge session will be sent to Model RealTime using the Compare/Merge Server. You then perform the merge using the Merge user interface in Model RealTime, and when you commit the merge result, ClearCase considers the file to be merged.
Git
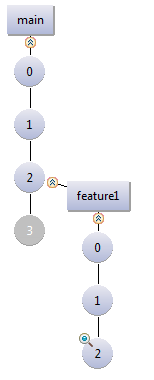
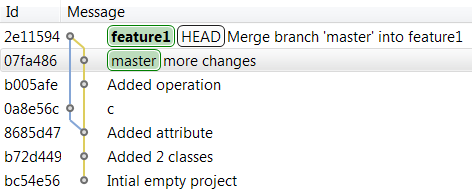
With Git you use the History view configured to show all branches and tags. Make sure you have the target version for the merge checked out. Then select the branch you want to merge from and perform the command Model Merge in the context menu. For example, consider the version tree shown below:
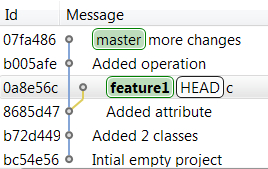
To merge the changes on the master branch with the branch called 'feature1', you right-click on the master branch commit (07fa486) and perform Model Merge. By default a dialog appears which lets you choose how to perform the merge (the preference Team – RSx EGit Integration – Merge kind selection can be set to avoid this dialog):
See Logical Models to learn about what logical model and closure merge means.
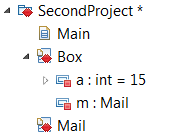
The merge is performed automatically, without showing the Merge user interface. You will be notified with a dialog if conflicts are detected and they are then shown using red icons in the Project Explorer on those top-level nodes that are stored in their own files:
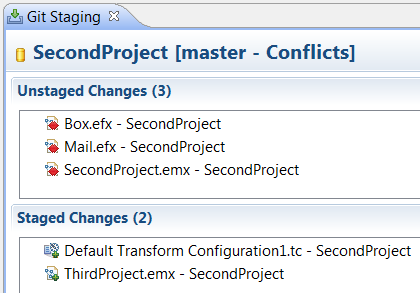
Files with conflicts are also shown in the Git Staging view under “Unstaged Changes”. Files that could be merged without conflicts will be automatically staged and will hence show up under “Staged Changes”.
To resolve conflicts you can right-click on a file marked to have conflicts in the Git Staging view and perform the command Merge Tool. It is also available from the Project Explorer context menu under the Team menu. The command brings up the Merge user interface which you then use for resolving the conflicts. When you have committed the merge session your workspace contains the merge result. By default files are automatically staged when you commit the merge session. There is a preference Team – RSx Egit Integration – Automatically add resources to index after resolving conflicts which you can disable if you prefer to manually stage the merged files.
When the merged files have been committed to the Git repository the History view will update to show that a merge has taken place.
Note that if there are no merge conflicts, you cannot run the Merge Tool command and hence the Merge user interface will not appear. In this case you can instead run a Compare of the merge result model in your workspace with the predecessor version to ensure that it looks as expected before committing it to the Git repository.
It is possible to launch the Merge tool from the Git command line. You need to configure the git mergetool to invoke the Command Line Tool for Compare/Merge.