Some aspects of what the p2 UI presents and how it behaves are configurable using the Policy class. You can configure an instance of this class (or subclass) in order to customize the UI for your application. This policy is registered as an OSGi service, and retrieved by the UI in order to make decisions about presentation.
Depending on the application requirements, the policy instance may be configured in code, configured using internal preferences, or even by exposing some of the decisions to a user in a preference page. The policy allows you to control things such as
This kind of customization is best described by example. A common scenario in RCP applications is that the user should be able to update the application, or install additional software, from a controlled set of update sites. This is common in managed installations, where a systems administrator is maintaining an internal update site. From the user point of view, updates come from one "cloud" rather than individual software sites, and there is no visibility of software sites.
In this example, we want the UI to behave in the following ways:
A sample RCP Mail application which does this kind of customization can be found here. The most important aspect of this example is that we need to configure the p2 UI Policy according to our requirements and register it.
We will register our policy in the startup code of the existing RCP Mail bundle class.
 public void start(BundleContext context) throws Exception {
  super.start(context);
  plugin = this;
  // XXX register the p2 UI policy
  registerP2Policy(context);
  getPreferenceStore().addPropertyChangeListener(getPreferenceListener());
 }
The registration method creates a default policy instance, updates it according to some preference values, and registers it.
 private void registerP2Policy(BundleContext context) {
  policy = new CloudPolicy();
  policy.updateForPreferences();
  policyRegistration = context.registerService(Policy.class.getName(), policy, null);
 }
In this example, we wish to initialize a policy instance that prevents the user from manipulating the repositories. There are several ways to go about this. The most direct way is that the policy initializes its desired values on construction.
public class CloudPolicy extends Policy {
 public CloudPolicy() {
  // XXX User has no visibility for repos
  setRepositoriesVisible(false);
 }
}
A more general approach is for the policy to derive its values from preference settings. These preferences are not exposed to the end user, but are used to control how the policy initializes itself. This is the approach taken in the cloud example. The advantage of such an approach is that the policy can be configured by altering the preference values in the plugin_customization.ini file for the application.
The policy code simply reads preference settings and adjusts the policy accordingly.
 public void updateForPreferences() {
  IPreferenceStore prefs = Activator.getDefault().getPreferenceStore();
  setRepositoriesVisible(prefs
    .getBoolean(PreferenceConstants.REPOSITORIES_VISIBLE));
  setRestartPolicy(prefs.getInt(PreferenceConstants.RESTART_POLICY));
  setShowLatestVersionsOnly(prefs
    .getBoolean(PreferenceConstants.SHOW_LATEST_VERSION_ONLY));
  setGroupByCategory(prefs
    .getBoolean(PreferenceConstants.AVAILABLE_GROUP_BY_CATEGORY));
  setShowDrilldownRequirements(prefs
    .getBoolean(PreferenceConstants.SHOW_DRILLDOWN_REQUIREMENTS));
  if (prefs.getBoolean(PreferenceConstants.AVAILABLE_SHOW_ALL_BUNDLES))
   setVisibleAvailableIUQuery(QueryUtil.ALL_UNITS);
  else
   setVisibleAvailableIUQuery(QueryUtil.createIUGroupQuery());
  if (prefs.getBoolean(PreferenceConstants.INSTALLED_SHOW_ALL_BUNDLES))
   setVisibleAvailableIUQuery(QueryUtil.ALL_UNITS);
  else
   setVisibleAvailableIUQuery(new UserVisibleRootQuery());

 }
Now, the plugin_customization.ini file can be edited according to the desired policy. A sample file that explains all of the configurable aspects of the policy is included in the example. It looks something like this.
# we can configure the update UI by using application preferences to initialize the default UI policy

# should user be able to see and manipulate repositories in the install wizard
org.eclipse.equinox.p2.examples.rcp.cloud/repositoriesVisible=false

# force restart after a provisioning operation (see possible values in org.eclipse.equinox.p2.ui.Policy.restartPolicy())
org.eclipse.equinox.p2.examples.rcp.cloud/restartPolicy=1

# show only latest versions when browsing for updates
org.eclipse.equinox.p2.examples.rcp.cloud/showLatestVersionOnly=true

# software should be grouped by category by default
org.eclipse.equinox.p2.examples.rcp.cloud/groupByCategory=true

# show only groups (features) in the available list, not every bundle
org.eclipse.equinox.p2.examples.rcp.cloud/showAllBundlesAvailable=false

# show only the install roots in the installed software list
org.eclipse.equinox.p2.examples.rcp.cloud/showAllBundlesInstalled=false

# do not drilldown into requirements in the wizards, just show the high level things
org.eclipse.equinox.p2.examples.rcp.cloud/showDrilldownRequirements=false

# automatic update options are defined in org.eclipse.equinox.p2.sdk.scheduler.PreferenceConstants

# check for updates on startup
org.eclipse.equinox.p2.ui.sdk.scheduler/enabled=true
org.eclipse.equinox.p2.ui.sdk.scheduler/schedule=on-startup

# remind the user every 4 hours
org.eclipse.equinox.p2.ui.sdk.scheduler/remindOnSchedule=true
# see AutomaticUpdatesPopup, values can be "30 minutes", "Hour", "4 Hours"
org.eclipse.equinox.p2.ui.sdk.scheduler/remindElapsedTime=4 Hours

# download updates before notifying the user
org.eclipse.equinox.p2.ui.sdk.scheduler/download=true
The rest of the UI code in the cloud example is based on code from org.eclipse.equinox.p2.ui.sdk. We copy the command handlers for install and update, and choose not to use any of the preference pages. The plugin.xml contributions for the standard installation pages are also included. The page implementations are contained in the p2 UI bundle, so we only need to define the names of the pages and point to the existing implementations.
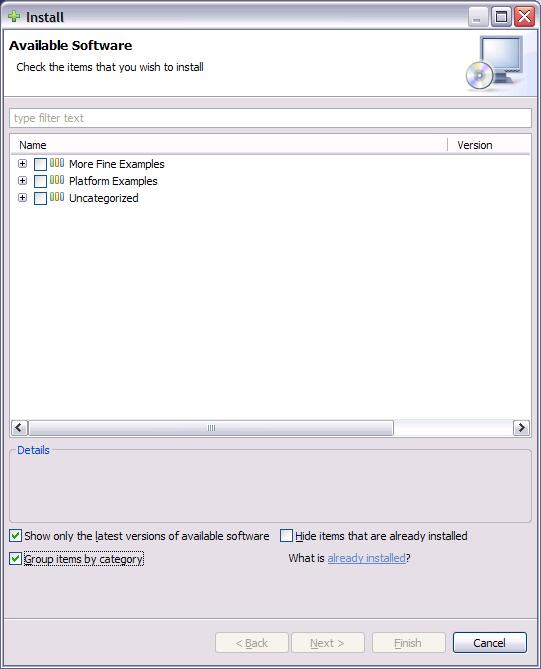
The end result is an application whose install and update UI looks familiar. The most significant change is that the Install New Software... wizard no longer provides any control over which sites are shown. Only the content from sites preconfigured in the product (using the p2.inf file in our example) are shown.
The Eclipse SDK and the examples shown so far use the default p2 UI Policy queries that control the visibility of software items. In practice, this means that only Eclipse features are shown when browsing the various update sites. However, p2 does not have any specific knowledge of Eclipse features, nor does it require that installation and update operations be based on features. Similarly, only items actually installed by the end user, (or defined as installed items at product-build time), are shown in the Installed Software page. This is done to simplify the view of the installation.
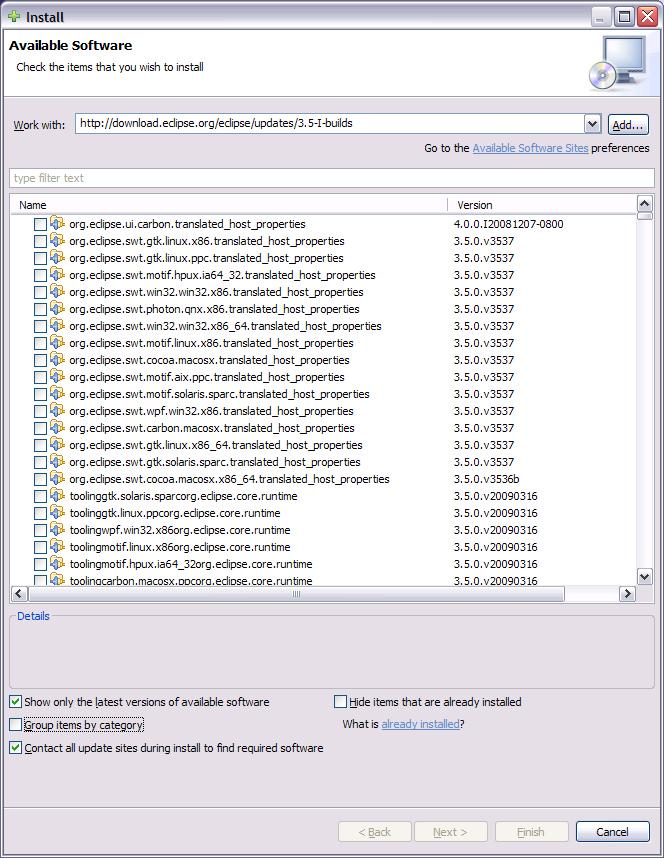
Your application can change the visibility of items in the UI by defining customized queries for obtaining the available or installed software. In this example, we'll replace the filtered queries normally used by the Eclipse SDK with queries that show everything available. (We'll also show how this can be achieved by altering the preference settings in the Cloud example. The approach taken in this example is shown in order to demonstrate how the queries can be replaced with application-defined queries. For example, the query could be modified to show only IU's with a certain property, or only those whose ids are associated with the application).
A complete example is available here. When installing new software, every available bundle is shown in the install wizard. (Note that you must uncheck the Group items by category checkbox to see this list.)
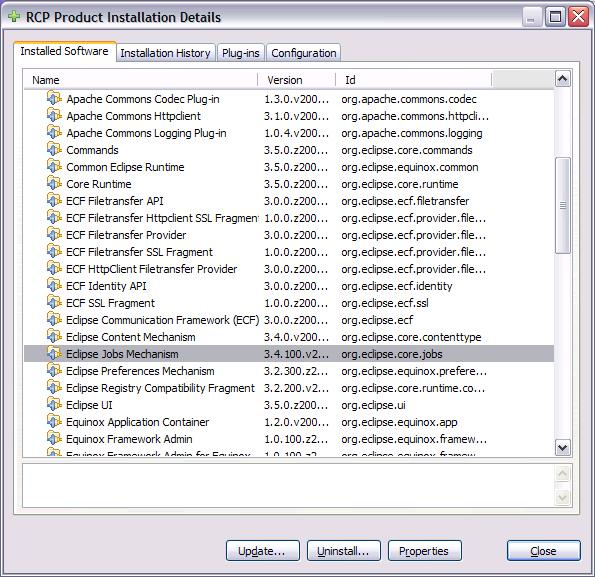
Likewise, the Installed Software page shows every bundle in the installation, not just the "root" of the product and the user-installed items.
The steps for building the contributions are similar to those for the Cloud example above. This time, the policy class is called AllIUsAreVisiblePolicy.
public class AllIUsAreVisiblePolicy extends Policy {
 public AllIUsAreVisiblePolicy() {
  // XXX Use the pref-based repository manipulator
  setRepositoryPreferencePageId(PreferenceConstants.PREF_PAGE_SITES);

  // XXX All available IU's should be shown, not just groups/features
  setVisibleAvailableIUQuery(InstallableUnitQuery.ANY);
  // XXX All installed IU's should be shown, not just the user-installed.
  setVisibleInstalledIUQuery(InstallableUnitQuery.ANY);
 }
}
The queries that retrieve the visible available software, and the visible installed software, are set so that all Installable Units are shown.
In this example, we use OSGi declarative services to register the policy. Rather than manually register the service when our example Activator starts, we instead declare the service in a policy_component.xml file. Using declarative services is not necessary in this particular example, but could become necessary if we were to separate our p2 UI contributions into another bundle. In that case, it becomes possible for p2 UI components that use the policy (the preference page or installation pages) to be invoked before the bundle that configures the policy starts. Declarative services ensures that the policy is found and the bundle starts when the service is needed.
As mentioned previously, the Cloud example preferences may also be used to make everything visible in the UI. This can be done by editing the plugin_customization.ini file in the example.
# show only groups (features) in the available list, not every bundle
org.eclipse.equinox.p2.examples.rcp.cloud/showAllBundlesAvailable=true

# show only the install roots in the installed software list
org.eclipse.equinox.p2.examples.rcp.cloud/showAllBundlesInstalled=true
Because the p2 UI Policy is defined as an OSGi service, products that ship with the org.eclipse.equinox.p2.user.ui feature unmodified can still provide an alternate implementation of the UI Policy. The org.eclipse.equinox.p2.ui.sdk bundle declares the service with a default ranking value (0). This means that the product must supply a policy implementation with a higher service ranking. When the policy service is found, the highest ranking policy will win. A sample file that declares a policy with a ranking of 1000 can be found here.