

| Tasks | ||
|---|---|---|
|
|
|
|
| Concepts | Reference | |
When setting up Git Repositories with EGit, there are two recommendations for the creation of "productive" (as opposed to "playground") Repositories:
The first mistake happens when you specify a workspace folder during cloning or creation of a Repository.
Both mistakes will happen when you use the Git Sharing Wizard from an Eclipse project that you have created manually in your workspace without taking precautions (the wizard has been fixed in the latest version).
Below you will find some motivation for these recommendations.
Git Repositories can be created in different ways, for example by cloning from an existing Repository, by creating one from scratch, or by using the EGit Sharing wizard.
In any case (unless you create a "bare" Repository, but that's not discussed here), the new Repository is essentially a folder on the local hard disk which contains the "working directory" and the metadata folder. The metadata folder is a dedicated child folder named ".git" and often referred to as ".git-folder". It contains the actual repository (i.e. the Commits, the References, the logs and such).
The metadata folder is totally transparent to the Git client, while the working directory is used to expose the currently checked out Repository content as files for tools and editors.
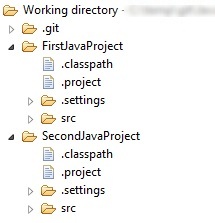
Typically, if these files are to be used in Eclipse, they must be imported into the Eclipse workspace in one way or another. In order to do so, the easiest way would be to check in .project files from which the "Import Existing Projects" wizard can create the projects easily. Thus in most cases, the structure of a Repository containing Eclipse projects would look similar to something like this:
The above has the following implications:
You can create a project first and share it afterwards. The Share Project Wizard supports creation of Git repositories (see Adding a project to version control).
You can also create a new empty Git Repository from the Git Repositories View (see Creating a Repository).
You may create multiple projects under a common directory and then create a common repository for all projects in one go:
In order to work with the content of a Git repository in the Eclipse workbench, the contained files and folders must be imported as projects. In principle, this import can be done using the generic "New Project" or "Import..." wizards, since the working directory of a Git Repository is just a normal directory in the local file system. However, the newly created projects would still have to be shared manually with Git. The "Import Projects from Git" wizard integrates project import and sharing and also offers some extra convenience.
To start the wizard click Import > Git > Projects from Git.
If you started in a clean workspace, the first page will display an empty list:
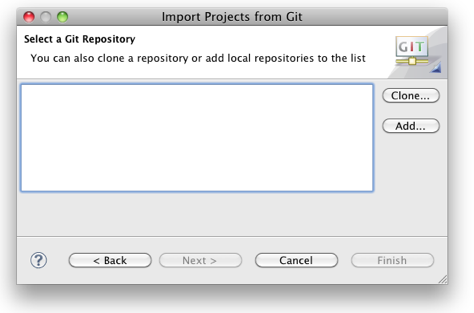
Before you can continue, you need to add one or several Git repositories to the list. If you already have repositories in the list, this step is optional.
There are two ways to add Git repositories to the list:
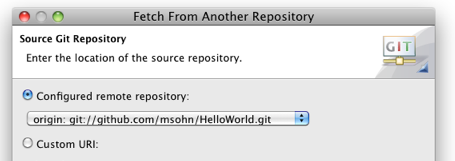
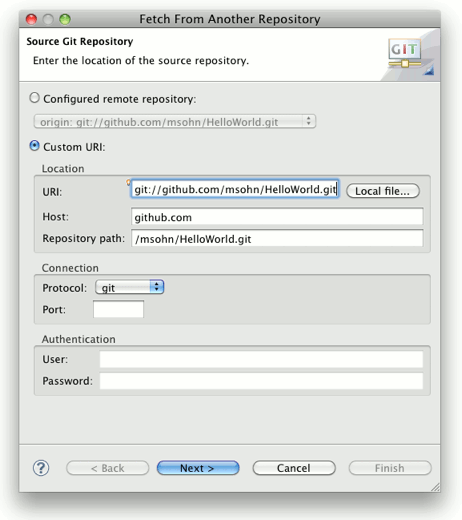
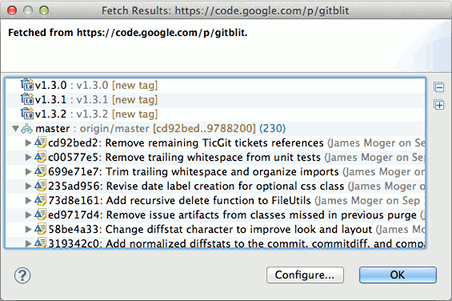
The first option is used if you start with a remote repository. The clone operation will copy that repository to your local file system. To start the Clone Wizard click Clone.... The Clone Wizard is described in more detail in Cloning Remote Repositories. Upon successful completion of the clone operation, the newly cloned repository appears in the list automatically.
The second option is useful if you already have a repository in your local file system, for example because you have cloned it earlier, you created it from scratch or you copied it from somewhere else. Click Add...; and select a directory in the local file system. Press Search to trigger a scan for Git repositories contained in this directory. If Git repositories are found, they will be listed and you can select repositories to add:

After successful completion, the repository list should contain some repositories:
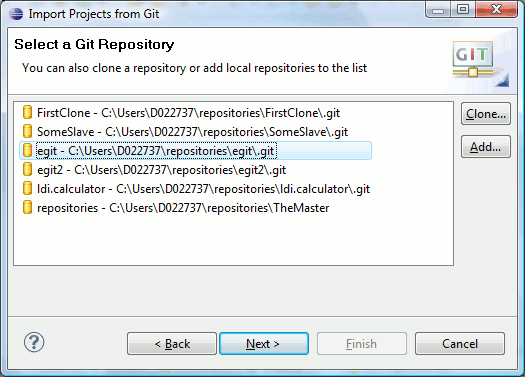
You can now select a repository and click Next. On the following wizard page, you will decide how to import projects.
This page offers a group with radio buttons that allows you to select a wizard and a directory tree that optionally allows you to select a folder in the working directory.
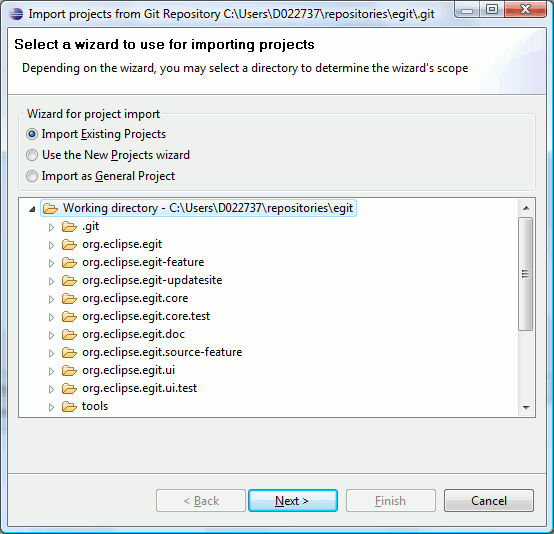
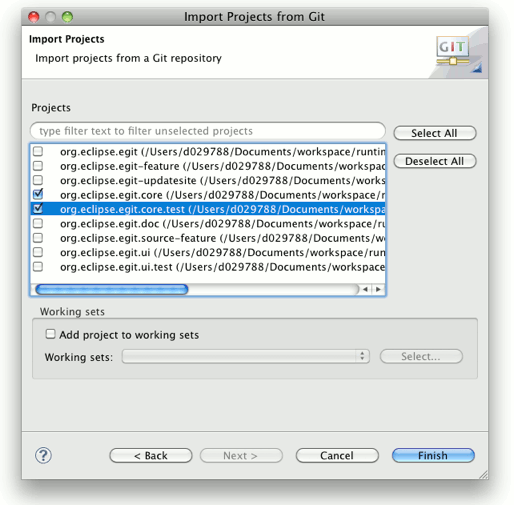
If this radio button is selected, the wizard will scan the local file system for .project files and display the projects found. This is the most comfortable solution and should be used if .project files are checked into the Repository.
In this case, the directory tree at the bottom is active. You can limit the search for .project files by selecting a folder in this tree, otherwise the complete working directory of the repository will be scanned. On the next page, a list of the found projects (if any) will be shown. This is very similar to the generic Import Existing Projects wizard, but has some additional filtering capabilities:
When this option is chosen, the generic "New Project" wizard will open. After completion of the "New Project" wizard, the "Import Projects from Git" wizard will resume and assist with sharing the projects you just created.
In this case, the directory tree at the bottom is inactive, as the selection is not relevant for the "New Project" wizard.
This option can be helpful when there are neither .project files available nor a suitable "New Project" wizard. If chosen, the wizard will generate a .project file and point the project to a folder of the Repository's working directory. The result is a "General Project".
By default, the newly generated project will point to the working directory of the Repository. By selecting some folder from the directory tree at the bottom, you can have the project generated for that folder.
Click Next to open a simple dialog for entering a name and a directory for the new project:
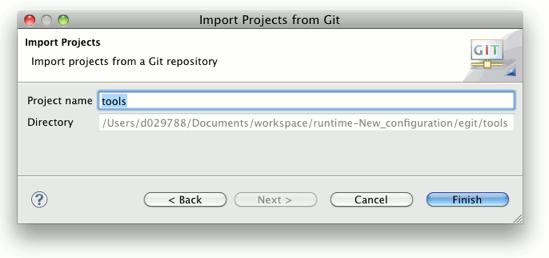
By default the suggested project name matches the name of the directory.<br />
Using the Git Clone Wizard you may clone remote repositories using different transport protocols.
The wizard can be started from the "Import Projects from Git" wizard using
File > Import... > Git > Projects from Git > Next > Clone URI > Next
or from the "Git Repositories View" (described in Managing Repositories) using the Clone a Git Repository toolbar button or view menu.
On the first page of the wizard enter the location of the remote repository:
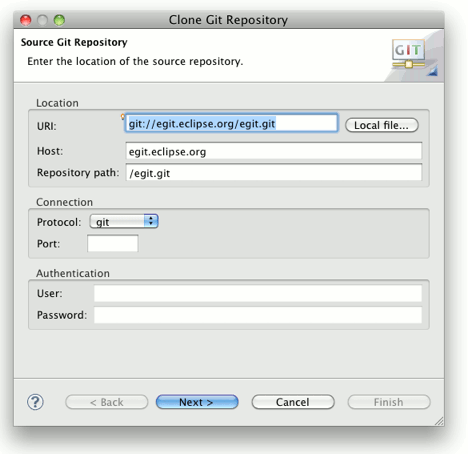
The following protocols are supported:
Note: If you are behind a firewall you may need to configure your proxy settings (
Preferences > General > Network Connections). Many HTTP proxies are configured to block URLs containing a username (and/or password) like e.g.
http://fred:topsecret@egit.eclipse.org/egit.git hence it's recommended to use the
user,
password fields at the bottom of the wizard page, the credentials will be transmitted as HTTP headers.
On the next page choose which branches shall be cloned from the remote repository:
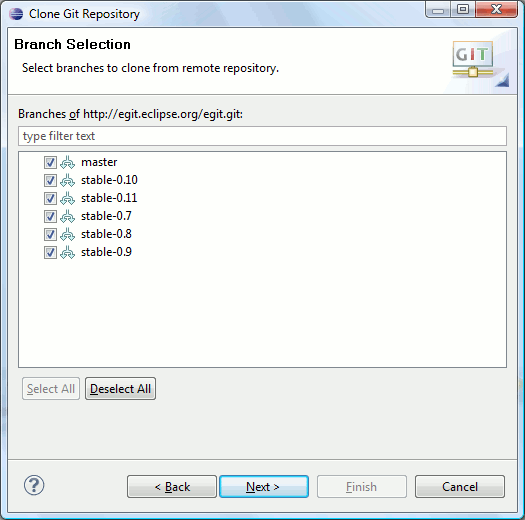
If you are not sure which branches you need, simply hit "Select All".
You can filter the branches by their name by typing using the text control above the list. Note, however, that branches that have been checked will always be shown in the list, i.e. they will not be filtered.
On the next page define where you want to store the repository on the local file system and define some initial settings.
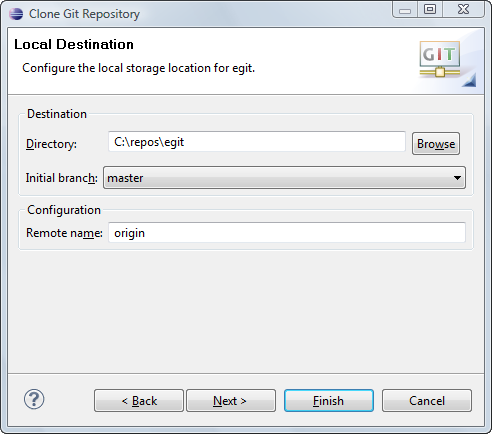
The default root path for storing Git repositories can be configured in the Preference Menu
Window > Team > Git > Default Repository Folder
You can press Finish on this page or press Next if you are working with Gerrit Code Review and you want to configure your repository accordingly.
The Clone wizard of EGit can be extended by other plugins in order to search for repositories on specific backends which host git repositories. Currently such an extension is available for Github and soon will be available for Gerrit. For both you need to install the respective Mylyn connectors. The Gerrit Mylyn connector extension then will also configure the remote repository for the work with Gerrit. This can also be done or changed later from the Git Repositories View, see Gerrit Configuration.
When you have installed such an extension, the Clone wizard opens with a selection page where you can choose between different sources of the repository to clone:

If you are working with a local branch which has a so-called " Upstream Configuration", the most convenient way for pushing relies on this upstream configuration.
Typically local branches are created based on a remote tracking branch. Since the remote tracking branch is associated with a remote and the remote contains the information required to access the corresponding remote repository, it is possible to automatically create this upstream configuration while creating the local branch (see Branching for more information).
When pushing upstream from the local branch, push requires no further parameters and hence can be performed without showing another dialog based on the stored upstream configuration.
In order to push upstream, right-click on a project and select
Team > Push to upstream or right-click on a Repository in the Repositories View and click
Push to upstream. There is also an action available in the
Git Command Group.
Push will then be executed immediately after selecting the action. Once finished, a confirmation dialog will be shown displaying information about the pushed data and/or error messages:

The upstream push can be configured using the "Configure..." button on the confirmation dialog (see above) or by right-clicking a project and selecting Team > Remote > Configure push to upstream....
A configuration dialog will be shown for configuration of push URIs and corresponding branch mappings (RefSpecs):
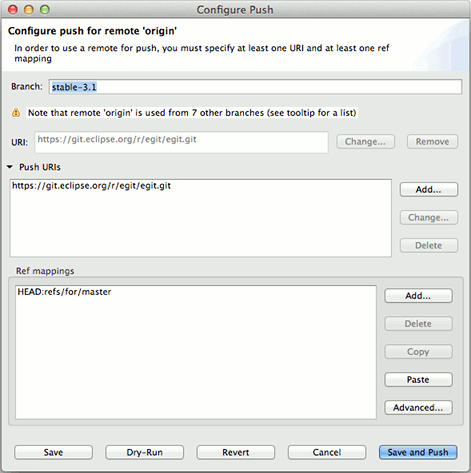
The dialog is divided into three main sections. In the upper part, information about the currently checked out branch and the remote it's following is shown. Usually local branches are created based on a remote tracking branch which auto-configures that the local branch tracks this remote tracking branch.
In this specific example, there is a warning message that there are several branches that use the remote named "origin". This means that changes in the push configuration will affect all these branches, not just the branch shown in the Branch field. Move your mouse over the warning to display these branches in a tooltip.
The URI Group contains two controls, a URI field and a Push URIs list. If the list is empty, the URI in the URI field will be used for Push, if at least one entry is in the Push URIs list, the URIs in the list will be used instead. It should be noted that if the Push URIs list is empty and the URI is changed in this dialog, the new URI will also be used for Pull, so care should be taken when doing so.
The RefMapping Group allows specification of one or several RefSpecs (see Refspecs) for Push.
"Add" will open a small wizard that helps in the creation of the RefSpecs. You can also paste a RefSpec from the clipboard into the list.
Clicking on the "Advanced" control will show/hide an "Edit (Advanced...)" button that allows for more complex RefSpec editing similar to the Push Wizard below.
The buttons in the lower button bar allow you to save your changes and do the push immediately, save the changes without fetching, dry-run (push without saving the configuration), revert your changes, and Cancel.
Alternatively, you can use Direct Push Support on a Push Specification of a Remote.
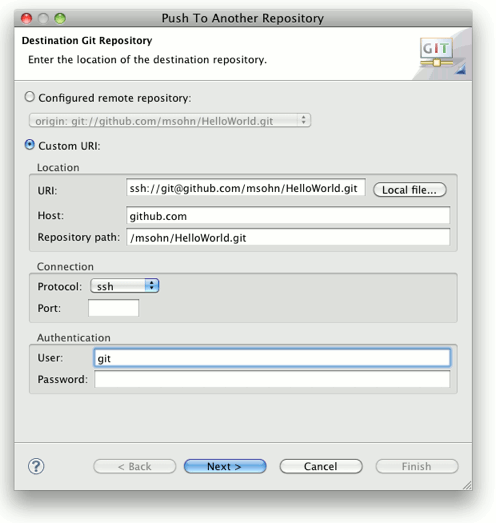
The most powerful (but also most complex) way is using the Push Wizard
Team > Remote > Push...
See also Refspecs for more explanations.
Click
Next
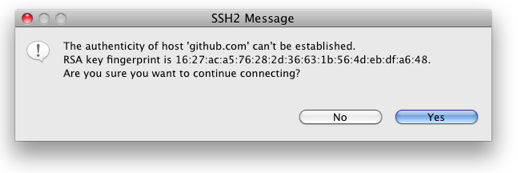
If this is the first time you connect to this repository via ssh you will have to accept the host key of the remote repository
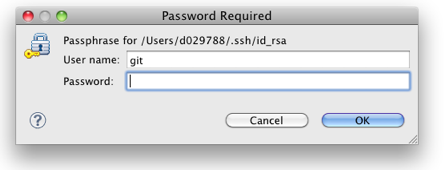
If your ssh key is protected by a passphrase (which is recommended) you have to enter it here
Click Add all branches spec
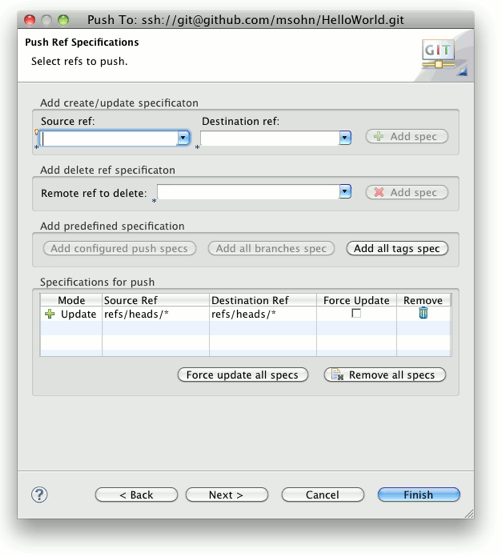
This is a convenient way to declare that you want to map your local branch names to the same branch names on the upstream repository you want to push changes to.
Click Add all tags spec to map local tags 1:1 to tags in the repository you want to push to.
If you want to map local branches to those in the upstream repository in a different way you may define more detailed mapping specifications in the following way
This will transfer the newly defined mapping to the list Specifications for push
Other common push specs:
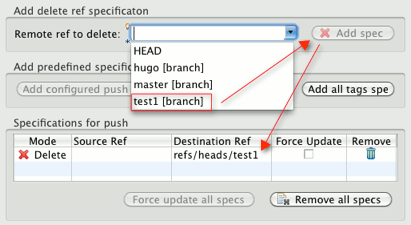
To delete a ref in the destination repository select the ref to be deleted from the drop-down list Remote ref to delete and click Add Spec. This will create a corresponding entry in the Specifications for push list. Alternatively you may type in the specification for the refs to be deleted, this may also use wildcards. Pushing Delete Ref Specifications will delete the matching Refs in the destination repository.
If you add multiple conflicting Push Ref Specifications they will be marked in red, solve this by removing or editing the conflicting specs. It is also possible to edit the specs in-place in the list Specifications for push

Click Next
This will open the Push Confirmation dialog showing a preview which changes will be pushed to the destination repository. If this does not match your expectation click Back and correct your push specs accordingly.

Click Finish
Depending on the options you have chosen a push result report dialog is shown. It displays the list of commits which are pushed to the remote.
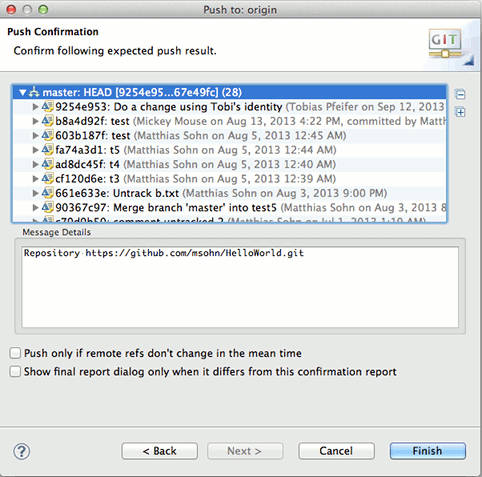
In the box at the bottom the push confirmation message from the remote server is displayed. In case of any errors you will find the error message from the remote server here. To see the message for a given list entry simply select it in the list.
Click
Ok to close the dialog.
If you are working with a local branch which has a so-called " Upstream Configuration", the most convenient way for fetching relies on this upstream configuration.
A local branch is typically created based on a remote tracking branch. Since the remote tracking branch is associated with a remote and this remote contains the information required to access the remote repository, it is possible to automatically create this upstream configuration while creating the local branch (see Branching for more information).
When fetching from upstream, this persisted configuration can be used to fetch automatically without the need to provide further parameters in a dialog.
In order to fetch from upstream, click Team > Fetch from upstream on a project or click Fetch from upstream on a Repository in the Repositories View. There is also an action available in the Git Command Group.
Fetch will be executed immediately after selecting the action. Once finished, a confirmation dialog will be shown displaying information about the fetched data and/or error messages:

The upstream fetch can be configured using the "Configure..." button on the confirmation dialog (see above) or by clicking Team > Remote > Configure fetch from upstream... on a project.
A configuration dialog will be shown for configuring the fetch URI and branch mappings (RefSpecs):
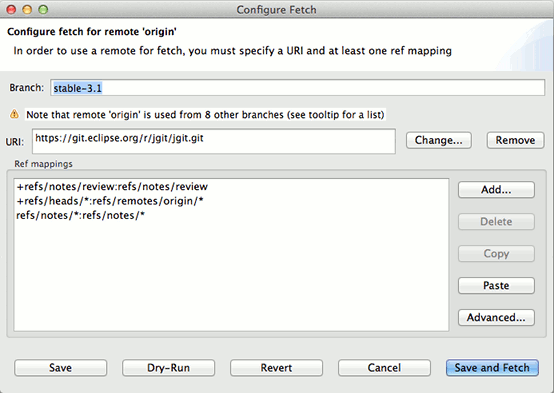
The dialog is divided into three main sections. In the upper part, information about the currently checked out branch and the remote it's following is shown.
The URI field can be used to add/change the fetch URI.
The RefMapping Group allows specification of one or several RefSpecs (see Refspecs) for Fetch.
The "Add" button will open a small wizard that helps in the creation of the RefSpecs. You can also paste a RefSpec from the clipboard into the list.
Clicking on the "Advanced" control will show/hide an "Edit (Advanced...)" button that allows for more complex RefSpec editing similar to the Fetch Wizard.
The buttons in the lower button bar allow you to save your changes and do the fetch immediately, save the changes without fetching, dry-run (fetch without saving the configuration), revert your changes, and Cancel.
Another way for fetching is to use Direct Fetch Support on a Fetch Specification of a Remote.
The most powerful (but also most complex) way is using the Fetch Wizard
Team > Fetch...
See also Refspecs for more explanations.
Click
Next
Click
Add all branches spec
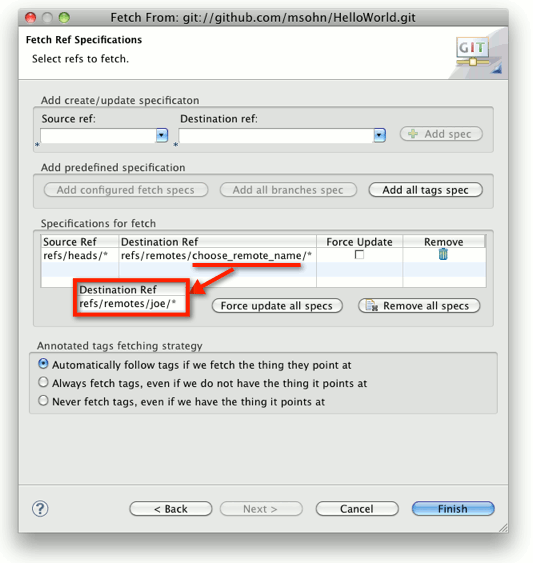
This is a convenient way to declare that you want to map the branch names in the upstream repository you want to fetch changes from 1:1 to the same local branch names.
If you want to map branches or tags in the upstream repository to local branches in a different way you may define more detailed mapping specifications in the following way
This will transfer the newly defined mapping to the list Specifications for fetch
Click Finish
A fetch result dialog is shown.
Ad-hoc selection of the upstream branch to pull from is not yet supported by EGit.
Available alternatives include:
If you are working with Gerrit Code Review, EGit allows you to conveniently push and fetch changes to and from the Gerrit servers.
When a repository is cloned in EGit from a Gerrit server using a http, https, or ssh URI, EGit will automatically set up the clone for use with Gerrit. The repository clone is configured such that
Change-Id unless they already have one.If a repository cloned from a Gerrit server outside of EGit is used in EGit, the clone may not be set up such that EGit recognizes it as a Gerrit repository. Gerrit operations in EGit will not appear in any menus unless you configure your repository first. To do that, open the Git Repositories view and browse down to the Remote that represents the Git repository server you want to use and select Gerrit Configuration....
Right-click on a project and select Team > Remote > Push to Gerrit... or right-click on a Repository node in the Repositories View and select Push to Gerrit...
A dialog will appear that lets you select or enter a URI and branch name:

The dialog also offers a content assist for the Gerrit branch. Simply press "Ctrl+Space" to activate this (consult the tooltip that appears when hovering over the little bulb decorator near the Gerrit Branch field). The remote tracking branches for the current repository will be shown. Note that this content assist is filtered, so in order to see all proposals, you need to make sure to have the Gerrit Branch field empty before requesting the content assist.
Upon clicking Finish, the currently checked out commit will be pushed to the Gerrit branch specified. Also, the URI and Gerrit Branch values will be remembered and suggested again when the dialog is opened again later.
This allows for more flexibility when working with different Gerrit branches in parallel (e.g. frequently switching between development and hotfixing).
The "refs/for" in the "Push to Gerrit" wizard is a combo drop-down box; click it and select "refs/drafts" instead of "refs/for" to push a draft change to Gerrit.
When a change has been pushed to Gerrit and the reviewers suggest to make some improvements, a new patch set for the change has to be uploaded. First, edit the commit(s):
Then push again to the same branch. Gerrit will detect that you are updating existing changes and will add new patch sets.
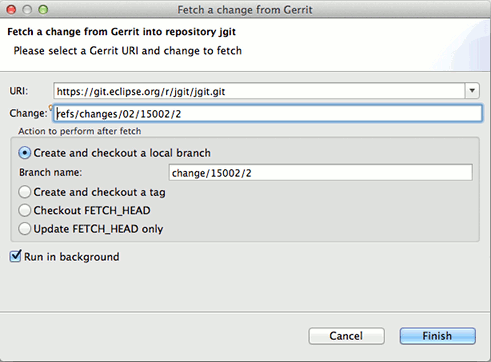
Right-click on a project and select Team > Remote > Fetch from Gerrit... or right-click on a Repository node in the Repositories View and select Fetch from Gerrit...
A dialog will appear that lets you select or enter a URI and a change as well as some additional options:
Instead of the tedious copy-paste or manual entering of the change ID, the dialog also offers a content assist for the change. Simply press "Ctrl+Space" to activate this (consult the tooltip that appears when hovering over the little bulb decorator near the Change field). The Gerrit Server will be contacted and all available changes will be fetched and shown in a content assist dialog:
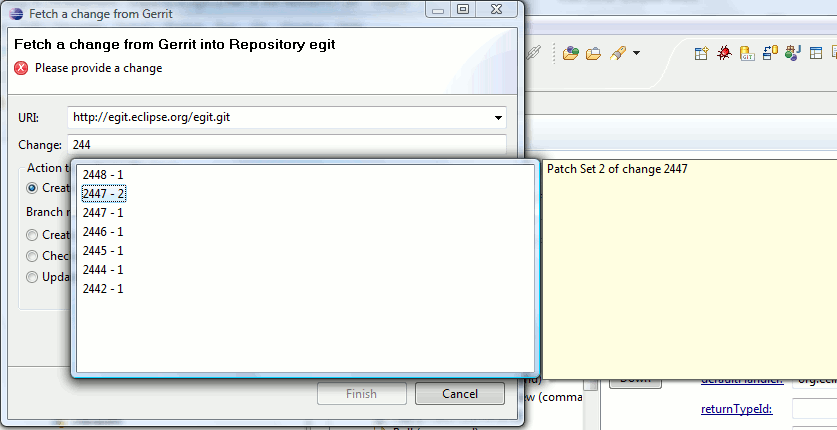
The list will be filtered with your input in the change field. After selecting the change in the content assist, the Change field will be filled with the correct information.
You can also copy the download command from the Gerrit WebUI to the clipboard before opening the Fetch from Gerrit... wizard. This will automatically populate the dialog with the values needed to fetch this change.

The Change field is also automatically filled in (and content assist is triggered) if the clipboard contains a web URL pointing to a Gerrit change, or the change number part of such a URL (numbers separated by "/"), or a plain change number.
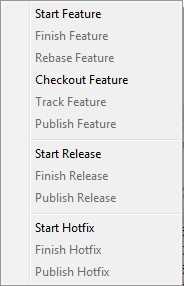
If you are using Gitflow ( http://nvie.com/posts/a-successful-git-branching-model/), EGit allows you to work with Gitflow operations, managing feature, release and hotfix branches. Install the feature "Git integration for Eclipse - Gitflow support" in order to install EGit's Gitflow integration.
Gitflow operations will not appear unless the selected repository is configured for Gitflow. To do that, open the context menu on a repository in the Git Repositories view and select
Init Git Flow.

You can skip this step if your repository was already configured for Gitflow by another client.
Right-click on a repository, select Git Flow, and select the appropriate start command.

A dialog will appear that lets you enter a name for the Gitflow branch, adding the correct prefix automatically.
Go to the EGit History view, and right-click the commit you want to start the release from.
In the context menu, go to
Git Flow, and select
Start release from commit <sha1>.

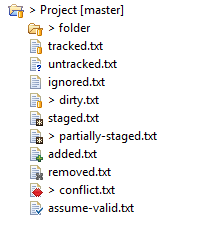
Label decorations show Git-specific information about resources under Git version control. They appear in all views showing model objects, like Package Explorer, Project Explorer, Navigator, and Hierarchy View.
The Git label decorations can be switched on globally in the Preference Menu ( Window > Preferences) under General > Appearance > Label Decorations, and more detailed settings can be modified in Preferences under Window > Preferences > Team > Git > Label Decorations.
There are two different types of label decorations: text decorations and icon decorations.
Text decorations appear on the left or right side of the text label. They can be configured on the Preferences dialog under Team > Git > Label Decorations on the Text Decorations tab. For example, the default for a dirty resource is a > on the left side of its name.
These are the default settings:

For files and folders there are the variables "name", "dirty" and "staged". "Dirty" and "staged" are flags; if they are true, the text after the colon is displayed.
For projects there are the additional variables "repository", "branch" and "branch_status". The "repository" variable displays the name of the repository.
The "branch" variable displays the name of the currently checked out branch. If no branch is checked out, the decoration shows the shortened name of the commit (first seven characters followed by ellipsis). If tags and/or remote branches are pointing to this commit, a "best guess" heuristic is applied to also show this information: tags take precedence over remote branches, and if several tags apply, the newest one is displayed. If there are several remote branches or tags that have no modification date, then alphabetic sorting is applied and the last one is shown. Example: the checked out commit
e49f576... refers to tag
v.0.7.1 of repository
egit:

The "branch_status" variable shows the status of the local branch compared to the remote-tracking branch that is set as upstream:
The status variable can be used with a leading space like this: { branch_status}. This results in the space being added only when the status is not empty.
Icon decorations appear on the lower right corner of the icon displayed in front of the label. They can be configured on the Preferences dialog under Team > Git > Label Decorations on the tab Icon Decorations.
These are the default decorations:
A summary of the status of all modified tracked files is displayed on the commit dialog. By double clicking a file the changes to be committed will be displayed in a compare dialog. As EGit currently always commits the content of the working tree (corresponding to git commit -a on the command line) the compare dialog will compare the working tree with the last commit.
In daily work you will often want to see the changes between your last commit, the index, and the current working tree. In order to do so, select a Resource (project, folder, or file) in the project explorer or navigator and right-click an action under Compare With.
To analyze the contents of a specific commit you should use the History View which supports this task much better, see task Inspecting Commits.
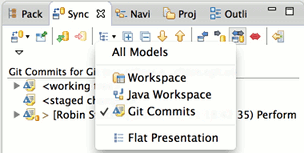
If you use any of the submenu actions of Compare With on a single file, a compare editor will be shown, otherwise (since EGit 3.1) the Synchronize View will be opened that lets you browse the changes; by double-clicking on a changed file in this view, a compare editor will be opened for this file. In the toolbar of the Synchronize View you can select the Sychronize Model you want to use for presenting the changes you are inspecting.
The difference between a resource in the current working directory and in the last commit in the current branch can be viewed from the context menu Compare With > HEAD revision. This feature is also available in the Commit dialog. Double clicking on an entry in the Commit dialog opens a compare dialog.
The differences between the current working tree and the index (based on the currently selected resource) can be viewed from the context menu Compare With > Git Index.
You can compare Index with HEAD using the Staging View. Double click a file displayed in the "Staged Changes" pane to compare its Index version against the HEAD version. Comparison between Index and another commit isn't implemented yet.
The difference between the working tree (including not committed changes) and a branch or tag can be viewed (since EGit 3.1) by selecting the project(s) you want to compare and clicking Compare With > Branch, Tag or Reference. The result is filtered for the resources you selected before starting the comparison.
You can also compare with a branch by clicking the dynamic menu Team > Synchronize on a project and selecting the Ref you want to synchronize your working tree against. If the Git repository contains multiple Eclipse projects it is sufficient to select one project, the Synchronization View will also include all other projects.

If you want to synchronize with a Ref not listed in the dynamic menu click Team > Synchronize > Other.... Then in the Synchronize Wizard click into the destination column of the repository you want to synchronize and select the Ref you want to compare against.
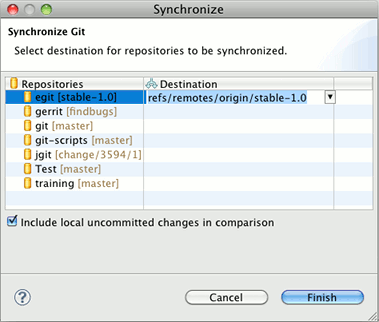
When clicking "Include local uncommitted changes in comparison" also local, not yet staged changes and the already staged changes will be shown in comparison.
It is also possible to compare multiple repositories at once. In this case in the Synchronize Wizard select for each repository the Ref you want to compare against.
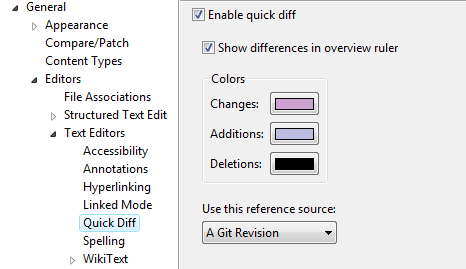
Instead of using a compare editor you can enable quick diff support and see the changes within the text editor.
This feature can be enabled via the
General > Editors > Text Editors > Quick Diff preference page:
The difference annotation will then be displayed on the left hand side of the editor:
If you move your mouse over the annotation you see the content of the version you are comparing to:

Per default, the comparison is against the HEAD. You can determine the version you are comparing to, the so-called quickdiff baseline, from the context menu of a commit in the history view ( Show in > History). There are three menu entries:
To inspect a given commit
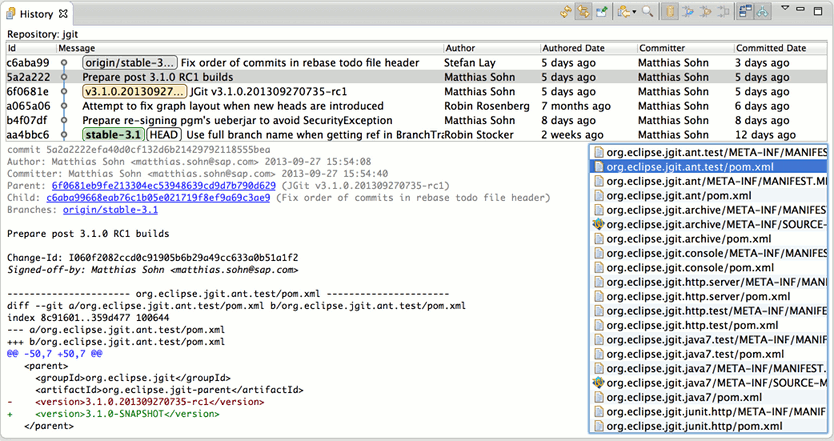
The history view displays the diff in the lower left pane. Selecting a file in the lower right pane shows the diff for this file.
The behavior of a double click on a file in the lower right pane depends on the state of the compare mode toggle button. If it's on, a compare editor will be opened which compares the file content in the current commit with the content in the ancestor commit; if it's off, an editor will be opened showing the file content in the current commit.
Modifications to a project under git version control are persisted in the git history through commits. Starting from the state checked out from the git repository modify your project until you have reached a state you are satisfied with and then commit all these changes into the repository as one single commit. Each commit represents a well defined snapshot of all the files stored in the repository.
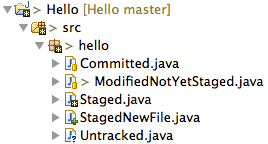
To modify a project which is already shared with Git modify or delete files either within Eclipse or directly in the file system. There is no need to tell Git in advance about these operations. New files which should be version-controlled have to be explicitly put under Git version control :
Alternatively you may display untracked files in the Commit dialog and check the Show untracked Files checkbox to select them for inclusion into the commit.
Label decorators, e.g. in the Package Explorer View, show :
For details see Label Decorations.
Here is an example in the Package Explorer for :
There are two ways to commit changes with EGit:
The Commit Dialog is considered deprecated and may be removed in future versions. Since EGit 4.4, the Team > Commit... context menu action by default opens the staging view instead of the commit dialog.
This behavior is, for the time being, configurable in the global Preferences > Team > Git > Committing preferences.

If "Use Staging View to commit instead of Commit Dialog" is checked (the default setting), the Team > Commit... action will open the staging view. If it's unchecked, the commit dialog will be opened.
If the staging view is used an additional option "Automatically stage selected resources on commit" available since EGit 4.5 determines whether selected files should be automatically staged when Team > Commit... is invoked. This will stage all changes contained in the selected resources. It makes the behavior a bit more consistent with the way the commit dialog works: in the commit dialog, individual files can be checked or unchecked for inclusion in the commit, and selected files are checked by default. In the staging view, you compose your commit by staging changes, and only staged changes will be committed. Auto-staging thus includes the selected files automatically in the commit when the staging view is used.
The "Include selected untracked files" option determines whether selected files that are not yet in the git repository at all are included in the commit (checked in the commit dialog, or auto-staged in the staging view if auto-staging is on).
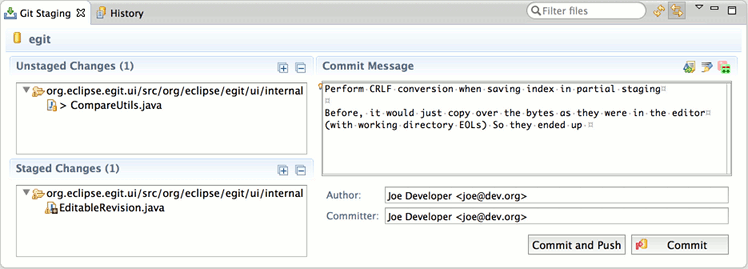
The preferred way to create commits with EGit is the Staging View since it always shows the current git status for the selected repository and allows to stage (add to git index) and unstage (remove from git index) modified files. Double click a file in the Unstaged Changes pane to compare it against the git index, double click a file in the Staged Changes pane to compare it's index version against HEAD. In the Staging View you can edit the commit message incrementally since it's a view and not a modal editor.
To commit a change click Team > Commit... in the context menu of a resource in the project.
Git tracks all changes made to the entire repository capturing the modifications of all version-controlled files in that repository not regarding if these files reside in the same Eclipse project or not.
Once you have triggered the commit the Commit Dialog will pop-up
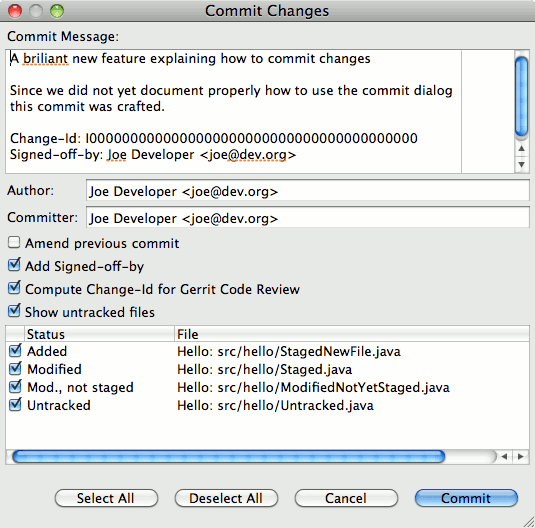
Select the changes you want to commit, enter the commit message and to create the commit, press Ctrl+Enter ( Command+Enter on Mac OS X) in the commit message text field, or click Commit.
In the Staging View or Commit Dialog you specify the commit message describing the change.
It is good practice to start the message with a short first line summarizing the change followed by a blank line and then the message body. In order to ensure that also git command line tools can format these messages nicely the lines shouldn't be formatted too wide (this is indicated by a grey vertical line).
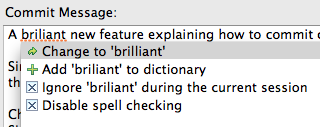
The commit message text is checked for errors by the Eclipse spell checker. The spell checker can be configured via the Eclipse Preferences > General > Editors > Text Editors > Spelling. Press Ctrl+1 to open quick fixes which may help to fix the spelling errors.
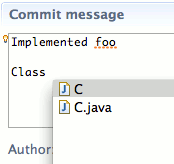
The commit message editor supports content assist for file names shown in Files section of the commit dialog, which can be activated pressing Ctrl+Space.
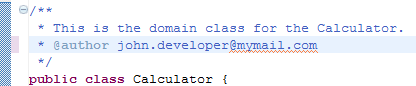
Footer TagsBug: 3176 Change-Id: I267b97ecccb5251cec54cec90207e075ab50503e Reported-by: Joe Developer <joe@dev.org> Signed-off-by: William Shakespeare <will.from@the.past>
The semantics of these tags are project or tool specific
Selecting changes to commit
One example: Imagine since the last commit you have fixed a bug in A.java and you have added a new method to B.java. These two modifications are logically independent from each other hence you may want to commit them in two independent commits. In this case you initate the commit, deselect B.java from the set of committed files and specify a commit message describing only the bugfix in A.java. After a successful first commit you just call commit again and the upcoming dialog will present you the remaining changes in B.java. Now you specify a commit message describing the addition of the method and finish the second commit.
In the Commit Dialog new files you added to the project which have not been explicitly added to version control (see "Modifying the content") will be listed in the commit dialog if you select the checkbox "Show untracked Files". If you select the checkbox in front of these files in the list they will be added to the repository and committed once you press the commit button. Files which are excluded by a .gitignore file will not be shown here. If you have no other changes in your repository than such untracked files the checkbox Show untracked Files is selected by default.
If you recognize that you missed something when committing a change you may fix this: open the staging view or commit dialog again and specify that the current commit shall "amend" the previous commit in the current branch. The new commit will then replace the previous one. This feature is often used to correct incorrect commits before they are published to other repositories.
Note: do not amend commits if they have already been published to a shared repository since this may disturb others if they already based their changes on the published change.
Amend example:
Imagine you have committed a change to a file containing a typo

After committing the change you detect a typo. In order to correct this typo and the corresponding commit you just fix the typo in the source file
Then open the Staging View or Commit Dialog again and select the Amend Previous Commit icon in the toolbar.
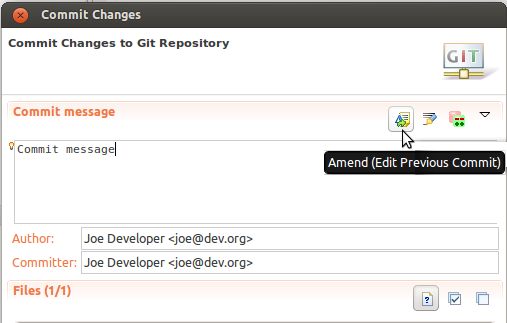
The commit message of your previous commit (the one you want to replace) is then filled into the "Commit Message" field. This gives you the chance not only to correct errors in the content of the version-controlled files but to also correct errors (e.g. typos) in the commit message describing your change.
As an alternative to amending you could just commit the corrected version as a subsequent commit. But the first commit containing the typo is of no use to anybody and in order not to clutter the history of your project with unneeded commits you should amend the commit.
Be aware that amending commits which are already published to other repositories may cause trouble. Once you have pushed a commit to a remote repository or your local repository was cloned by somebody else, you should be very careful with amending commits. In this case publishing a second commit which corrects the first one is probably a better solution. Otherwise inform all others that you amended a published commit so that they can react accordingly.
Changes which are not yet committed and not yet staged can be reverted for a set of selected files. Select the file(s) in the Package Explorer or an analogous view and click Replace With > File in Git Index.
Click Replace With > HEAD to replace the selected files with their HEAD version. You can also use Reset to with option hard to forcefully reset the entire working tree of your repository back to the state of the HEAD commit (See "Resetting your current HEAD" below). This operation will revert all changes in the working tree and the index.
Click Replace With > Branch, Tag or Reference to replace the selected files with their version corresponding to a branch, tag or reference.
Click Replace With > Commit to replace the selected files with their version corresponding to a selected commit.
Changes that are already staged or even committed can be "reverted" by replacing them with a version from the previous commit. Select a single resource in the Package Explorer or an analogous view and click Replace With > Previous Revision. The repository will determine the last commit that modified the selected resource and offer to replace the workspace resource with the contents of this commit.
This is mainly intended for "removing" single files from a commit (when committing the reverted workspace resources, they are effectively removed from the current commit). Even though this also works on folders and projects, the results of replacing a folder or project with a "previous revision" may be unexpected.
The quickdiff feature can be used to revert individual changes to a file. You can revert by line, block (se range of changes lines) or selection. Select all text and then Revert selection to revert a whole file.
Changes which are introduced by a given commit can be reverted by an automatically created new commit on top of the currently checked out commit. The commit which is to be reverted does not have to be checked out for that.
Select the commit in the History View, open the context menu and select Revert Commit. This reverts the changes that the selected commit introduces by creating a new commit on top of the currently checked out commit.
Git offers the possibility to reset the HEAD of the current branch to any other commit. It optionally resets the index and the working tree to match that commit. Note that this action affects all files and folders in the entire repository.
You have the option to do a hard reset, a mixed reset and a soft reset.
Select Team -> Reset... on a project. This opens a dialog where you can select a branch or a tag.
Select a commit in the History view and open the context menu. Here you find the entries Hard reset, Mixed reset and Soft reset.
This can be done using a hard reset. If you reset to the current HEAD (normally the last commit on your branch) with the option hard you reset the currently checked out branch to this commit and overwrite the working tree and the index with the content of HEAD. You can do this in three ways:
Committing changes to a local repository is impractical without using a local branch (see concepts section above). Furthermore, by using several different branches, it is possible to work on different changes in parallel by switching among these branches.
Thus, before starting to change the local repository, the first step is typically to create a local branch. Local branches are "based upon" either a commit or a remote tracking branch.
The second option is recommended when working with remote repositories, as it simplifies the task of synchronizing the local changes with the remote ones by adding so-called "upstream configuration" to the new local branch.
See Branch Creation dialog for more details.
Each local branch which is based on a local tracking branch can have some additional configuration indicating the remote repository, the remote branch, and the so-called pull strategy. See Branch Creation dialog for more details.
Typically, this configuration is created automatically when creating the local branch based on a remote tracking branch. However, it can be displayed and edited in the repository configuration or by clicking Show In > Properties on a branch in the Repositories View.
If there are too many branches the list does not show all of them. In this case
This is always done with the Branch Creation dialog. The newly created branch can optionally be checked out by selecting a check box on the dialog.
All the actions below show the same behavior with respect to the following:
There are several actions available to create a local branch. All these actions use the Branch Creation dialog:
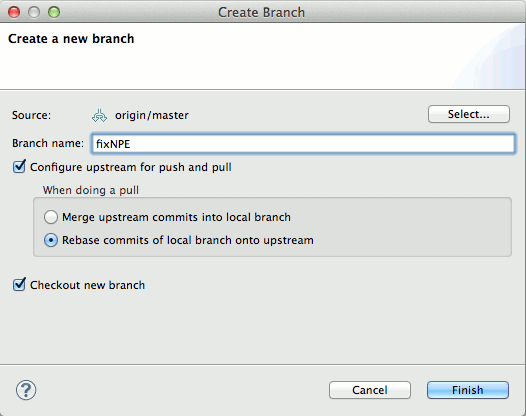
Enter the name of the local branch you want to create. If a source branch is selected which is a remote tracking branch EGit will suggest to create the new local branch with the same name.
Click Select... to select the source branch the new branch shall be based on. Typically, this is a remote tracking branch, but it could be any branch or commit in the repository (selecting a local branch is not recommended if you are working with a remote repository). If you want to base the new branch on a commit no branch is referring to then click Create Branch... from the commit shown in the History View.
When a source branch is selected you can configure the "upstream configuration" of the new branch which is helpful when fetching and pushing, but particularly when pulling. Depending on the selected option the following configuration can be chosen:
You may view and edit the upstream configuration in the repository configuration or by selecting Show In > Properties on a branch in the Repositories View.
EGit also supports the git configuration parameter branch.autosetuprebase, set it to always if you want to use the rebase pull strategy by default. If you set this in the repository configuration this is used for all local branches created based on a remote tracking branch in this repository, if you set it in your user configuration it will be used for all your repositories.
In the lower part, you can decide whether the new branch shall be checked out immediately.
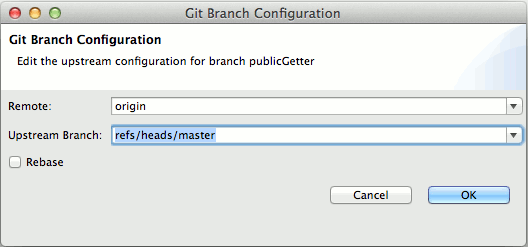
Click Configure Branch... on a branch in the Repositories View in order to change the upstream configuration of a local branch. Select which remote ("." means the local repository) and branch the selected local branch should track. Check "Rebase" if you want pull to rebase the local branch onto new changes arriving for the tracked branch, otherwise pull will merge new changes arriving for the tracked branch.
A merge incorporates changes from another branch or tag, since the time their histories diverged from the current branch, into the currently checked out branch.
You can trigger merge from:
This is the recommended view to start a merge since it shows you the history of your repository. Ensure that the toggle buttons Show all changes in repository and Show all Branches and Tags are selected in the History View's toolbar. This ensures that you see the complete history of your repository in order to decide which branch you want to merge. Select the commit with the branch or tag label you want to merge and click Merge.
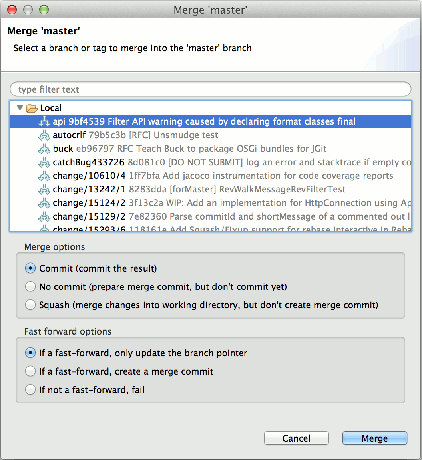
In the Package Explorer or Navigator, open the context menu on a project node. Select Team > Merge...
Now the merge dialog opens:
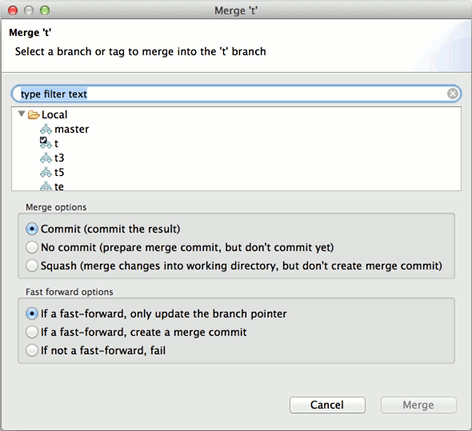
On the dialog, select a branch or a tag you want to merge with your current branch. This dialog also allows you to select merge squash and fast-forward options.
You can trigger a merge from any branch and tag node and from the repository node if you have checked out a local branch. See Merging a Branch or a Tag for further details.
The following fast-forward configuration options for merge are recognized by EGit, which are used for all branches:
[merge]
    ff = true|false|only
When you only want to configure it for a certain branch, use the following:
[branch "name"]
    mergeoptions = --ff|--no-ff|--ff-only
When you start merge from the Team menu "Team > Merge..." you can set the fast-forward, squash or no-commit merge options in the merge dialog:
After pressing the Merge button, the following scenarios can occur:
The result of a merge is summarized in a dialog:
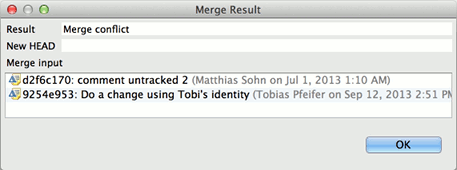
On the first line you see the result of the merge. The possible results are "Already-up-to-date", "Fast-forward", "Merged", "Conflicting" or "Failed". A possible reason for "Failed" may be that there are conflicting changes in the working directory.
On the second line you see the new HEAD commit in case of a successful merge (Already-up-to-date, Fast-forward or Merged).
In the table you see the commits which were merged.
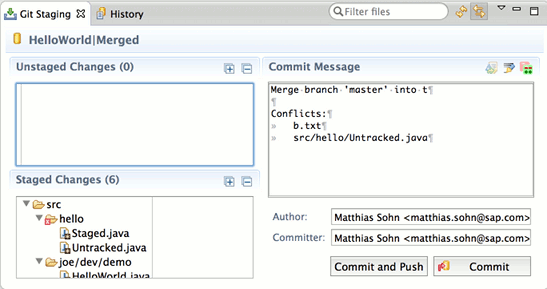
A merge can result in conflicts which require user action. This is the case when the content of files cannot be merged automatically. These conflicts are marked with a label decoration in the Staging View. Using the Staging View to find the files with conflicts in order to resolve them is handy since the Staging View shows only modified files so that you don't have to wade through all of your resources but only those which might need your attention for resolving the conflicts.
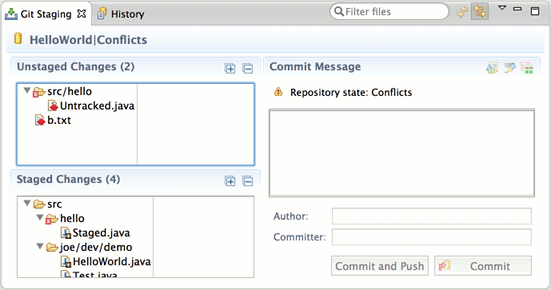
Also the conflicting resources are decorated in the navigation trees like Project Explorer or Package Explorer views
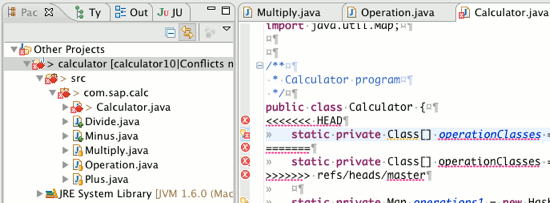
The merge conflicts in the content of files are presented with textual conflict markers (see http://www.kernel.org/pub/software/scm/git/docs/git-merge.html#_how_conflicts_are_presented for more details).
To resolve a conflict you have to do the following steps:
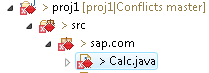
A repository which contains conflicting files has the textual label decorator "|Conflicts" attached to the repository name. Conflicting resources and folders containing such conflicting resources get a conflict label decoration.
Alternativley, it's easy to find a list of all conflicting files in the staging area.
Open the
Git Staging view. The conflicting files with decorators will be seen
on the left.
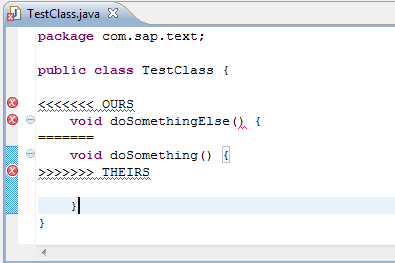
In the file content, the area where a pair of conflicting changes happened is marked with markers <<<<<<<, =======, and >>>>>>>. The part before the ======= is typically your side, and the part afterwards is typically their side (see http://www.kernel.org/pub/software/scm/git/docs/git-merge.html#_how_conflicts_are_presented for more details).
Open the file in an editor, edit the content and save the editor.
Note that this step is not mandatory. EGit does not check the content to decide if a conflict is resolved. The next step is the relevant one.
Once you are finished with editing a file either click Add to Index in the Staging View or click Team > Add to add the conflict resolution to the git index. This will also mark the corresponding conflict as resolved.
When you have resolved all conflicts the textual repository label decoration changes to "Merged". There are no conflict markers anymore.

When the repository is in state "Merged" (as is indicated with the textual label decorator "|Conflicts" attached to the repository name) the merge can finally be committed.
In the Staging View you may want to remove the conflict remarks from the standard merge commit message which is generated by the merge operation and update the commit message if necessary. Then click Commit in order to commit the conflict resolution.
If you want to use the Commit Dialog to commit the conflict resolution click Team > Commit... anywhere in the navigation tree. The commit dialog opens with a slightly different look compared to a normal commit:
After pressing the "Commit" Button the merge is completed.
If a merge resulted in conflicts you can abort the merge with a hard reset to the current branch. This can be done in state "Conflicts" and in state "Merged", i.e. before and after you have resolved the conflicts.
The hard reset can be done from the team menu, the Git Repositories View or the History View. See Revert all local and staged changes for more details.
Rebase applies a chain of commits onto a given commit. A typical scenario is the development of some feature on a "topic" branch which was created from a "master" branch at some point in time. When "master" is updated with changes e.g. from other developers while "topic" is still under development, it may become necessary to incorporate these changes into "topic".
Let's assume we start development on "topic" by creating the "topic" branch from master. At this point, both "master" and "topic" point to commit "E". When the first commit ("A") is added to "topic", the commit history of the repository looks like this:
          A topic
         /
    D---E master
Now, let's assume that there were some more commits on "topic" and as well some more commits on "master" (for example, "master" may track some remote repository and there were some changes in that remote repository that have been pulled into "master"):
          A---B---C topic
         /
    D---E---F---G master
Now, in order to incorporate the changes in "master" into "topic", a Rebase of "topic" onto "master" would produce
                  A'--B'--C' topic
                 /
    D---E---F---G master
Technically, the sequence of commits that are contained in "topic" but not in "master" are applied (that is, cherry-picked) on top of "master" one by one.
Note that the commits A, B, C are neither lost nor changed, instead a new chain of commits A', B', C' with the same changes and commit messages as the original commits (but different commit IDs) will be created. The old commits A, B, C are still around in the object database but not visible anymore as they are no longer reachable from any branch. A', B', C' are different from the old ones as they now also contain changes F and G.
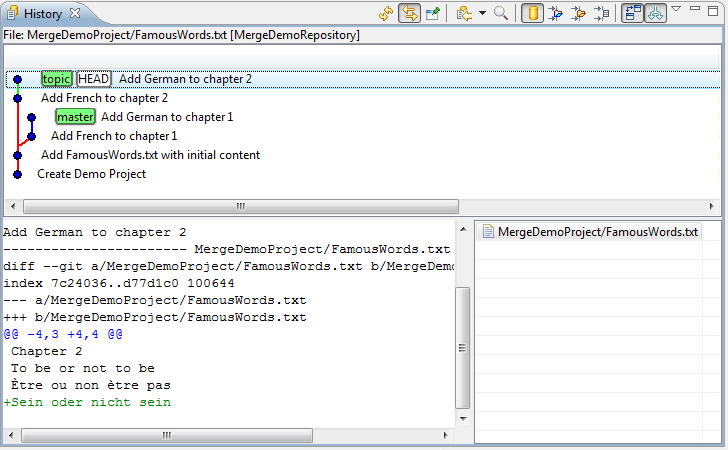
Let's have a look at some simple example: we have a text file "FamousWords.txt" which initially might have some content like
Chapter 1
Once upon a time...

Chapter 2
To be or not to be
Now, in "topic", two commits are created, the first one adding a French translation to Chapter 2, and another one adding a German translation:
After first change in "topic":
Chapter 1
Once upon a time...

Chapter 2
To be or not to be
Être ou ne pas être
After second change in "topic":
Chapter 1
Once upon a time...

Chapter 2
To be or not to be
Être ou ne pas être
Sein oder nicht sein
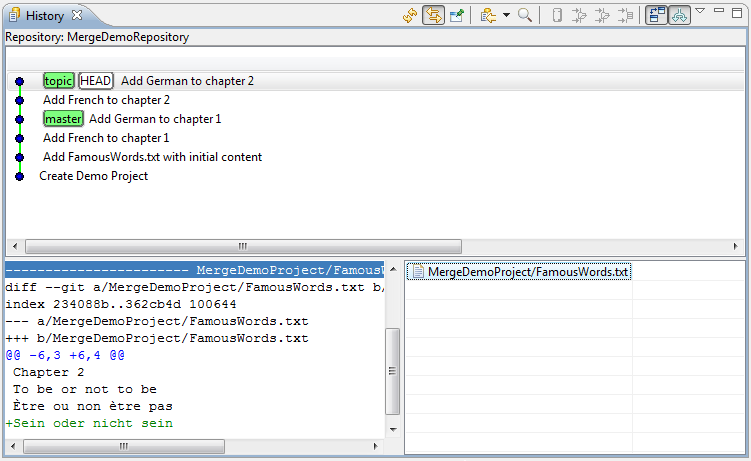
At the same time, the file was changed in "master" by adding two commits adding French and German translations to Chapter 1:
Chapter 1
Once upon a time...
Il était une fois
Es war einmal

Chapter 2
To be or not to be
The commit history looks like this:
Now, if "topic" is rebased onto "master", the two changes in topic are applied in the same sequence as they were applied during the evolution of "topic".
The result is a merged version of "FamousWords.txt":
Chapter 1
Once upon a time...
Il était une fois
Es war einmal

Chapter 2
To be or not to be
Être ou ne pas être
Sein oder nicht sein
and a commit history with the commit history of "topic" on top of the current "master":
Up to now, we have assumed that the changes in "topic" can be auto-merged into "master". In the real world, however, it may happen that you encounter conflicts during rebase. Now, if a commit that is to be cherry-picked contains changes that conflict with changes in "master", the rebase operation is interrupted after applying the conflicting change; the conflicts are visualized in the usual way (with conflict markers) and the user gets a chance to decide whether to
If Resolve Conflicts is chosen, and the conflicts have been resolved manually, the changes must be "Added", and then rebase can be resumed, i.e. the next commit in the chain will be applied.
If Skip was chosen, the conflicting changes will be reverted and the next commit in the chain will be applied.
If Abort was chosen, the rebase operation will be completely rolled back, returning the Repository into its original state before the rebase was started. This process is repeated until the last commit was applied successfully or skipped. Finally, the "topic" branch will be changed to point to the last commit.
To understand "Skip" better, let's look back to the introduction above. If we assume that commit "B" causes some conflicts with the current "master", the user might decide to simply skip "B"; the new commit history after the rebase would then look like this:
                  A'--C' topic
                 /
    D---E---F---G master
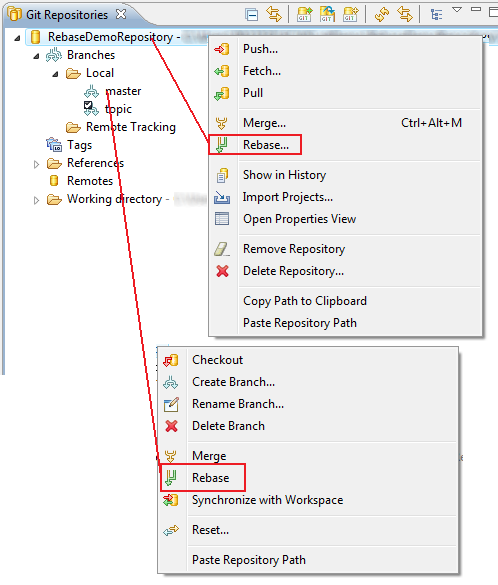
In the History View:
In the Git Repositories View: On Repository nodes, Rebase... opens a dialog asking the user to select a branch that is not checked out; the currently checked out branch will then be rebased onto the selected branch. On "Branch" nodes (both Local and Remote Tracking branches, but not on the currently checked out branch), Rebase immediately rebases the currently checked out branch onto the selected branch:
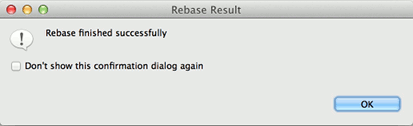
If Rebase was successful, a confirmation dialog will be displayed; this dialog can be suppressed by ticking a checkbox; a preference on the Git preference page allows to make the dialogs appear again. If the dialog is suppressed, an "Information" message is written to the Eclipse log instead.
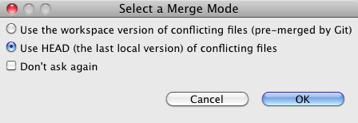
If a conflict occurs during rebase, a dialog is shown giving some information about the commit that caused the conflict. By selecting a radio button, you can decide whether to
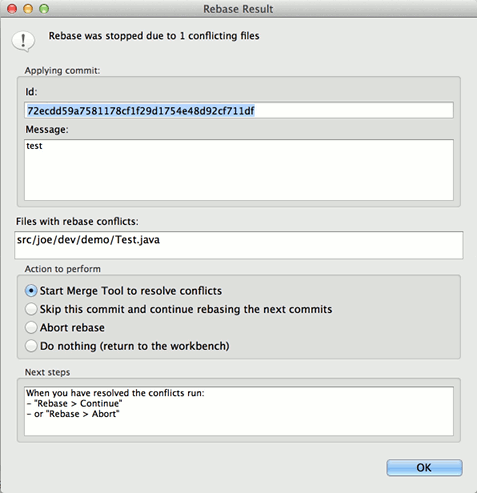
Unless Skip or Abort was chosen in the dialog, the conflicts must be resolved manually by editing the conflicting files. When done with editing, the files must be declared as being resolved by adding them to the git index.
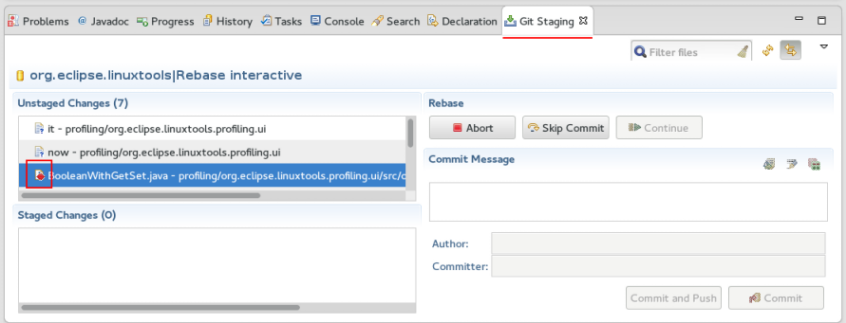
If you canceled the rebase wizard the easiest way to find the files with conflicts is using the Staging View. Click Merge Tool on the file with conflicts to open the merge tool for this file. The Merge Tool can also be started from the corresponding entry in the Team menu.
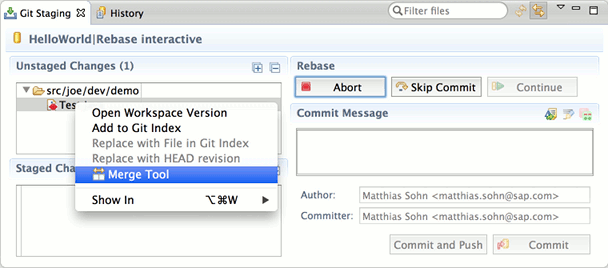
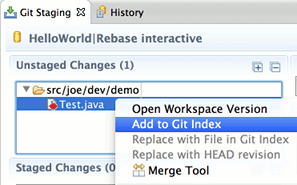
Edit the file until you are happy with the conflict resolution and click Add to Index on the corresponding entry in the Staging View. This stages the conflict resolution and marks the conflict resolved.
After all conflicts have been resolved, the Continue operation gets enabled. In order to continue the rebase operation which was stopped due to conflicts click the Continue button in the Staging View or click Rebase > Continue on the repository node in the Repositories View.

If instead of resolving conflicts you want to skip the commit which caused the conflicts click Skip instead.
If you want to abort the ongoing rebase operation click Abort. This reverts everything to the state before you started rebase.
As long as the Repository is in "Rebasing" state, the user can always abort the rebase in the Git Repositories View using the menu action "Rebase > Abort" which is available on the Repository node.
Interactive rebase allows to quickly edit a series of commits using the following actions defined in a rebase plan:
Warning: don't rewrite commits you have already published on a remote repository, it's considered a bad practice for all but experimental or review branches since your colleagues may have already based their work on these published commits and you would force them to also rewrite their changes. Though it's a tool frequently used on review branches e.g. when using Gerrit to rework changes which have to be improved based on review feedback.
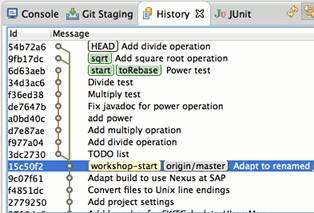
First checkout the local branch (here branch toRebase) containing the commit series you want to edit. Then open the History View for this repository and click Interactive Rebase on the commit preceding the oldest commit you want to rewrite. Often this is the one origin/master points at.
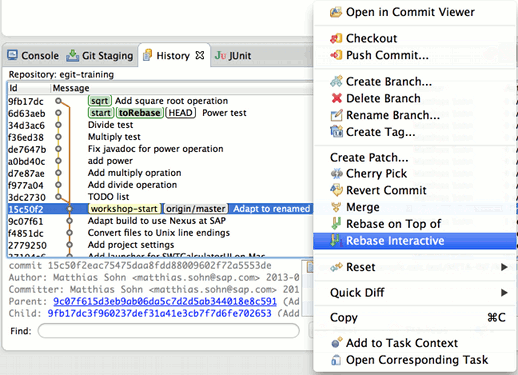
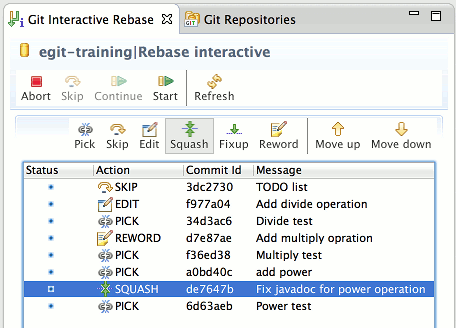
This opens the new view Git Interactive Rebase showing the rebase plan populated with the commits to be modified in topological order in the sequence they will be processed during the rebase operation. The initial action for all commits is Pick which would cherry-pick the corresponding commit. Note that EGit also rewinds HEAD to the commit preceding the first one in the edit list in order to prepare the repository for rebasing.
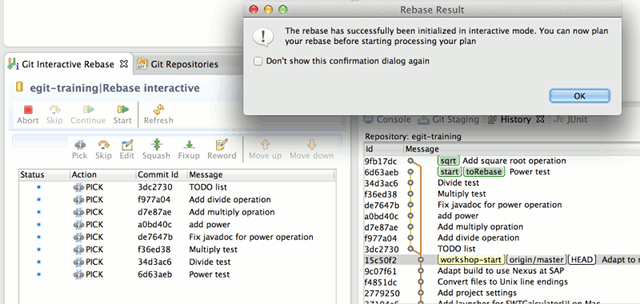
Here the initial rebase plan, the first commit to be applied on the rewound HEAD comes first and then all the other commits to be rebased in the order they will be applied when clicking "Start".

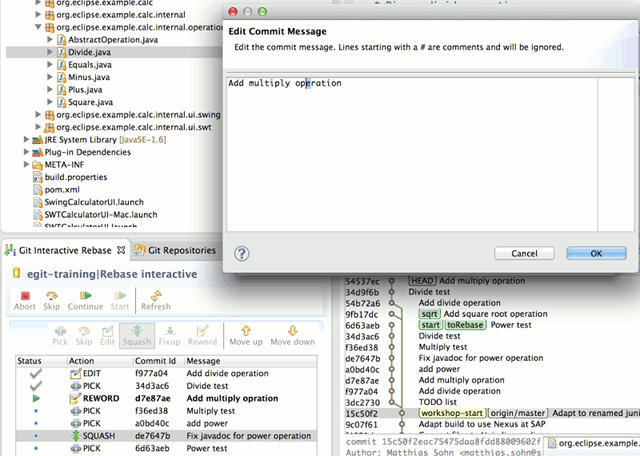
Next we prepare the rebase plan, moving commits up and down using the arrow buttons to reorder commits and choosing the rebase action we want to apply on the commits we want to tweak.
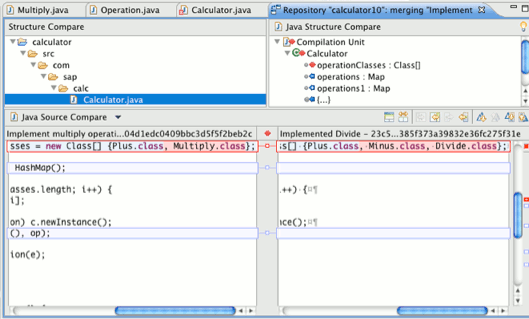
In this example I first reordered the commits so that the implementation of new calculator operations immediately precedes the commit implementing tests for the respective operation.
Here what I want to modify in this series of commits:
I want to skip commit "TODO list" since it contains a private todo list I used while implementing the operations and I don't need this anymore. I need to amend commit "Add divide operation" since it's buggy, this was revealed by the corresponding test which was implemented in a later change, hence I select action Edit here the commit "Add multiply opration" obviously has a typo in the commit message header so I choose Reword. I want to squash commit de7647b into its predecessor since it doesn't make sense to have the JavaDoc fix separate from the implementation of what it describes, hence I choose Squash to squash it with its predecessor.
When you're done planning the rebase click Start to start execution of the rebase command. EGit will process the plan and stop at the commits where you have selected actions which need your intervention to interactively edit the corresponding commit.
In our little example rebase stops the first time on commit "Add divide operation" since we signaled that we want to edit it. The last picked commit is highlighted in bold. At this time the first step skipping the commit "TODO list" was already processed and this commit is no longer in our commit series we are rewriting while executing rebase. Also the commit "Add divide operation" was already cherry-picked since we want to amend it. Note that EGit has already selected the "Amend" option in the Staging View in order to prepare amending this commit.
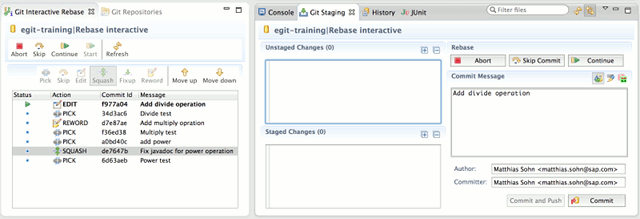
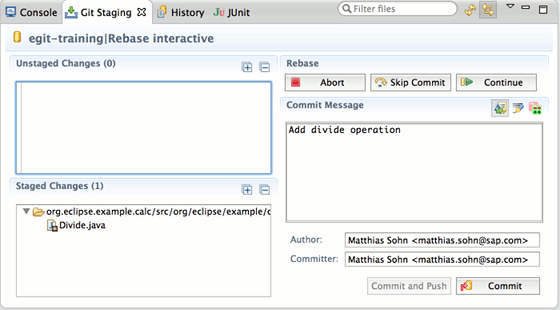
Now we fix the bug in this commit, stage the changes needed to fix the bug, adjust the commit message if necessary and click Commit in order to amend the buggy commit.
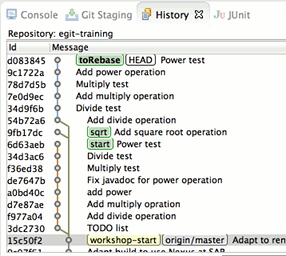
Let's have a look at the History View to see the resulting commit graph. HEAD now points at the rewritten fixed commit "Add divide operation", note that its SHA1 is different from its original version since we rewrote the commit to fix the bug.
Next we click Continue in order to resume processing the rebase plan. Rebase picks the commits "Divide test" and "Add multiply opration" and stops again raising a commit message editor so that we can fix the typo in the commit message of the latter commit.
Edit the commit message to fix the typo and click OK in order to amend the commit message and resume processing.
Rebase picks the next 3 commits, squashes the commits "add power" and "Fix javadoc for power operation" into one new commit and stops again so that we can prepare the commit message of the new commit. Its initialized with the concatenation of the messages of the commits being squashed.
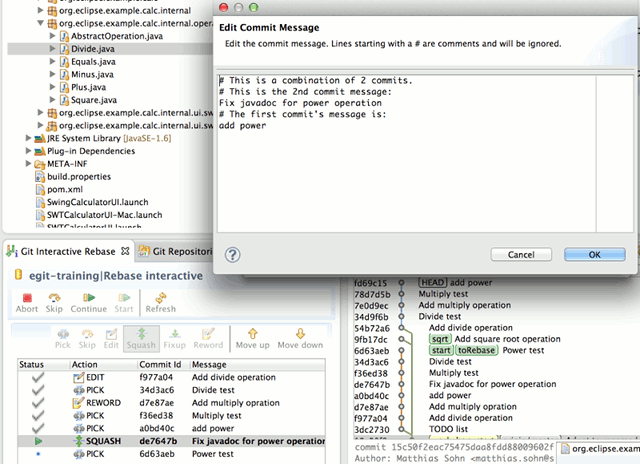
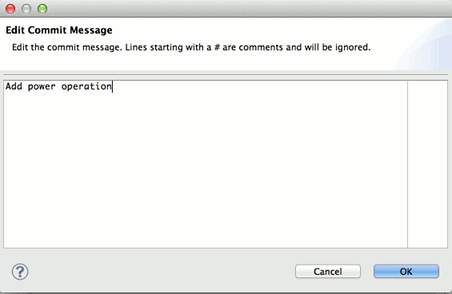
Edit the squashed commit's message and click OK to resume processing.
Rebase picks the final commit "Power test" and completes successfully.
Finally lets have another look in the History View to examine the result of the interactive rebase command. Compare the rewritten series of commits now contained in branch "toRebase" with the old commit series still visible since I have placed another local branch "start" there in order to keep the old series visible.
If you happen to go wrong during this multi-step process you can always hit Abort in order to stop the rebase operation in progress and roll back to the starting point.
When you are starting to use this feature it's maybe a good idea to place a second local branch on the starting point (as I showed in this example) to make it more obvious what's going on until you are familiar with this powerful git command.
EGit also supports the Git configuration option rebase.autostash. Set this option rebase.autostash = true to automatically create a temporary stash before a rebase operation begins, and apply it after the operation ends. This means that you can run rebase and also interactive rebase on a dirty worktree. However, use with care: the final stash application after a successful rebase might result in non-trivial conflicts.
A given commit C on branch stable-1.0 contains a set of changes you would like to integrate in your current development on branch master.
                  A--B--C--D stable-1.0
                 /
    D---E---F---G master HEAD
Cherry-pick the commit C to create a new commit C' on top of the head commit of the currently checked out branch master. C' will then contain the changes performed in C applied onto the HEAD of the currently checked out branch master.
                  A--B--C--D stable-1.0
                 /
    D---E---F---G--C' master HEAD
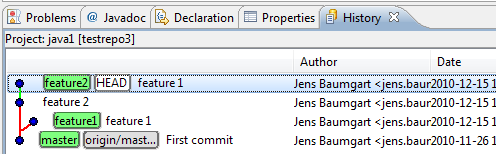
You are currently working on branch "feature2" (HEAD). There is a commit "feature 1" in another branch.
You want to integrate the changes performed by commit "feature 1" into your current development on branch "feature 2".

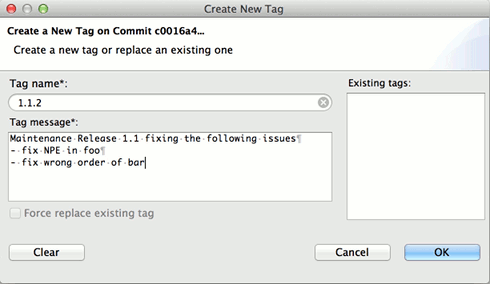
To create a lightweight tag storing neither message nor author information leave the tag message empty.
Tags can also be created from the team menu, click Team > Advanced > Tag..., enter the tag name and message, select the commit you want to tag (default is HEAD) and click OK.
What to do if you tagged the wrong commit or ended up with some sort of typo ?
So if your old tag wasn't yet pushed you may correct it in the following way :
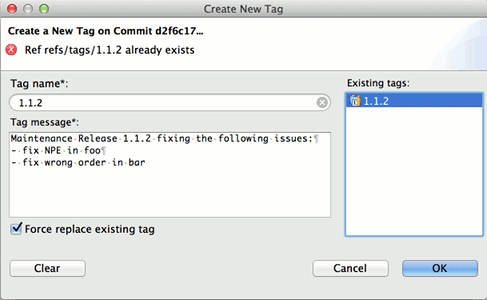
You can also change annotated tags into lightweight tags by removing the message or vice versa by adding a message.
In order to delete a tag, select the tag to be deleted and click Delete Tag.
Note: it's a bad practice to delete tags which have already been published on a public server, some Git servers even disallow tag deletion to ensure traceability for releases which are usually tagged. Also see the section "On re-tagging" in the Git reference documentation of the tag command.
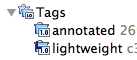
Light-weight tags are shown in the Repositories View as well as in the Create Tag dialog. Tags are shown with a blue icon in the Repositories View; annotated tags are decorated with a yellow person icon.
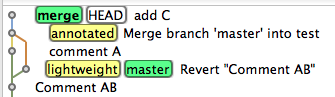
In the History View, tags are shown as yellow labels.
Signed tags are not yet supported by EGit, use command line git tag -s instead.
"A patch is a piece of software designed to fix problems with, or update a computer program or its supporting data" ( wikipedia). A patch file contains a description of changes of a set of resources which can be automatically applied to another eclipse workspace or git repository.
The patch formats used by eclipse ( Team > Apply Patch) and by git ( git apply or git am on the command line) are different. It is possible to create both types of a patch in EGit.
This is the most common use case for a distributed versioning system. A developer commits a change on a local feature or bugfix branch and wants to export this change into a patch file.
It can be done from the history view:
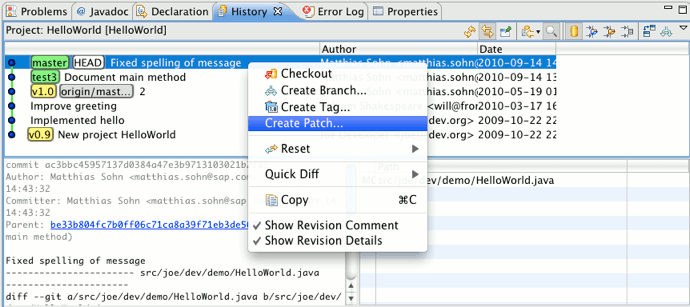
The patch file will contain the difference between the commit and its parent in the history view. Note that the filter of the history view applies also for patch creation.
The Wizard consists of two pages. Page one lets you select the location of the patch:
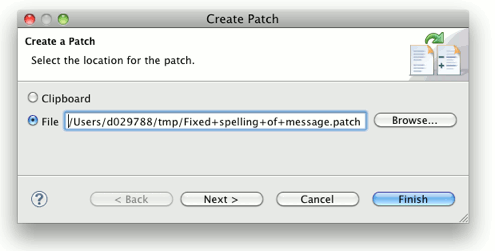
The name of the patch file is created from the first line of the commit message.
On the second page you can change the patch format.
Currently there is one check box: Export in git patch format.
Binary diffs are currently not produced.
Currently EGit isn't able to apply patches in git format. It is possible to apply patches using the standard Eclipse (unified diff) format using Team > Apply Patch.... Git patches may contain non-standard extensions for rename and binary diffs. The current version of EGit does not generate these extensions.
The "Git Repositories View" is the primary UI element to facilitate working with multiple Repositories simultaneously (i.e. within one Eclipse Workspace).
This view can be opened using the menu path
Window > Show View > Other... > Git > Git Repositories
It is also part of the "Git Repository Exploring" perspective available using menu path
Window > Open Perspective > Other... > Git Repository Exploring
If you already have projects in your workspace which are shared with a Git Repository, you can use
Team > Show in Repositories View
on any resource to open the view.
Initially, the Git Repositories View is empty. In order to add Repositories to it, there are several options:
You can add a Repository from your local file system to the Git Repositories View without cloning it. This can be helpful if you are setting up a new Eclipse workspace and want to re-use your Git Repositories. Use the Add an existing Git Repository button from the view's toolbar:

A dialog will appear prompting you for a directory of your local file system. After selecting the correct directory, you can hit the Search button to see a list of Git Repositories in this directory. You can then select some or all found Repositories and add them to the view using OK:
In order to clone a Repository, refer to Cloning remote Repositories. After a successful clone operation, the newly cloned Repository should appear in the Git Repositories View automatically.
You can also use the Clone a Git Repository button from the view's toolbar to start the Clone wizard:

Please refer to Cloning remote Repositories about how to use the wizard.
You can create a new, empty repository on the local file system. This is useful if you later on want to create one or more new projects below this repository. Another usecase is to create a new bare repository where you can push to. Use the Create a new Git Repository button from the view's toolbar:

A dialog will appear which lets you choose a directory:
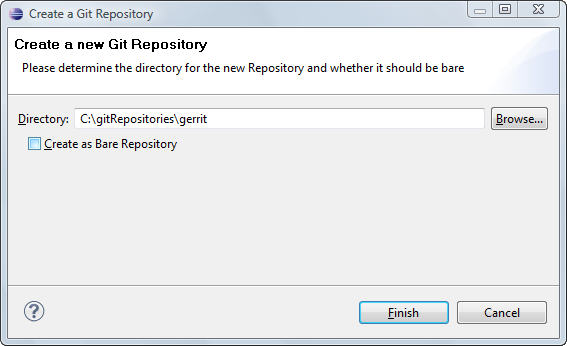
If you select the checkbox Create as Bare Repository the new repository will not have a working directory. You then can only add content by pushing changes from another repository.
As a shortcut, it is also possible to paste the local file system path of a Git repository from the clipboard into this view. In order to do so, copy the path of a Git repository (the full path of its .git folder) to the clipboard, then open the context menu on the view panel:
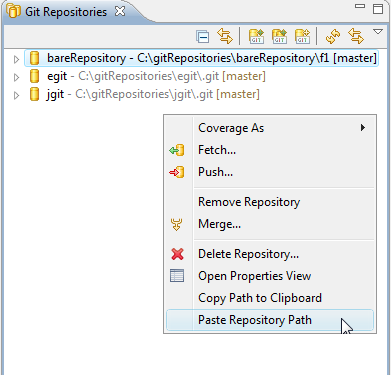
or click Edit > Paste from the main menu (or the corresponding keyboard shortcut). If the clipboard content is not suitable, an error popup will be displayed, otherwise the added Repository should appear automatically.
After the view has been populated with some repositories, it should look like this:

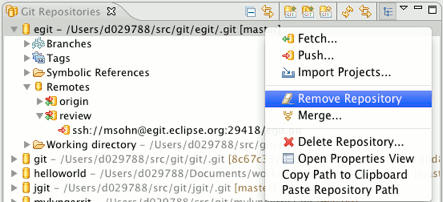
In order to remove a repository from the Repositories View select a repository and click "Remove Repository"
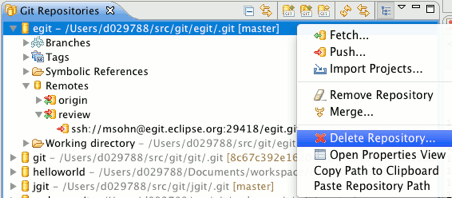
In order to delete a repository, select it in the Repositories View and click "Delete Repository".
Then confirm that you want to delete the repository and decide if you want to delete the repository's working directory with the projects contained in the repository from the Eclipse workspace.
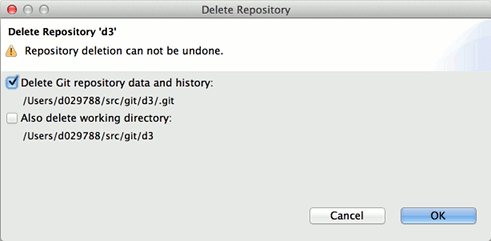
Attention: deleting the working tree (second checkbox) along with the repository (the .git directory; first checkbox) of course removes everything contained in that working tree directory. This includes Eclipse projects that were ever shared (see
Adding a project to version control) with that git repository, even if later disconnected (
Team→Disconnect)! Sharing a project copies it into the git working tree; disconnecting it does
not
copy it back.
The following screenshot shows the topmost two levels of the Git Repositories View:
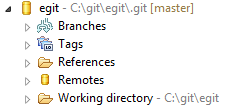
The root node represents the Repository itself. The node text indicates the name of the Repository and its location in the local file system. The "Branches" and "Tags" nodes allow browsing and manipulation of tags and branches. The "References" node lists other references which are not branches or tags, most notably the "HEAD" and "FETCH_HEAD" symbolic references (see Git References).
The "Working Directory" node displays the location and structure of the working directory on the local file system (only in case of a development, or non-bare Repository, for bare Repositories, this node is always a leaf).
Finally, the "Remotes" node allows browsing and manipulating the remote configurations used for Fetch and Push.
The repositories shown in the Git Repositories View can also be organized into groups. Groups are like logical folders; they are a purely visual structuring aid: moving a repository into or out of a group does not move the repository on disk. A group does not have a folder on the disk.
Repository groups can be created via the context menu, sub-menu "Repository Groups", or via the view menu, entry "Create Repository Group...". Repositories can be moved into or between groups by drag'n'drop or via the context menu. Dragging a repository from a group into the white unused area of the view moves the repository out of the group, back to top-level. Groups can be renamed or deleted via the context menu. Deleting a group never deletes the repositories contained, those just go back to the top level. Nested groups are not supported.
In order to work with the contents of a Git Repository, its files and folders must be imported into the Eclipse workspace in the form of projects. While the Git Clone wizard allows to do such imports directly after cloning, the Git Repositories View allows to trigger project imports independently of the clone operation.
The "Import Projects..." context menu is available on the "Repository" node as well as on any "Folder" node within the "Working Directory" node and the "Working Directory" node itself:
The rationale for offering the Import Projects... action on several nodes is that some of the wizards used for importing projects can take the file system directory into account, for example the Import Existing Projects wizard. If the import is started from the "Repository" or the "Working Directory" node, the working directory of the repository is set as context, otherwise the directory corresponding to the currently selected "Folder" node.
The details of project import are discussed in Use the New Projects Wizard.
The "Branches" node allows to create, browse, checkout and delete local and remote branches. The "Tags" node allows to browse and check out tags. Both the "Branches" node and the "Tags" node allow to merge the branch or tag into the currently checked out branch and also to synchronize with the currently checked out branch.
For better readability, branches are organized in two sub-nodes for local and remote branches, respectively, and only the shortened names are displayed, e.g. instead of "refs/heads/master" you would find an entry "master" under the "Local Branches" node, instead of "refs/remotes/origin/master" the shortened name "origin/master" is displayed under the "Remote Branches" node. Similarly, tag names are shortened by omitting the "refs/tags/" prefix:
Branches and tags can be checked out by either double-clicking on the respective node or by selecting the corresponding context menu entry.
Local branches can be created using the Branch Creation Dialog. The wizard is opened by right-clicking on the "Branches", the "Local Branches" on any "Branch" and "Tag" node).
Branch deletion is done using the corresponding context menu entry.
You can trigger rebasing of the currently checked-out branch onto another branch by right-clicking Rebase on any (local or remote tracking) branch node.
You can trigger a merge from any branch and tag node and from the repository node if you have checked out a local branch. See Merging for further details of the merging features.
You can perform a comparison of the changes in your HEAD with the changes done in any other branch or tag. Right click and select Synchronize... on any branch or tag. Then the eclipse synchronize view opens which contains a representation of the changes that are contained in your HEAD but not on the other branch or tag (outgoing change) or vice versa (incoming change). Please refer to the documentation of the synchronize feature for further details.
There are two ways to determine which branch or tag is currently checked out: the checked out branch/tag node is decorated with a little check mark and the "HEAD" entry under the "Symbolic References" node shows the (full) name of the checked out branch:
Right click and select Reset... on any branch or tag. This opens a dialog which lets you decide on the reset type. See Resetting you current HEAD for further details.
If HEAD is "detached", i.e. is not pointing to the tip of a local branch but to a commit or tag, then none or several "checked-out" markers may appear in the tree, since any number of remote branch or tags may point to the currently checked out commit. The state you are in while your HEAD is detached is not recorded by any branch (which is natural --- you are not on any branch).
The References node displays some References other than branches and tags (the list is dynamic and depends on the current state of the Repository):
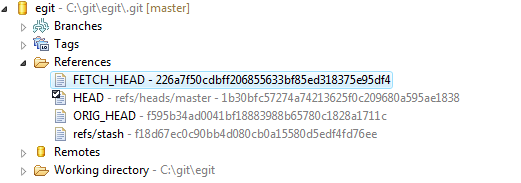
If the Reference is symbolic, i.e. points to another Reference, the name of the target reference is shown, followed by the object ID of the reference's target. If the Reference is not symbolic, only the object ID is shown.
In the example above, HEAD is a symbolic Reference pointing to branch "refs/heads/master" (i.e. branch "master" is checked out", while FETCH_HEAD points directly to commit 226a7f... .
The following actions are available on right-clicking on a Reference: Checkout (unless the Reference is already checked out) and Create Branch ... .
The "Working Directory" node visualizes the local file system structure of the Git Repository. It is also possible to open a text editor on the files:
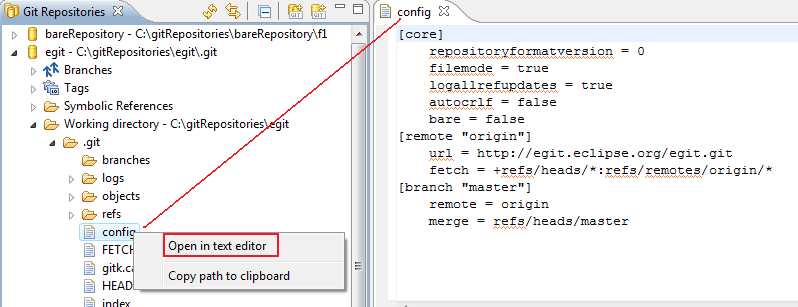
Alternatively, files can be opened by dragging them from the Working Directory to the Editor Area.
Also, on all file and folder nodes as well as on the "Repository" node, an option is offered to copy the (file-system specific) path to the clipboard. This is sometimes useful when the path is needed, for example to open a directory using a file browser or to copy and paste Repositories between view instances (see above about how to add Repositories to the view). The Copy to Clipboard action is also available using Edit > Copy (or the corresponding keyboard shortcut).
Integration with the generic "Properties" view in Eclipse allows to view and edit the Git Configuration (global and repository-specific configuration). If the "Properties" view is open, it is updated automatically when a "Repository" node is selected. With a drop down box (left red box in the screen shot) you can switch between the display of the Repository Configuration, the Global Configuration and a view which aggregates both. If the view displays the Repository Configuration or the Global Configuration you can open an editor dialog with the Edit button (right red box in the screen shot). The editor dialog has the same functionality as the preference page Team > Git > Configuration.
In the Git Repositories view, there is a Properties action in the context menu, which will open a configuration dialog allowing to edit the Repository Configuration. Here, key value pairs can be added, changed or deleted. The Open button allows to open the Repository Configuration file in a text editor.
The "Remotes" node allows for browsing and editing Remote configurations. Each Remote configuration has a name and either a Push Specification, a Fetch Specification, or both. If a "Remote Configuration" node or any of its children is selected, the Properties view will show a summary of the Remote configuration. In this example: there is a Remote configuration named "origin" which only has a Fetch Specification, but no Push Specification:

Menu actions are provided to add, configure, and remove Remote configurations and Fetch and Push Specifications.
It is possible to execute fetch and push directly (i.e. without a wizard) on the remote node as well as on the respective "Fetch" and "Push" nodes:
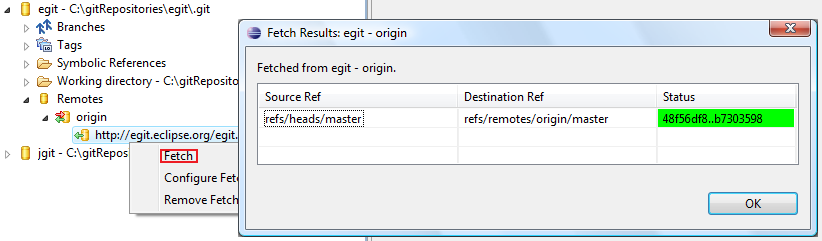
Note that the fetch or push operation will be executed immediately in an asynchronous job; on completion you will get a confirmation pop-up displaying the fetch result.
The "Fetch" node contains a so called fetch specification and the "Push" node contains a so called push specification.
A default fetch specification is created when the repository is cloned. You can edit the fetch specification with the menu entry Configure Fetch.... This opens a wizard. On the first page you can edit the Fetch URI. Ob the second page you can determine the fetch ref specifications, see Fetch Ref Specifications.
You can create or edit a push specification with the menu entry Configure Push.... This opens a wizard. On the first page you can edit the Push URIs. If a fetch is specified the fetch URI is automatically included into the push specification and no additional Push URI is needed. On the second page you can determine the push ref specifications, see Push Ref Specifications.
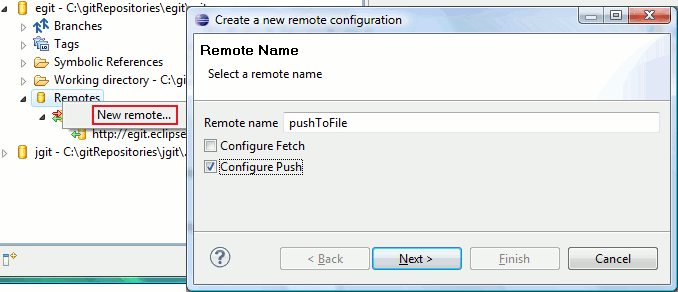
This is done using a context menu action on the "Remotes" node. A wizard is started asking for the name of the new configuration and whether to configure Fetch, Push, or both:
If the Configure Fetch checkbox was selected, the next wizard page will ask for the URI of the Repository to fetch from:
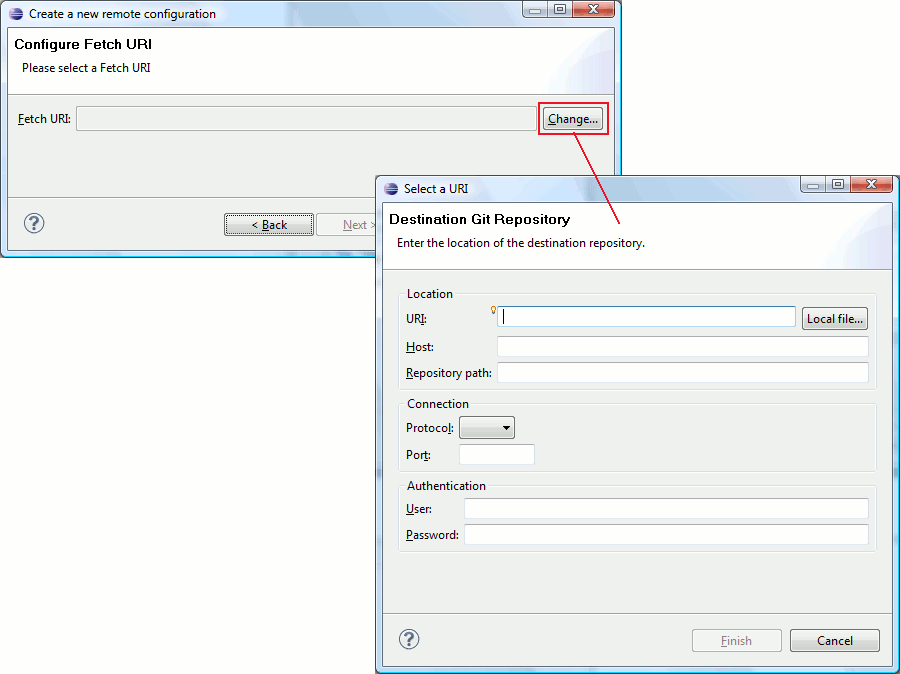
Click Change... to open a dialog that allows you to select a URI. The next step is to define the Remote Specification for the fetch URI. See Fetch Ref Specifications about the details.
If the Configure Push checkbox was selected, the next wizard page will ask for the URIs of the repositories to push to. This is actually a list, as you can push to multiple repositories at once. Click Add.... to add URIs to the list using the same dialog as above. You can remove URIs by marking them in the list and hitting Remove. This step is completely optional if there is already a fetch URI defined. In this case, the fetch URI will also be used for push. If at least one push URI is defined in this steps, it will override the fetch URI. In this example, there is already a fetch URI, so the Next button is enabled, even though there is no Push URI in the list:
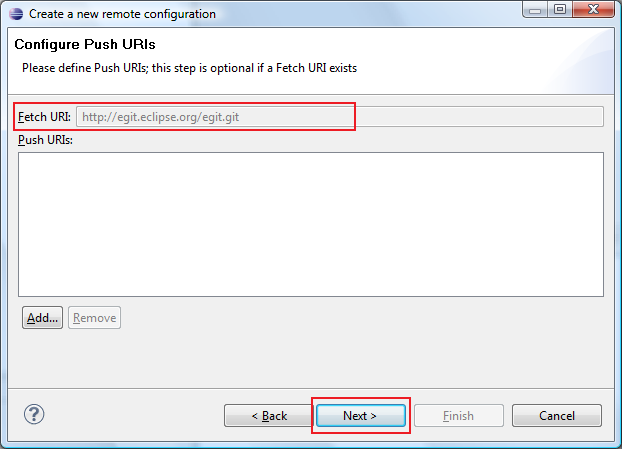
The next step is to define the Remote Specification for the push URIs. See Push Ref Specifications about the details.
Upon completion, the new Remote configuration will be visible:
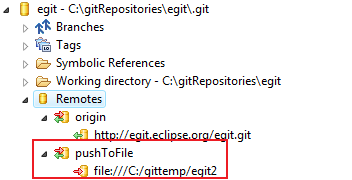
It is also possible to add, remove, or change Fetch/Push Specifications for an existing Remote configuration using the context menu.
If you work with Gerrit Code Review as remote repository server you can
Select Gerrit Configuration... from the context menu of a Remote. This opens a wizard with one page:
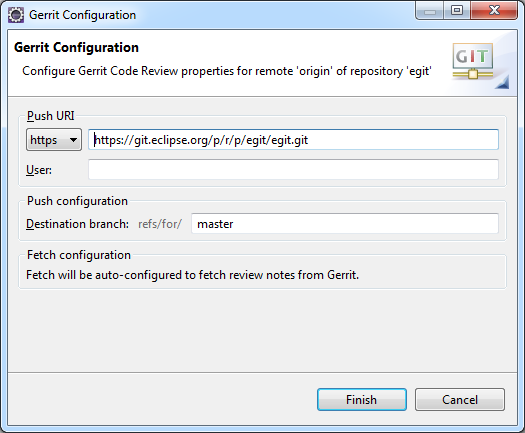
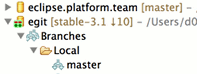
The view is auto-refreshed periodically. The Refresh button in the toolbar allows to trigger an immediate refresh:

If the Link with selection toggle is enabled, the file or folder corresponding to the current workbench selection will be displayed automatically:

If the Link with editor toggle is enabled, the file or folder corresponding to the currently active editor will be displayed automatically:

If the Hierarchical Branch Layout toggle is enabled, branches will be shown in a hierarchical layout using slash (/) as hierarchy separator:

This can be helpful for organizing large numbers of branches.
"Bare" Git Repositories (as opposed to "development" or "standard" Repositories) have no working directory by definition, so all actions related to the working directory (check-out, project import, browsing the working directory) are not available for such Repositories. The "Bare-ness" of a Repository is visualized on the "Working Directory" node, which is always a leaf:
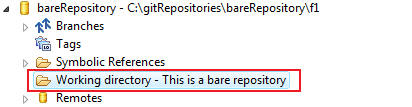
Bare repositories are only changed by pushing changes to them.
This is offered as a menu action on the "Repository" node. Note that this does not delete the Repository, but just removes the node from the view. If there are projects in the workspace which are located in the working directory of the Repository, the user will be prompted to confirm deletion of these projects from the Eclipse workspace.
The command Show in > History will open the History View showing all changes in the selected repository.
The command Show in > Reflog will open the Git Reflog view showing the Git reflog of the selected repository.
The command Show in > Properties will open the Properties view showing the properties of the selected repository.
The EGit integration with Mylyn was moved to Mylyn in Eclipse 2023-06. See mylyn.egit.
The Egit commit viewer allows commits to be opened in the Eclipse editor area.
The EGit commit viewer displays the following commit information:
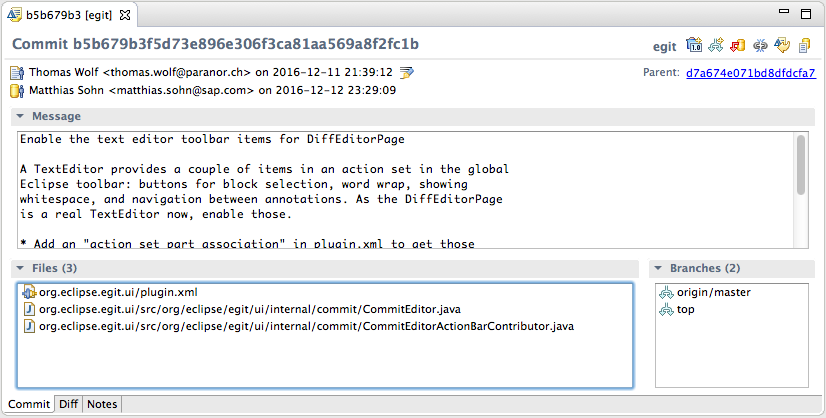
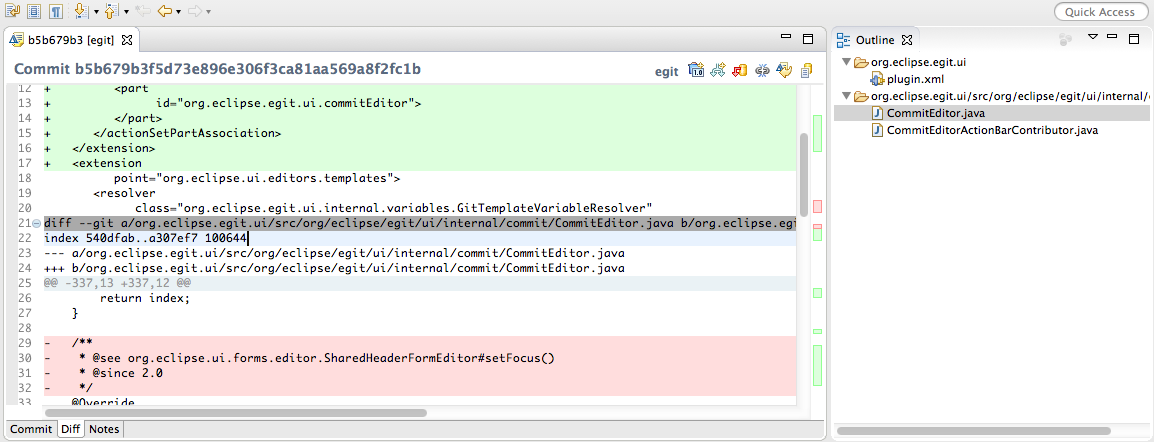
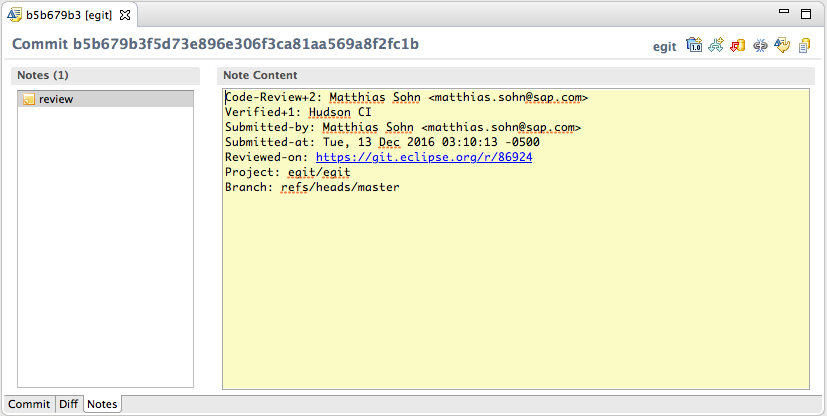
This checks out the commit displayed in the commit viewer. The commit will be checked out and HEAD will become detached.
Applies the change introduced by the commit displayed in the commit viewer on top of the currently checked out commit or branch.
The commit viewer can be opened from the following places:
EGit supports searching for commits.
Commits can be searched from the Git Search tab in the standard Eclipse Search dialog.
This dialog supports searching for text or patterns present in the different fields of a Git commit such as the message, author line, committer line, and the SHA-1 ids of the commit, its parent(s), and the tree associated with it.
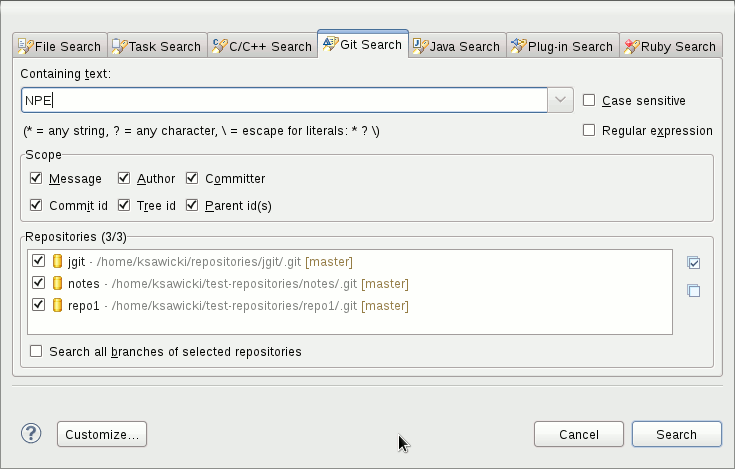
Commit search results are displayed in the standard Eclipse Search view. Results are grouped by repository when in Tree mode. Double-clicking a commit from the Search view will open it in the commit viewer.
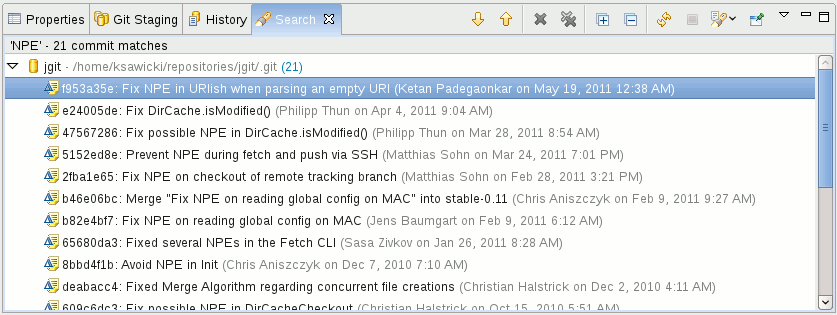
The Git Search page can be opened by selecting the Git Search option from the Search drop-down on the Eclipse toolbar.
EGit has an Open Git Commit dialog similar to the Mylyn Open Task and core' Open Resource' dialogs. The dialog searches every configured Git repository for the branch, tag, or commit SHA-1 entered into the filter box and displays the matching commits.
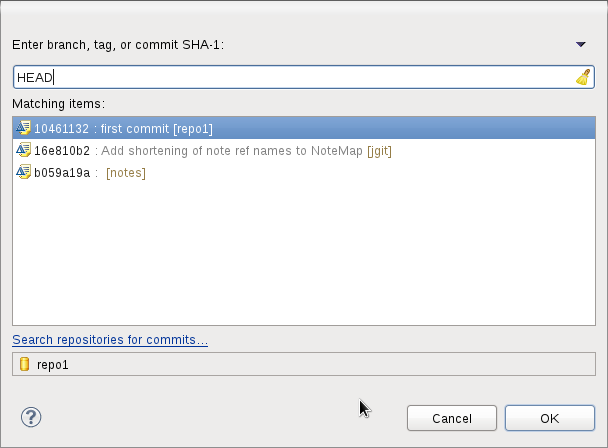
The dialog can be opened by selecting the Open Git Commit button on the Eclipse navigation toolbar.
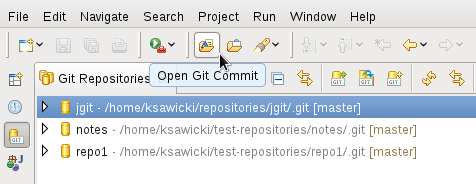
EGit supports showing git blame information inside the editor ruler.
Selecting the Team > Show Revision Information action on file selections will open the editor and display an annotation ruler with commit and author information for each line in a file. Hovering over the ruler will display a pop-up showing the commit id, author, committer, commit message and the diff applied by this commit on the selected hunk.
The look and feel of the blame annotation editor ruler can be configured from the Revisions sub-menu available from the ruler context-menu.
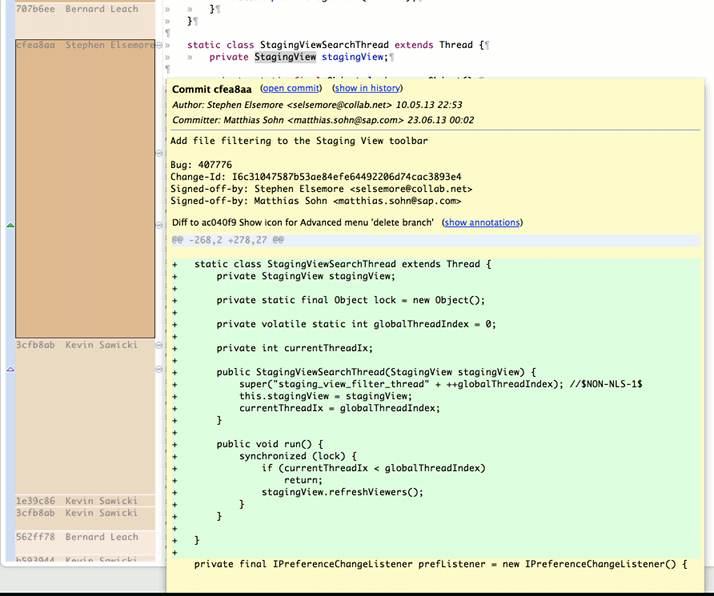
Click open commit to open the commit in the commit viewer, click show in history to show the commit in the History View. Click show annotations to show annotations of the parent commit of the commit shown in the hover.
You can read more about what Git submodules are and how they work in this Git Community Book chapter.
Submodules are repositories nested inside a parent repository. Therefore when doing a clone of a parent repository it is necessary to clone the submodule repositories so that the files/folders are available in the parent repository's working directory.
Checking the Clone Submodules button from the Git Clone wizard will clone all submodule repositories after the clone of the parent repository finishes.
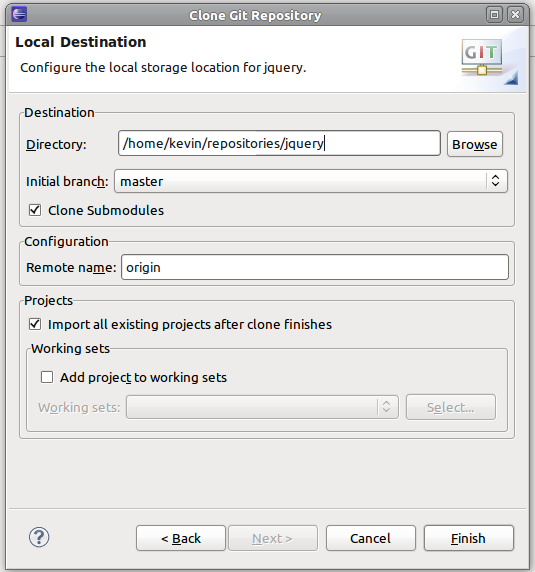
There is a Submodules node displayed in the Git Repositories view for repository's that contain submodules.
All submodules in the given parent repository are displayed under this node as well as information about what commit is currently checked out.
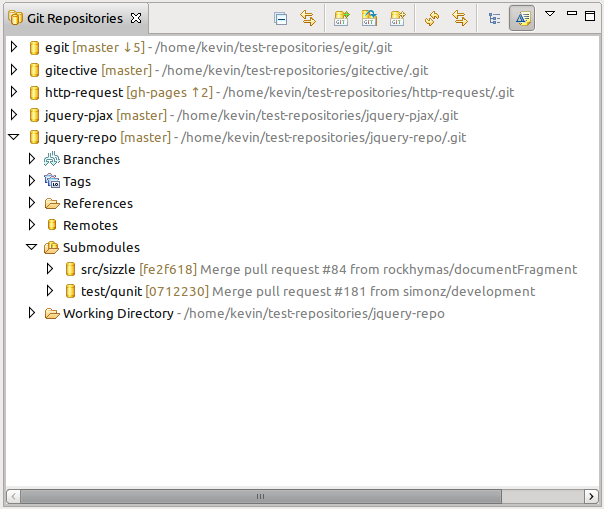
You can add a new submodule to a repository by selecting a repository in the Git Repositories view and selecting the Add Submodule context menu option.
The wizard will prompt for the path and URL of the submodule being added. The path entered will be relative to the parent repository's working directory and the URL will be used to clone the repository locally.
Once the wizard is completed the submodule will be cloned, added to the index, and the submodule will be registered in the .gitmodules file as well as in the parent repository's .git/config file.
There are two actions that can be used to update submodules, Update Submodule and Sync Submodule.
Selecting the Update Submodule action on a submodule will check out the commit referenced in the parent repository's index for that submodule. This command will also perform a merge or rebase if that has been configured in the update field for the selected submodule's configuration section in the parent repository's .git/config file.
Selecting the Sync Submodule action on a submodule will update the remote URL used by the submodule from the current value in the .gitmodules file at the root of the working directory of the parent repository.
Team project sets (.psf files) are supported by the Git team provider.
To import an existing project set, use the Import... wizard and then select Team Project Set from Team.
You can then select a file which contains the import definitions and optionally choose to add imported projects to a working set.
In the next step, the repositories are cloned, the projects imported and connected. This can take a while depending on the size of the repositories.
To create a project set file for existing Git projects, select the projects/working sets which are already connected to the Git team provider.
Then open the Export... wizard and select Team Project Set from Team. There you can choose to export working sets or projects only and can refine your selection. In the next step, select an output path and finish the wizard.
You can also manually edit a .psf file. Each project has an entry which looks like this:
<project reference="1.0,git://egit.eclipse.org/egit.git,master,org.eclipse.egit"/>
The values are separated by commas and have the following meaning:
Each project has one entry. So for multiple projects in the same repository, create such an entry for each project with the same repository URL. The import is smart enough to only clone each repository once.
If the repository contains a project at the root, use . as the project path.
Partial support for GIT LFS is included in EGit when the optional JGit LFS support bundle "Java implementation of Git - optional LFS support" is installed. This support works best when using the SSH protocol with a capable LFS remote (i.e. GitHub or Gerrit with LFS plugin).
To enable usage of EGit's LFS support, either enable it globally (for the current user) by pressing the "Enable LFS support globally" button:
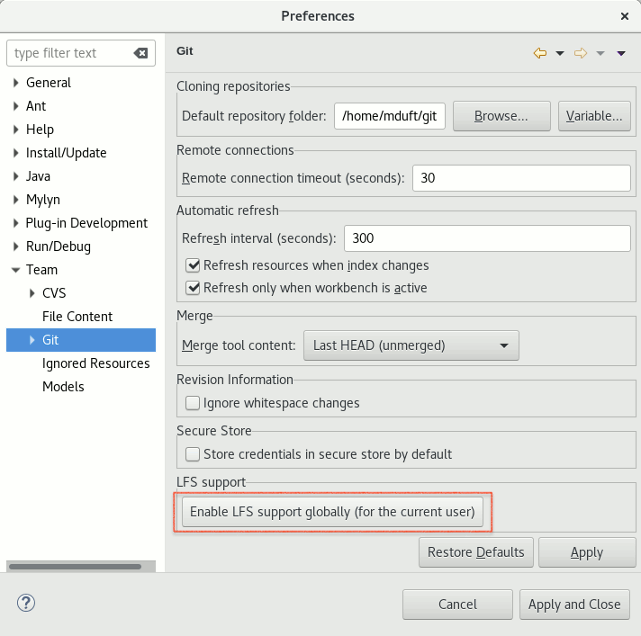
... or configure Eclipse to automatically make sure the LFS support is enabled whenever Eclipse starts up. Check the "Automatically configure LFS..." checkbox:

... or - to enable builtin LFS support only for a single repository - right click a repository and select "Enable LFS locally"
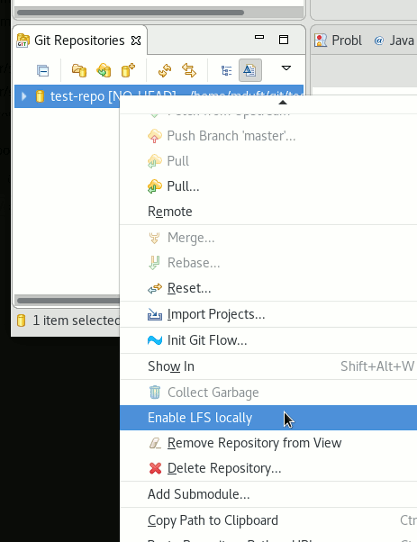
Note that if the JGit LFS support has not been installed some actions are disabled. If LFS support is already enabled in a more global scope the "Enable LFS locally" action is not displayed.
Once LFS support is enable directly or indirectly for a repository, you can work as usual with files, more specifically these use cases should work:
|
|

|
|
| Concepts | Reference |