
Model RealTime supports three compilers out of the box:
Although these are popular compilers, they are by no means the only compilers you can use with Model RealTime. In fact, it's easy to configure Model RealTime to use any C++ compiler you like.
In this post we will look at how to use Clang which is a popular open source C++ compiler. (To be more accurate, Clang is a compiler frontend using LLVM as the backend). Clang comes in two flavors, one that is compatible with GCC, and one that is compatible with Visual Studio. So if you today use GCC on Linux or Visual Studio on Windows you can just replace your compiler with Clang. Let's look at the steps required for building an Model RealTime application with Clang instead of Visual Studio.
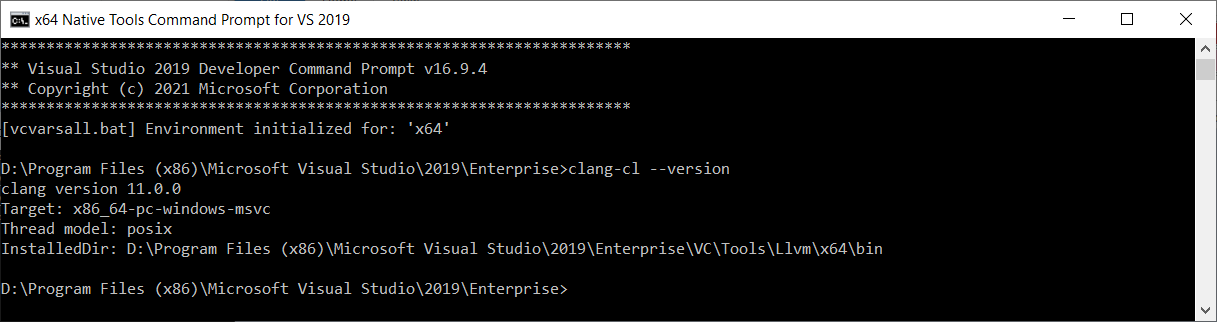
First, we obviously need to install Clang. The easiest way to install Clang for Windows is to download Visual Studio 2019. Its installer contains an option for installing everything you need for using Clang on Windows.

Once the installation has completed, open a Visual Studio 2019 command prompt (you should have a shortcut to it in your Start menu). Make sure Clang is available by typing clang-cl --version ("clang-cl" is a command-line driver for Clang that is compatible with the Visual Studio "cl" compiler).
Next, start an instance of Model RealTime from this command prompt and open the model that you want to build with Clang.
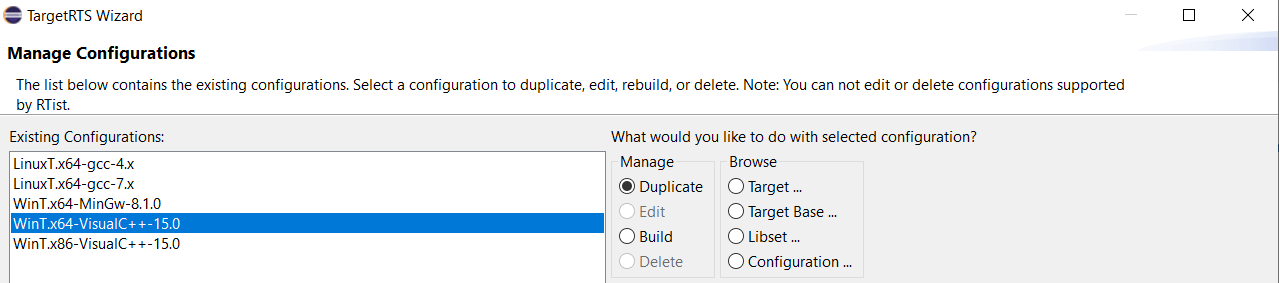
Before we can build the model we need to create a new target configuration and build the TargetRTS with Clang. Perform the command Libraries - TargetRTS Wizard. On the first wizard page make sure the TargetRTS path points at a location where you want to create the new Clang target configuration. By default it's pointing at the target configuration folder in the Model RealTime installation. If you don't want to modify the installation you can first copy this folder to another place. Click Next.
On the second wizard page select to duplicate the Visual Studio 64 bit target configuration. Since Clang for Windows is command-line compatible with the Visual Studio compiler, we will use that target configuration as a starting point for creating our Clang target configuration.
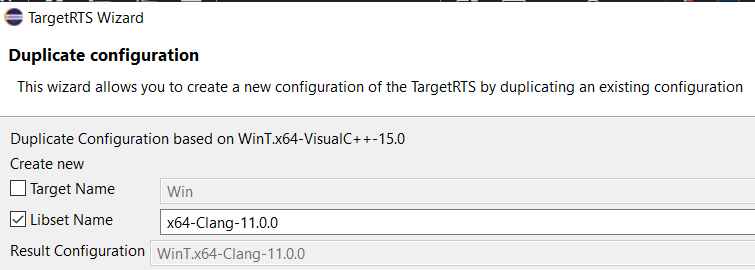
Click Next to arrive at the third wizard page. Here we need to give a name to our new target configuration. To follow the usual naming conventions, just update the Libset Name to specify the compiler name and version:
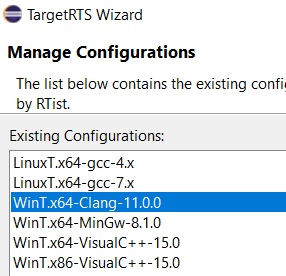
Click Finish to create the new target configuration. You should now see it in the list of target configurations.
We must now update a few of the configuration files to replace "cl" with "clang-cl". Use the radio buttons in the Browse group to edit the following files (double-click on the files to edit them):
$preprocessor = "clang-cl /nologo /EP /P";
CC = clang-cl
Optionally we can also update the LD and/or AR_CMD commands in libset.mk. LD specifies the link command and if you want to use the LLVM linker instead of the default Microsoft link.exe tool, update the LD command like this:
LD = $(PERL) "$(RTS_HOME)/libset/$(LIBRARY_SET)/ld.pl" lld-link
AR_CMD specifies the archive command (the command for creating libraries from object files) and if you want to use the LLVM library tool instead of the default Microsoft lib.exe tool, update the AR_CMD like this:
AR_CMD = $(PERL) "$(RTS_HOME)/tools/ar.pl" -create=llvm-lib,/nologo -output=/out: -add=llvm-lib,/nologo -input -suffix=$(OBJ_EXT) -limit=4000
Finally, select the Build radio button in the Manage group and click Next. Select "nmake" as make command and press Finish to start the build.
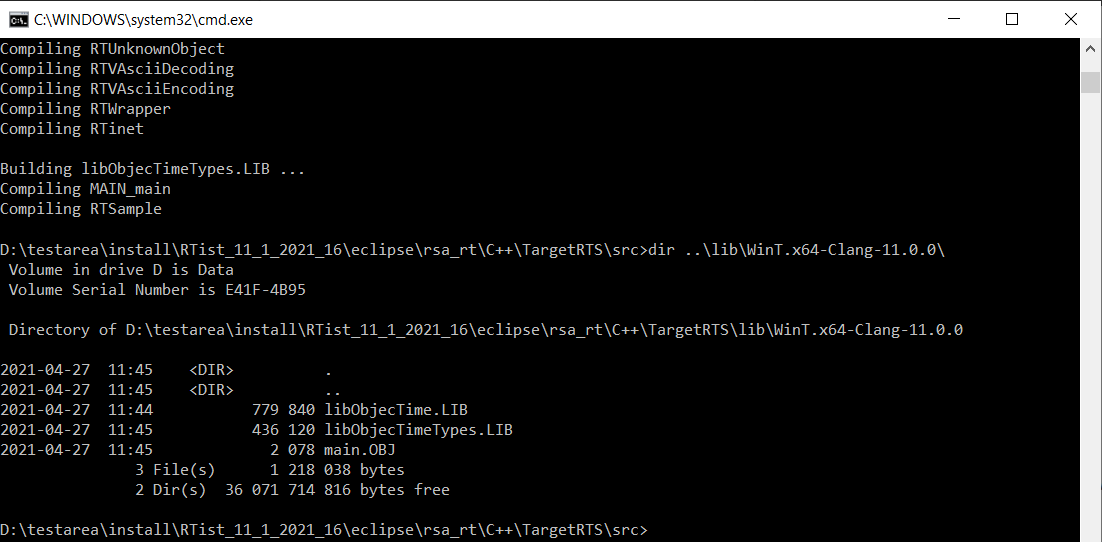
All TargetRTS files will now be compiled with Clang. You may see some new warnings that the Visual Studio compiler doesn't print, but all files should compile successfully.
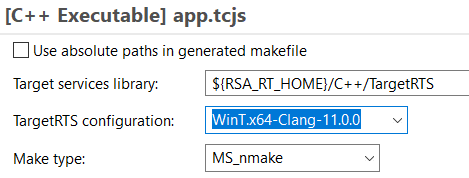
Now it's time to use the new target configuration. Open the TC of your model and set the Target Configuration property to the new Clang target configuration.
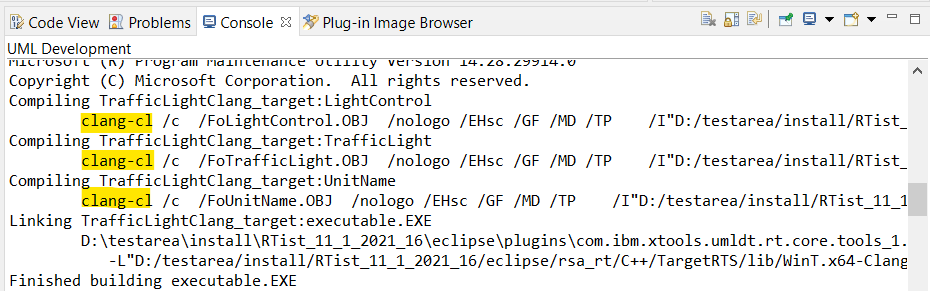
You can also remove "-s" from the Make Arguments property so you can see that Clang really is used when you build the TC.
To summarize, switching from compiling your realtime application with Visual Studio to Clang is straightforward thanks to the "clang-cl" compiler driver. If you today use GCC or MinGW and want to switch to Clang you would follow similar steps, but instead use "clang" as your compiler driver.