You can create unit tests for a capsule using the Mocha framework (Mocha is a popular JavaScript unit testing framework that makes testing of asynchronous applications easy). This article describes how to create tests for capsules using it.
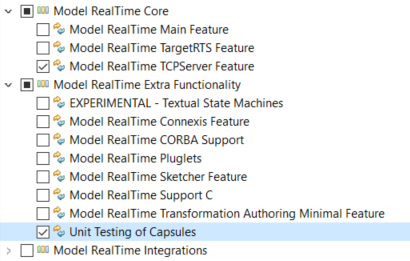
The Unit Testing of Capsules feature is located in the Model RealTime Extra Functionality category and you need to choose this feature during the installation of Model RealTime.
The feature requires a JavaScript development environment for running and debugging unit tests. There are many such environments to choose between, and it's not required to use an Eclipse-based environment. For example, Visual Studio Code is a popular development environment with excellent support for JavaScript.
Capsule unit testing is based on TCP communication between two applications (one Node.js application containing the unit test and one C++ application containing the "capsule under test"). Therefore the Model RealTime TCPServer Feature is also a prerequisite (it's located in the Model RealTime Core category when installing - see picture above). Currently the TCPServer library is only available for the "WinT.x64-VisualC++-17.0" and "LinuxT.x64-gcc-12.x" target configurations. For other target configurations you have to build the TcpServer library manually and then set it as a prerequisite in the test driver TC. Learn more about the TCPServer library here.
For writing test cases you need to have a basic understanding of the JavaScript language and the Mocha test framework.
The picture below shows how capsule unit testing works:

To the left we see the Node.js test application which is run by Mocha. It contains the unit test and uses an rt-test-probe library which provides a JavaScript API for testing RT applications. For example, this API lets you send events to a port on the capsule under test, or to set up expectations on what events that should arrive on such a port. The source code for this library is available on GitHub and you are welcome to extend it to cover your testing needs.
To the right we see the C++ test driver application that is built by Model RealTime. It contains the capsule under test, as well as two other capsules needed for driving the test (based on events received from the test application):
The Unit Testing of Capsules feature will generate the test driver application fully, while it will only generate the test application partly, since you need to manually implement the Mocha test case.
To create a unit test for a capsule right-click on the capsule in the Project Explorer and choose the command Add Unit Test… in the context menu. A dialog for creating the unit test will appear. Enter the necessary details for your unit test in the dialog and click Finish. This will create a test driver package in the package that contains the selected capsule. This package contains the full implementation of the test driver application. A skeleton unit test will be added as a JavaScript file in your model project. You may need to move it to a different location depending on which JavaScript development environment you are using.
The Add Unit Test dialog contains four groups as shown below.
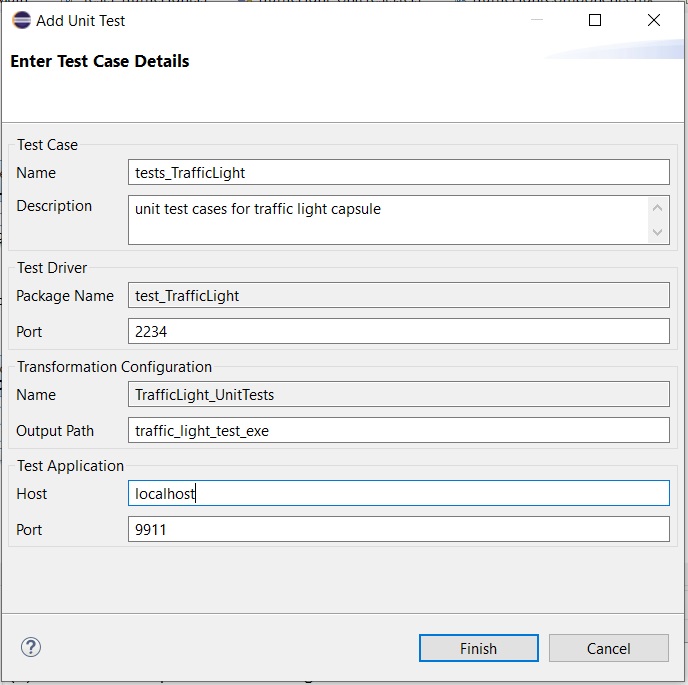
In the Test Case group write the name and a description of the unit test. A JavaScript file with the given name which contains a skeleton Mocha test case will be created.
The Test Driver group specifies the name of the package where the capsules for the test driver application will be generated. It also specifies the TCP port which the test driver executable will connect to for receiving events from the test application.
The Transformation Configuration group allows to specify the name of a TC which will be created for building the test driver application. It also specifies the workspace output path for that TC.
Finally there is the Test Application group where you can specify the host name and TCP port which the test application will connect to for receiving events from the test driver application. Note that the test driver can run remotely (for example on the target), which is why the hostname can be specified.
The Add Unit Test dialog creates a skeleton Mocha test case as a JavaScript file in the model project. The test case will connect to and then communicate with the test driver executable. For example, it can send or invoke events into the capsule under test and ensure that expected events are received from it.
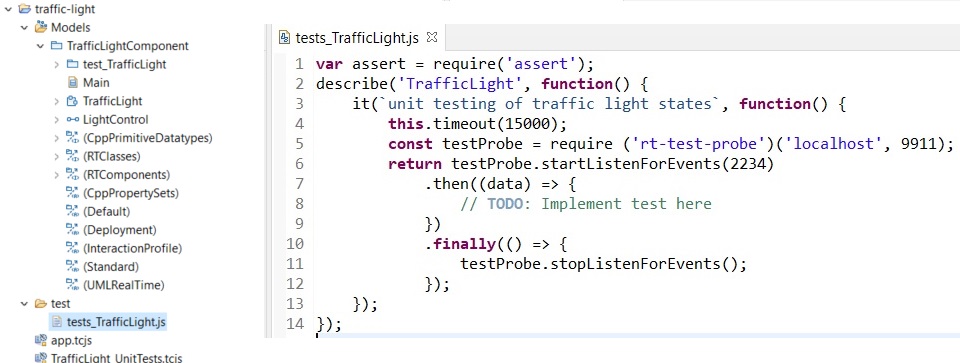
Based on the skeleton you can implement the unit test as needed. Use the API provided by the rt-test-probe JavaScript library for sending or invoking events, for setting up expectations on what events to receive from the capsule under test etc. The GitHub rt-test-probe project contains a few sample test cases that demonstrate how to use this JavaScript API to write tests. Note that the API uses strings for specifying which events to send and to which ports. You can directly use the port names of the capsule under test. Here is an example of a test case that sends an event "InEvent1" to the port "protoX" on the capsule under test, and expects to receive an event "OutEvent1" on the same port:
.then((data) => {
    // TODO: Implement test here
    return Promise.all([
        testProbe.expectEvent({ event: 'OutEvent1', port: 'protoX' })
        .then((receivedEvent) => {
            // The OutEvent1 event was received
        }),
        testProbe.sendEvent('InEvent1', 'protoX')
    ]);
})
Before we can run a unit test with Mocha, we need to perform a couple of preparatory steps.
npm. You only need to perform this step once.npm install
Next, start the test driver application, either from command-line or using the TC context menu command Run As - RealTime Application.
Once the test driver application is running successfully, you can start the test execution by running the JavaScript file with Mocha. For more details see Running Tests from Command-line.
You can debug a test case and for example inspect the received events during runtime. This will help to understand and improve the test case. Use your JavaScript development environment to set appropriate breakpoints and then debug the test case. When the breakpoint hits during test execution you can debug the test code.
To debug the capsule under test you can use the Model Debugger for debugging the test driver application.
The Add Unit Test… command can be invoked multiple times to create additional test cases for the capsule. If a test case has already been created for the selected capsule, then the Add Unit Test dialog will ask for less information. The information related to the test driver executable doesn't need to be provided again since the same test driver application can be used for all unit tests for the same capsule.
Another way to create more test cases for a capsule is to simply add another it-declaration inside the same describe-declaration. Here is an example of having two tests in the same JavaScript file:
describe('MyCapsule', function () {
    it(`should pass first test`, function () {
        this.timeout(15000);
        const testProbe = require('rt-test-probe')('localhost', 9911);
        return testProbe.startListenForEvents(2234)
            .then((data) => {
                // ...
            })
            .finally(() => {
                testProbe.stopListenForEvents();
            });
    });

    it(`should pass second test`, function () {
        this.timeout(15000);
        const testProbe = require('rt-test-probe')('localhost', 9911);
        return testProbe.startListenForEvents(2234)
            .then((data) => {
                // ...
            })
            .finally(() => {
                testProbe.stopListenForEvents();
            });
    });
});
When running the JavaScript file with Mocha, all tests it contains will be run sequentially.
To run tests from the command-line, make sure you have Node.js and Mocha installed as globally available tools. Then you can simply run Mocha for a single JavaScript file like this:
mocha test1.js
Or run Mocha on all JavaScript files in a test folder like this:
mocha test/*.js
Remember that you can reach the command-line from inside Eclipse by means of the Terminal view. Here is an example of running a JavaScript file that contains two test cases (where the first one passed and the second one failed):
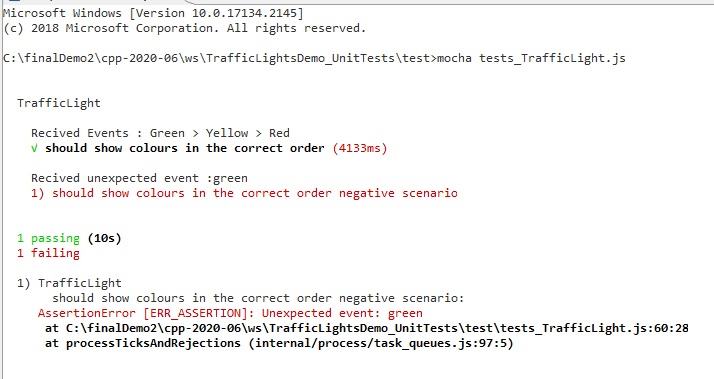
When you run multiple tests in a sequence, without restarting the test driver executable in between, you need to take into account whether test execution modifies the state of the capsule under test. Sometimes this is acceptable, and the order of the test cases within a JavaScript file then can become significant. If you want you can invoke the Mocha test execution from another script which takes care of starting/restarting the test driver executable as necessary. Such a script can be suitable for batch unit testing.
Refer to rt-test-probe for more examples on running tests from the command-line.
