As you learned earlier it is possible to start the Compare/Merge tool from outside Model RealTime, like using a command-line tool called "cleartool". But how does this tool know which Model RealTime to use? Well, each open Model RealTime has a special server called a "Compare/Merge server" (or "Team Server"). This server waits for requests to compare or merge files. When you use a command-line tool, it transfers a request to one of these servers to begin the compare/merge process.
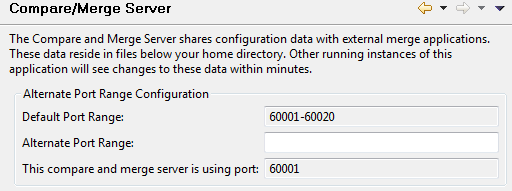
If you open preferences at General - Compare/Patch - Modeling Compare/Merge - Compare/Merge Server you can configure the Compare/Merge server. The first set of preferences control the range of ports to use for Compare/Merge servers:
By default, ports in the range 60001 to 60020 are used. This means that at most 20 instances of Model RealTime can run at the same time on the machine. If you launch more than that, the additional Model RealTime instances will not get a Compare/Merge server and can hence not host compare/merge sessions that are initiated from outside of Model RealTime. You can change the port range using the preference Alternative Port Range. You need to do this if the default port range is not available on your machine, or if you want to support more than 20 Model RealTime instances running at the same time.
When a command-line tool (or some other tool external to Model RealTime) wants to launch a compare/merge session it will iterate over the Compare/Merge Server port range to find out which instances of Model RealTime that are running on the machine. If there are no Model RealTime instances running, a new Model RealTime instance has to be launched and the compare/merge session will be sent to it. Different command-line tools have different strategies for how to find an appropriate running Model RealTime instance, or (in case such an instance does not exist) perform an automatic launch of Model RealTime. There are in principle two strategies:
Let the user of the command-line tool specify how to select which running Model RealTime instance to use, or how Model RealTime should be launched. The cmcmdline.jar tool (see Command Line Tool for Compare/Merge) uses this approach.
Ask the user at run-time for this information. The XtoolsTypeManager tool (see Command Line Tool for Compare/Merge) uses this approach.
The XtoolsTypeManager will open a dialog to let you choose which of the running Model RealTime instances to use for the compare/merge session. It also let's you choose to launch a new Model RealTime instance. The Model RealTime instances are identified in the dialog by the location where they are installed as well as the workspace they are currently using. To make it easier to pick the right Model RealTime instance you can modify your eclipse.ini file to launch Model RealTime using the option -showlocation. Thereby the workspace path will be shown in the window title of Model RealTime. You can also set the preference General - Workspace - Workspace name to provide a description of the workspace which also will be shown in the Model RealTime window title. For example, when using ClearCase it may be useful to give the workspace the same name as the ClearCase view that is used by files contained in that workspace. These measures make it easy to pick the right Model RealTime instance for the compare/merge session.
If you always want to use the same Model RealTime instance for your compare/merge sessions (or always want to launch a new instance), then you can make your choice in the dialog and then mark the checkbox Reuse the same instance for future merges without prompting. This setting is stored in a textfile .PreferredRSAInstanceForMerge that is located in the user home directory. To later make the dialog appear again you can simply delete this file.
When the XtoolsTypeManager application launches a new Model RealTime instance, the launch is done by using the second set of preferences in the Compare/Merge Server preference page which specifies the installation path, the workspace to use etc.
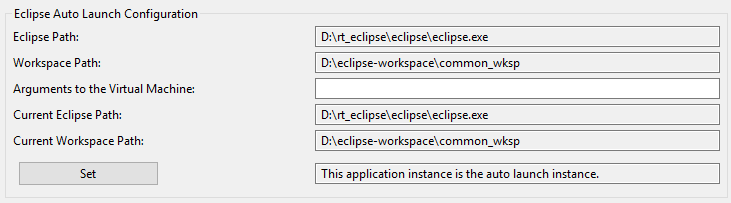
These settings together form something called an Eclipse Auto Launch Configuration and at each point in time exactly one such launch configuration is active. You can set the active launch configuration by pressing the “Set” button. The settings are stored in the file EclipseAutoLaunchCommand.cfg which is located in the user's home directory under AppData/Roaming/Rational/TeamServerSharedData (on Windows) and rational/TeamServerSharedData/linux_x86 (on Linux).
The first time you launch an Model RealTime instance that either uses a new installation location or a new workspace, a dialog will appear to ask you whether the Eclipse Auto Launch Configuration should be set to the newly launched instance:
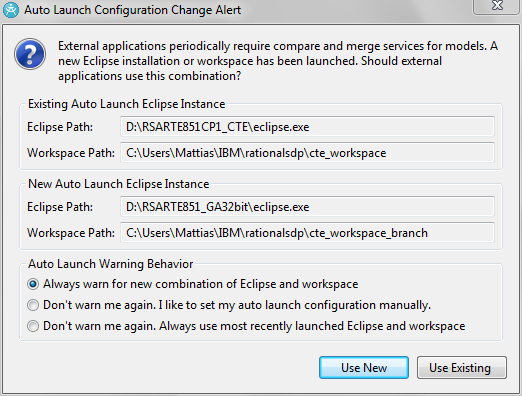
If you press the "Use New" button, the Eclipse Auto Launch Configuration will be updated to the new values shown in the dialog, while if you press "Use Existing" the previous settings will still apply.