Sometimes it can be useful to get a preview of what the generated code will look like, without building a TC in the usual way. For example, you may want to quickly see what the generated code for a certain model element, such as a class, will look like. Such a code preview can help you understand how changes made in the model will affect the generated code.
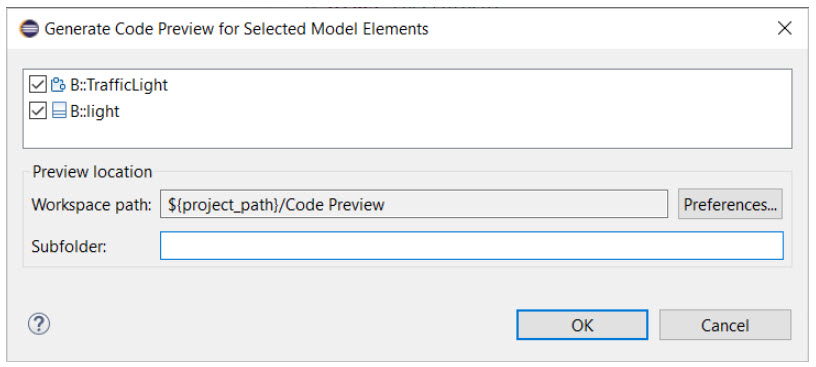
To generate a code preview for one (or several) model elements use the command Generate Code Preview from the toolbar or the Project Explorer context menu. The command has the default keybinding Alt + Shift + E and is available on all model elements that get translated to their own C++ files, for example a class, capsule or protocol. A dialog appears where you can specify where to place the code preview.
By default the code preview will be placed in a folder called "Code Preview" in the Eclipse project that contains the selected elements. If you have selected elements from multiple projects, the project of the first element will be used. You can change the default code preview location in the preferences. It's also possible to specify a subfolder. This can for example be useful if you want to give a meaningful name to the code preview location that describes what it contains.
When you press the OK button the model compiler will be invoked to generate the code preview for the selected elements. Note that in this case the model compiler does not use a transformation configuration for generating the code. This means you can get a code preview even before you have created your TCs, and it also makes code generation faster. However, there will be some minor differences in a code preview compared to the real generated code because of this. One example is the inclusion of the Unit name header file. Since the name of the unit header file is defined in the TC it will look like this in a code preview:
#include <.unitName.h>
Usually such differences don't matter since you are not supposed to compare a code preview with the real generated code, but rather with another code preview.
If you re-generate a code preview into the same location twice, all files that are different from before will be suffixed with the "~" character. Here is an example of what it can look like for a capsule "TOP":
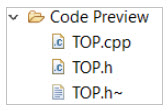
Here we can see that the capsule was changed in a way that affected the generated header file, but not the implementation file.
You can utilize this feature for quickly understanding how some changes you did to a model element will affect the code that is generated for it. Follow these steps:
Generate a code preview for the element
Make some changes to the element
Generate another code preview for the element into the same location
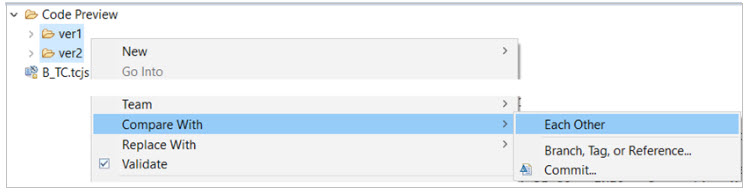
Select the new and old version of the generated file (TOP.h and TOP.h~ in the above example), and perform the context menu command Compare With - Each Other. In the Compare editor that opens you can easily see how the changes you made to the model element have impacted the generated code.
Another similar scenario is to compare two versions of a model element to see how the generated code for those two versions differs. For example, the versions can be stored on two different branches in Git. Follow these steps:
Checkout one of the branches and generate a code preview for the element. Specify the branch name (for example "ver1") as the subfolder name.
Checkout the other branch and repeat the same procedure, this time using the other branch name as the subfolder name (for example "ver2").
Your "Code Preview" folder will now contain two subfolders "ver1" and "ver2". Select these folders and perform the context menu command Compare With - Each Other. The Compare editor will show how the generated code differs between these two versions.
The Generate Code Preview command is also available in the context menu of a TC. In this case the TC will be used by the model compiler for generating the code preview, which means the code preview will be identical to the code that will be generated when the TC is built.
Generating code preview for a TC is convenient when you want to get a preview of all files that will be generated by that TC when it's built. You can for example use it for comparing one version of a TC and model with another, as explained in Using Code Preview for Code Comparison.
The dialog for generating code preview for a TC has two additional checkboxes which let you choose if you want to also include generated makefiles into the preview:
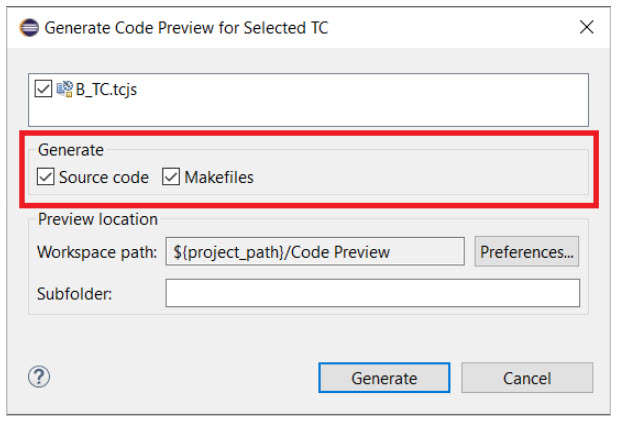
Comparing the makefiles for two versions of a TC can be a useful tool for troubleshooting build problems.
If the preference for using a Build Variants script is set, the above dialog will also contain the user interface provided by the build variant script so that you can set the build variant properties (i.e., build configuration) in the same way as when you build the TC. The values you set for the build variant properties can influence what the generated code will look like.
When you no longer need a code preview you can simply delete it from the Project Explorer, or delete the folder from the file system and refresh the Project Explorer. There is also a useful command File - Remove All Code Preview that will remove all code preview from your workspace. It can be convenient if you have generated lots of code preview and want to remove it all at once.
A third way is to trigger a build programmatically from a plugin using available APIs. These APIs are not covered in this document.